Pinterest. A Treasure Chest or a Junk Drawer?

I've been working in the playroom lately - it's my current #letsroomtogether space!  Well, technically, we're supposed to be working on a bedroom but, that's where we are headed with this room so it counts.  *high five*  Our kids have been sharing a bedroom for the past 2+ years and we are just now getting to the point where the twins could use their own space with a little bit more privacy than sharing a room with your little bro affords.  So, they're taking over the shared bedroom and we're moving S (6) and G (4) into the playroom, soon to be bedroom.  And then eventually, G will probably move back in with the girls when S needs his privacy and we'll be back to the drawing board.  We'll have kids' rooms to design for years to come.  Yippee!  They're probably my favorite spaces to design.

There's not much to write about as regards progress because really, I've just moved all of the toys to the middle of the room and started painting.  Nothing really fun.  I can't even say it's looking more like a bedroom.  But I can say it's turning the corner to looking more fresh.  To be honest, my plan wasn't even to paint this room yet.  It was to figure out how to separate and purge the toys and move one set of bunk beds in.  But, you know, you get the ball rolling on changing a space and, well, if you know me, aesthetics always somehow get involved.  Hehe.  So, we have yet to purge a single toy and move bunk beds even an inch BUT there's fresh paint going up.  I'm always a glutton for more work if it involves a fresh design.  ;)

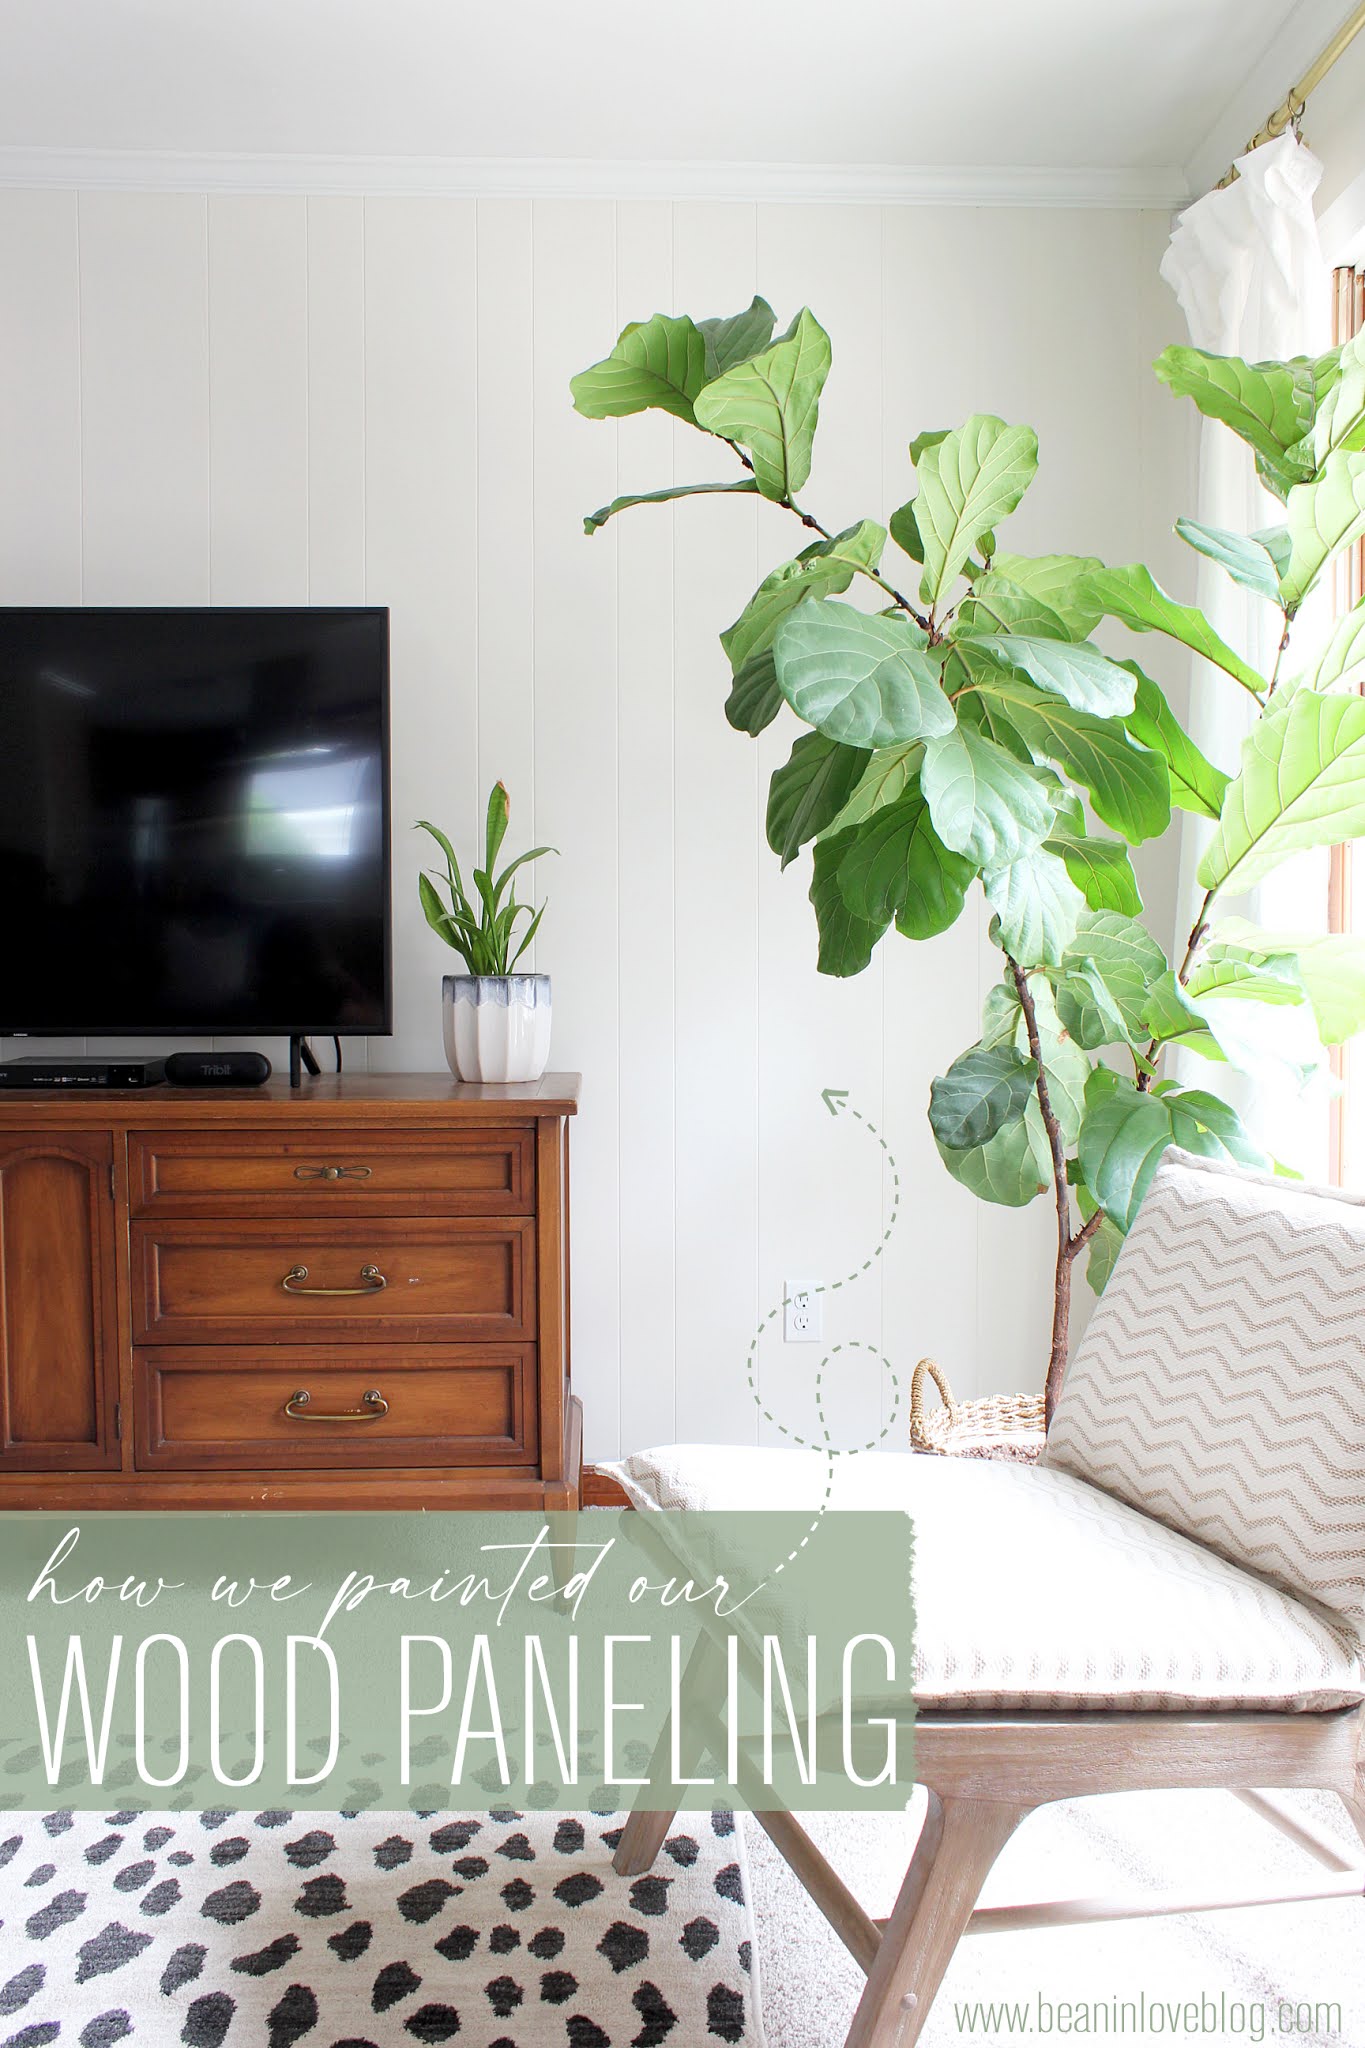
This is the realtor's photo of the room when we were courting the house:


When we moved in, we basically tossed all the toys in and stamped it "playroom".

We knew eventually we'd want to repaint the trim - it was a glossy ivory/cream and was freshly painted before the house was listed but we wanted it to match the rest of the crisp white trim in the rest of the house so we had cohesive going on but doing anything to this room was very, very, very low on the priority list.

But, as it turns out, when it has to warp into a kids' bedroom, priorities get bumped up.  Things get planned, stuff moved around, trim gets painted all of a sudden...

IKEA Lenda Curtain Hack | DIY

I like working wall-by-wall.  It's a little less overwhelming than trying to tackle an entire room at once, not really knowing where in the heck to start.  So, during the current #letsroomtogether challenge, I really wanted to chip away at the to-do list for the whole living room but in three weeks?  It wasn't all going to happen.  You should see my list.  HA!  But, I knew we could probably hammer out this one wall.


And we did...ok, we almost did.  There's still some german shmearing and a new mantel to be had but, we made good progress in three weeks and are even farther considering what it looked like before we moved in:


Within that year and a half, we scraped and painted the popcorn ceilings, painted trim and walls, and hung some curtains.  It looked like this a few weeks before we started the challenge:

A Shady Ordeal

I recently played musical lamps and moved the big lamps from our living room (one was currently living on the piano) into our bedroom.  (I thrifted them years ago and we've had them in each living room ever since.  One year, I even painted them!)  We've had mismatched lamps in our bedroom for a good long while now and I just got to the end of my tolerance with it.  In the past few months we've acquired new (to us) curtains, a new rug, new pillows, and a new quilt and if you're anything like me, you'll understand that you can't make everything else look good and not remedy the lamp situation.  It'd be a travesty.  ;)

So, lamps?  Moved.  Great except they had these massive shades on them that didn't look so bad in a living room but in a bedroom on a side table?  They were just too big.  The hunt was on to find some smaller shades.  But, it wasn't an easy one and only took me oh, a couple of months.  Sure, I could've gone to the nearest retail store and grabbed a pair for whatever price they were but that's just not how I roll.  I kept my eyes peeled at Dirt Cheap forever but two of the same just never turned up.   

Within those couple of months, I also went to TJ Maxx, Walmart, World Market, Target, Home Depot, Lowe's, Marshall's, and Home Goods but the store with the best prices and a selection that blows the rest out of the water?  At Home.  (Pssst...this post is not sponsored by them.  They don't even know I'm writing it.)

I went out to ours last week and came home with three different shades because I couldn't decide in-store which would look best.  (Thankfully, they have a good return policy so I'll be able to return the ones I decide against.)  If I were smarter, I'd have just brought one of my lamps into the store with me.

I always seek out clearance first and at At Home, much of their clearance is mixed in with their original priced stuff.  Such was the case for the first shade I found.  It was the perfect size and color and it was 50% off at $8.99...but there was only one.  *womp womp*  I cried for a little bit and then put myself back together to keep looking.  Looking, looking, grab a couple of other shades, more looking.  Wait, what is that shade up there with the clearance sticker on it THAT LOOKS EXACTLY LIKE THE CLEARANCED SHADE I JUST WALKED AWAY FROM TWO AISLES AGO?!  Could it be????  It's on the tippity top shelf and I don't see any store employees around so I'll just run to the stool aisle quick and grab one of those so I can reach.  If anyone touches either of these shades while I'm gone, I will...they will...well, hurry Sheena.  RUN!  *grabs stool, uses stool, runs to put the stool back, runs to grab the first shade annnnnnd...YES!  THEY ARE THE EXACT SAME!  Dear Jesus, you love me.

I checked out with my plethora of shades and headed home to try them all on.  

Shade #1

Pity Project

Sometimes our lives are so busy with keeping kids alive and thriving that we don't have time to take on or even complete any in-progress bigger house projects...like right now.  Although I will admit that there are a hefty amount times when I really have to convince myself to vacuum/cook/wash when what I really want to do is paint something.  When the imprudent thing is to project big, that's when I start to get antsy and seek out little ten minute projects I can do to satisfy that hunger.  This is one of them.  We'll call it a pity project.  :)

A couple of months ago, our coffee maker broke.  If you're anything like us, you love your morning coffee.  It's a routine; a ritual even.  For us, it's about the taste and feel of those moments when you can sip in peace in the morning before everyone wakes up (until they do and you're still sipping, just not in peace).  Maybe it's a little bit about that slight jolt caffeine gives you to start your day too.  So when our coffee maker breaks, well, uh-oh.  Chaos.  Shame too because it was so cute.

Ok, ok, there's really no chaos that follows a broken coffee maker.  It's really just a small thorn in the side.  We weren't left completely hanging though because we have a french press* we pull out once in awhile and it got pulled out daily until we got a replacement.  But there is nothing like the simplicity of an automatic maker, right?  But french press coffee just tastes so much better.  I know.  I've heard.  I drink my creamer with a side of coffee though so I really couldn't tell you the difference.  Anthony however, the black coffee drinker, will tell you that's true.  That's why we splurged a little bit this time around (we usually go for the $17 maker at Walmart or Target) and bought ourselves this coffee maker*.  I found it on Amazon awhile ago and saved it to one of our lists.  It has a shower sprayer, which we've heard is the best way to brew and a reusable filter which doesn't steal all of the oils in the grounds.  (Our friends run a coffee shop and I learned a ton about coffee this past summer talking with them!)  Well, when I went to buy, the red option was the cheapest (as compared to the white* that we really wanted) and there was a one like-new, on Amazon Warehouse for $35.  I jumped on it because I knew that I could probably either deal with the red for a lower price or remedy it.  Enter this pity project.

Here's our month-old maker:  


Except now it looks like this:

Frame a Builder-Grade Mirror - DIY

I'm no Chelsea, but I'm going to write up how I built a frame to trim out the mirror in the kids' bathroom.  It was a pretty simple project that I was way more intimidated than I needed to be about.  I wanted to do it all by myself without any help from Anthony and huzzah (or is it phew...), I did just that!  So, I'll just say it, "If I can do it, you can do it!"

I'm also no pro interior photographer so I apologize that the mirror trim is enveloped in a ton of light from the plethora of light bulbs we've got on our vintage fixture up there but you can still see it, right?

Here's what the same mirror looked like a couple of weeks earlier (along with the same toddler in a different mood):

Builder grade, big, and boring.  You might've seen them.  You might even have them in your own house!  If you do, follow along closely.

I wanted to trim this thing out and I wanted a simple, thin frame.  I looked into companies that specialize in making custom mirror frames (and was even very tempted to write them asking for a sponsored post, I'll admit it).  But the price tag to frame out our mirror started at over $178 for a slim frame and I knew I could probably make one myself for a whole lot less.  (Spoiler alert:  I was right.)

Spotted: Goodwill

The four-year old and I made a quick trip into a local Goodwill here while out running errands last week and we found some STUFF.  I hadn't planned on going in and taking pictures to show you the treasures because I haven't had much luck finding things at thrift stores recently but after I spotted a few great things, I thought "why not?"  (If you're reading and you're local to the Mobile area, these were all seen at the Goodwill in Semmes.)  

I know it might be disheartening to you for me to show you what I found here - things you can't buy there since they're here, but my whole point of these "Spotted" posts is to show you what potential lies in those little (and big) things laying around inside thrift stores around the world.  You just have to open up your mind a tad and picture those things somewhere besides on a thrift store shelf surrounded by a random assortments of objects.

I didn't take notes on the prices of what I saw but everything was under $5, with the exception of the lamps.

It took a fair amount of back-and-forth mind conversation to convince myself I didn't need this wallpaper:

(I was juggling things in my hands so I struggled getting a good picture of the whole roll.)  If it were the modern peel & stick kind, I would've pounced.  But, having torn loads and loads of wallpaper off the walls in this house within the last year, I'm still raw about the idea and so pasted wallpaper isn't on my list of things I would like right now.  However, this pretty roll that mimicked a beautiful blue sky with wispy white clouds would look dreamy on the ceiling in a kids' room, inside a closet, on an accent wall, just anywhere.

Kids' Bathroom Reveal!

Are you ready for this reveal?  I feel like I've mentioned "we're making progress in the bathroom" one too many times and probably deserve all of the eye rolls for taking so dang long to finish it.  The last we left off, I told you I was trying to find a cheap solution to frame out the builder-grade mirror.  The good news is, I found it.  The bad news is, we didn't get every single thing done we had set out to do in this bathroom according to our inspiration board.  I'll explain in a minute.  More goods news though - we only spent $112 on this whole makeover.  Folks, get ready to feast your eyes on a major difference in aethetics brought to you by a relatively small amount of cash.

 Before:

Like many of the other rooms in this house, this one was wallpaper laden.  Luckily, and probably with the help of bathroom humidity, the paper in this room peeled off pretty easily once we had started.  For months it sat with bare drywall as we worked on other rooms in the house (however, we did seal the drywall in close proximity to the shower to protect those walls from H2O).


Eventually we removed all of ceramic towel rods and those big metal support bars, leaving us to fill in a whole lot of holes.  

We also replaced the light bulbs to get rid of that orangey glow.  If we were into fake tans, that wouldn't be the fake tan we were looking for.

Now:

Scrubba, Scrubba

 I can see the finish line of this little, Phase 1 bathroom makeover...I can see it.  Here's where we left off:


Freshly painted walls that gave us a nice, blank slate.  As much as I'd love to post another updated picture, I have to keep you in suspense.  ;)  Instead, let's get sidetracked and let's move our gaze from those sparkling walls to that floor.  I can't say they're sparkling.  You can't tell from the above photo but if you look closer...


No sparkle in sight.  Not only do they not gleam, but they look like they haven't been cleaned in months...even though they have.  The grout is stained and those spots that look like dirt on the tile are actually bits of wax sealer.  When we first moved in, I took a scrub mop and some bleach and went over the floors quick just so I felt comfortable letting our kids walk on them barefoot.  They were probably "cleaned" before the house was put on the market even though it really didn't look clean thanks to the stained grout but you know, nothing is clean enough until you do it yourself.  Anyone else feel like that?  Just me?  Okey dokey.  Well, they must have sealed the floors after that "cleaning" and whatever sealer they used came right off in clumps when I started scrubbing with bleach.  I picked up the majority of it while I scrubbed, but assumed I could just keep scrubbing and brush the rest up after the floors dried.  WRONG.  That wax dried and stuck and it was going to take another big scrub to get it back up and off.  At the time, we were also knee deep neck high in scraping popcorn ceilings so scrubbing the floor a second time quickly sank to the bottom of the priority list.  But at least they were sanitary, right?

Lincoln Cane Chair Makeover

Right before we moved out of our rental last year, we bought these chairs:

They're from Target* and I grabbed them because they were on major clearance in the teal color - we paid $140 for two.  We had been on the hunt for some smaller chairs to replace the big, hand-me-down club chairs we had and since secondhand searches hadn't turned up anything we liked for months and months, the discounted, new route looked pretty good. 

How to Paint Wood Paneling


My fingers haven't been so excited to type out a title for a long time.  It's one thing to be done painting the paneling but it's a whole 'nother feat to get up a tutorial about it - only took me a couple of months...HA!  It's a hefty one with a lot of carefully ordered steps to help you along if you've been thinking about laying a fresh coat on the wood paneling you've inherited.  We are certainly happy we took on the task.  The end result has us heck-yeahing and has our living room looking a bit more modern. 

We've painted painted wood paneling before in our rental, but we've never painted unpainted, stained and sealed wood paneling before so this was somewhat uncharted territory for us.  There are lots of tutorials written out there but I'm going to let you in on a few tips and tricks and everything we learned to show you a really efficient way to unload some paint onto those dated, paneled walls if you've got 'em and want to bring them into 2020.

First things first, like I said above, this is a doozy of a painting project.  It's not just slapping paint on a few walls and calling it a day.  There is prep and more prep involved and it can get tedious, so before you start, search and scroll through the abyss of photos on pinterest or google of "painted wood paneling" to absorb all the inspiration you can.  You'll need all that inspiration to turn into motivation.  Ok, ok.  Maybe I'm making this sound way harder than it is.  It's hard but it is SO worth the effort.  Take it one step at a time.  You can do this!  Here's our after (or so-far if we're including decorating) to add to the plethora you can log into that motivation bank:

Drum Shade Light Fixture - DIY

I've been stalled in the kid's bathroom by mirror trim that I know exists somewhere but is currently hiding from me.  I mean, I can find a trim solution easily by walking through Home Depot and Lowe's but I'm pretty determined to do this under 10 bucks so that's where I'm getting stuck.  Our local ReStore is all out of trim so no luck there and I know I saw something I could use at a store somewhere in the past month but I can't remember where it was.  This is where decorating on a slim budget gets fun...the patience part.  ;)  

So, while we're getting closer to a reveal post (and let me tell you, it is looking so good!), I'll let you in on a quick little update I put up last week.  Up being a very literal word for it.

Unlike most of the other brass, flush mount light fixtures in this house, the one in the kids' bathroom (there's another in the master bath) was not one to love.  It was not only boring and too small...


but the shade was bedecked with a grapevine and I'm pretty sure that look went in and quickly out of style back in 1983...just enough time for this home's owner to grab a couple before they were pulled from the shelves after the designer realized his/her beautiful grape-laden glass shade was in fact, not so beautiful.  Not a true story for fact but just a probably true one.  Also, if you love the grapes, it's ok.  To each his own.  Personally, I'd rather have my grapes in the form of wine or mixed into chicken salad.  ;)  

Whoop, there it is:

(Pardon a few bad photos to follow - it's really hard to photograph an interior light with an ancient iPhone with zero natural light and no fancy lighting equipment.  I think you'll get the jist though.)

No harm done though because the grapes came down easily and were replaced by a much better shade in under 10 minutes.


This little upgrade is fun not only because it's quick, but because it is super easy to do. You don't need any tools, just a few simple supplies.

Quick Bathroom Update

 We have...

A BLANK SLATE!


Besides the wallpaper gone and paint on the walls, the biggest difference is in lighting.  


Kids' / Guest Bathroom Plans - A Mood Board

 One of the rooms in our house that's been majorly neglected is the kids' bathroom, which is also the guest room when family/friends come visit.  It was wallpaper laden when we moved in...


and that, coupled with a cheap plastic shower curtain, worn cream trim, and some horrible orangey light bulbs made it look like it was part of an 80's time capsule.
 

Not in mint condition though because the tile grout was (and still is) stained and the paint on the cabinets started peeling off long before we moved in.  But, those are exactly the kinds of rooms we like, right?  

Righty-o.

We got as far as getting the wallpaper off, hanging a much better shower curtain, and attempting to remove the popcorn ceilings (they're oil-based-painted on and going nowhere...womp womp) but that's about it.  


Then she sat and sat and sat.  Very much used by the kids but very much neglected.  We looked away when water got splashed on the drywall from showers but we can't push it off much longer.  We've got to get that drywall sealed and painted before worse things happen.  And while we're at that, might as well take it to the next level and touch up a few other things.  Snowball effect.   

So, now that the painting of the living room is behind us (tutorial on painting paneling coming soon!), I'm moving my energies into this room for a (hopefully) quick makeover.  This is only the start though - Phase Uno.  Also known as mostly using what we've got to squeeze in a makeover that costs less than $100.

Here's the plan:

Living Room Update + Some Fireplace Ideas

Whew!  After a whirlwind romance with primer and paint, we are FINALLY done painting the living room.  Ok, so there a few spots that need to be touched up like where I accidentally got some trim paint on the ceiling but they're not noticeable to anyone but me so I'm going to push them off like a lazy person.  I need a break from touching paint brushes and rollers to any part of this room.  ;)  It was a doozy of a project that required lots of painting after lots of bedtimes because of oil-based paint fumes but hip hip hooray.  We're over that mountain.

I took this a few weeks before we started priming:

So. Much. Wood.  Not even our modern-era furniture can make a dent in those aesthetics.  Instead of the furniture pulling the room more towards 2020, the room pulled the furniture back towards the disco age.  💃

Sometimes I feel bad for even wanting to paint over stained wood in great condition but, in this case, we're both so glad we did.  It's like a completely different room!

Lights & Registers

Sounds exciting, right?  Ok, maybe not that exciting but I'll tell you what is exciting...we finished painting the living room and kitchen ceilings this past weekend!  There are two more (tedious) things left to do on the old to-do list and then...well, then we just make another to-do list with more stuff on it like deep clean the couch, hang stuff on the walls, and recover the chairs...but cheer with us because the big stuff is almost DONE!

In honor of the ceilings being painted and finally done (because that was a j.o.b.), let's talk about two things on it that make quite the difference - our new lights and our *new* ceilings registers.

Lights first.  When we bought this house, there was a big fan in the middle of the living room.  

Not only was it old and ugly (although it did have caning embedded in the blades and that is making a comeback...), but it hung so low we had to walk around it if we were carrying anything that rose above our own heads (like a child, for instance), lest the thing we were carrying knock into the glass covers on the light bulbs.  Within days of closing on the house, Anthony had it down.  Unfortunately, that fan was the only light source in the room though so we knew we'd eventually have to put in lights.  Well, eventually came a few months ago and we decided on staggering some recessed lights throughout the room.  Anthony knows electrical but we have a friend who is an electrician and knows way more than Anthony, so we paid him to come put in some lights for us.  We found out from him that, because of the way our joists run in comparison to the beams in the room, we wouldn't be able to put in traditional recessed lights.  There was only a moment of that let-down/what-are-we-going-to-do-we-don't-want-bulky-lights-in-here feeling though because our friend showed up with these LED lights* and we had ourselves a solved problemo.  I've never been one to get super excited about can lights but these, they were/are exciting.  Not only are they going to last us a very long time (thanks LED) but they're super slim so you can put them in places the bigger can lights can't venture.
  

Oh, and they have three Kelvin settings - so you can set them to warmer light all the way to cooler light with the flick of a switch.  Cool, right?  ;)  Awesome, I knew I wasn't the only one to get a kick out of these things.

We went back and forth with how many we should install but we ended up going with four lights - two in between the second and fourth spaces between beams - and they are just perfecto.  Plus, we had them installed on a dimmer switch so they can be dimmed.  It feels so fancy.  We also had our friend do the wiring in the attic for us to install two more of the same recessed lights in a smaller size over the peninsula in the kitchen.  With the vent hood there, pendants seemed like they'd be too much so these are the perfect solution.

Lights.  Check.  Onto the vents...which sounds way less exciting but they come with a tutorial so hold onto your horses... 

Living Room & Kitchen Update

Last week, instead of typing on the old keypad here, we were spending our free moments knocking out some major (well, sorta major) progress in the living room, kitchen, and breakfast nook area - it's all one big room now thanks to a wall getting taken out.  

We still have yet to actually paint but we did spend a few nights after the kids went to bed priming.  The ceilings had to be primed along with the trim and the walls...it was quite a feat.  Not only did they need to be primed, but we had to use oil-based primer (the worst!) to knock out that smoker smell once and for all and because the wood paneling required it.  I'll write a whole post on why and how to paint wood paneling when we are all done and that will have all the details and explanations.  Until then, hows about a little update?

Warning, I did not clean up my house for you.  I just snapped these in-progress shots real quick like when the sun was shining.  I know you don't mind.  ;)

Starting at the beginning (for the biggest shock factor, of course), here's what the room looked like right after we closed: 
I know that, if you've been reading for awhile, you've probably seen this before a million times so I apologize, but nevertheless, a quick recap is always fun, no?

Now, things are a heck of a lot whiter and a heck of a lot brighter:

DIY Lightening & Balayage - What I Use


I've been coloring/bleaching my own hair for over ten years now.  I was born a blondie and stayed that way until about middle school, when my hair slowly started darkening. 

My mom liked big hair.  It required a whole lot of Paul Mitchell mousse and hairspray and lots of backcombing and I've never fully recovered from the trauma...neither have my lungs.  😱

In high school, I started going to a salon on my parents dime for highlights and then paid for my hair to get cut and colored at a salon for a couple of years during college...until I couldn't afford it anymore.  You might know those financially tight college days.  They're fun, right?  Nothing like working an entire summer and then budgeting for several months over a school year with just that cash to teach you about adulthood, right?  ;)  I paid a friend a few bucks to highlight my hair during that time after my bank account told me I couldn't do salons anymore and also colored it darker for that au naturale look for a few years in there.  

After college, before Anthony and I were married and I was living rent-free with a good job, I went back to the salon but then we got married and started paying two sets of student loans plus a mortgage and it turned out I preferred spending money on decorating and fixing up our first little house vs. those increasing salon prices.  But, I still liked coloring my hair.  What a conundrum...  #inserttheeyeroll

So, I started out using blonde box dyes to lighten my hair, not knowing much about the whole process and just hoping each time that I'd get pretty close to what the picture showed on the box front...spoiler alert, I never quite hit the jackpot.  I could get my hair maybe three levels lighter with one box application but I always skipped the toning step after because I had no clue what toning was.  And, as it turns out, toning is so important.  Lightening my hair takes out the pigment but leaves me pretty brassy.  It's the toning that gets rid of the brass.  It's a whole scientific process that I had no clue about until Sylvia brought it to my attention within the past couple of years.  Here's her video explaining it all.

As it stands today, we don't have extra money laying around for me to go to a salon, we just don't.  It would cost me $150 every 8-10 weeks to maintain what I've got going on on my head.  Would I go to a salon if we were swimming in a large budget pool every month?  Absolutely.  It's not the easiest thing to color my own hair and the idea of relaxing in a big vinyl chair while someone else did it is quite appealing.  Of course, I could just stop coloring it altogether and let my natural color grow out but it's just too much fun.  ;) 

Over the past few years, I've learned A LOT about highlighting/bleaching your own hair thanks to the gem that is YouTube and a thousand question texts to my pro-stylist cousin Kendra (thank you Kendra!) and I've nailed down a good system and products that really work for me.  And the best part?  It only costs me $10 to color my hair each time I do...which is about every two-three months.  So, if you've found yourself in the same budget boat as we are - that tiny rowboat - and you have a hankering to or already are lightening or coloring your own hair but looking for some new products, this post is for you.  ;)

Eventually, I hope to get the whole process on video - as awkward as I'll probably be - but until then, these are some good resources:
= Brad Mondo just posted this video recently and it's packed with good info and is a must-watch.  Plus, he's funny.  I appreciate him sharing the wealth as a professional hair stylist.  One commenter under his video wrote, "He knows he can't stop us so he's decided to help us.  What a legend."  Agree, agree, AGREE!  
= If you're a first-timer, Jillian's tutorial is what you need.  She uses the teasing method and it's probably the most fool-proof way to get the balayage look.  She's really great at explaining and showing what she does and also talking about the mistakes she's made for you to learn from.  The one thing she's missing that could make her whole process a little easier?  A balayage board.  :)  
= I started doing my own babylights after watching Sylvia's video.  
= I have had a wild idea to go platinum maybe once or a thousand times but Anthony vetoes me every time.  BUT, if he didn't mind so much, I'd pull up Jill's tutorial and blog post and go to town.  No painting or teasing required...no balayage either but it would be fun to go super light for a little while.

These are the things you'd find if you stepped into my bathroom makeshift salon while I'm touching up my blonde do: 

Kitchen & Living Room Progress


While we've been trying to focus all of our free-time and efforts outside, we have spent a few moments here and there trying to chip away at the kitchen.  It doesn't look like much since I last wrote about it, but we've actually made some good progress in here.

This is where we left off on the last progress report:

If you remember, we took out that wall and had a structural beam put into the ceiling (something we hired out) and then we put up new drywall and started mudding the joints.  After hours spent mudding ourselves, we realized that we just weren't that good at the whole process and it was taking us way longer than it would take a professional, so we decided to pay someone to finish that up.  Plus, we had an area between one of the beams in the den that was hastily repaired (we think there was water damage from the a/c unit in the attic that had to be fixed some time ago) and then covered with popcorn ceiling texture, which hid it's horrendous defects.  We had our guy mud the new joints and also do a skim coat over that repaired area.  It took him about five hours within the span of two days...something that definitely would have taken us hours over the span of weeks.  It was well worth spending the cash.

Anyway, enough talk about drywall mud, here's what the kitchen looks like today:

How We Organize Kids Clothes with Four Kids in One Room


Our kids are all still sharing one room.  We made that decision almost two years ago now and even when we moved again, they got moved into the same room again.  They LOVE it.  Last week I mentioned to Anthony that maybe we should consider moving Sebastian and Gianna into their own room since the girls have been wanting to stay up later ("since we're older") and we're almost getting closer to the point where they could stand to have their own space with some privacy.  But you guys, they really love it so much that we both came to the conclusion that it's not quite time yet.  


So, in the same room they stay.  But, as you can imagine, it's not the easiest as far as logistics go.  Their room isn't tiny but it's definitely not huge either (I think the measurements are around 12' x 13').  The two sets of bunk beds fit fine plus the long dresser that holds most of the clothes but that's about all that fits.  And really, that's all we need to fit in this room.  Next door there's a dedicated play room (that will eventually become Sebastian and Gianna's room and even farther into the future, just Sebastian's room) and all of their toys are corralled there, so there's no need for a toy space in their bedroom.

With four kids though, comes a good amount of clothing, as you can imagine.  I have really purged and learned to intentionally buy clothes they really need in the past few years so their stash isn't as big as the twins' once was - they had a whole lot in their first years.   We're not minimalists (yet?), more capsule-wardrobe fans, so I can truly say they don't have an over abundance and it feels really good.  And, it's the only way this whole set-up would work without having to overflow into another room.  :)

The Dark Side


We tried something new on for size.  It regards the front of the house.  We've got plans for it and if you missed them, you can read all about them in this post I wrote last year.  But, as the planning has gotten more serious and we're closer to actually putting those plans into motion, we've been trying to really nail down details and maybe changed a few things up.

Before I go into details...  

Here's a (blurry realtor) photo to jog your memory on what the house looked like when we bought it.

I wrote a one-year-in exterior update here but in a nutshell, we took down the shutters, replaced the glass in the windows, painted the front door, replaced the overgrown jasmine along the sidewalk with pretty white flowers, laid bricks along the sidewalk, and transplanted a few more plants from the backyard in front of the left side of the porch.  

Getting there.

A few months back though, I was reading an article about the new black house trend and I got really excited.  I love that look.  Love it so much I really thought maybe we should change our plans and go black or charcoal instead of white on the exterior trim.  And so, I made it happen...

Patio Plans


We have been spending a ton of time outside on our back patio.  The weather down here has been really mild - 80's during the day but without the humidity that hangs out most of the year, it's been oh-so enjoyable.  So, naturally, I've been doing a lot of dreaming about the direction I want to go on our patio.  (Shhh...don't tell Anthony.  He always thinks I should focus on one thing at a time...ha!)  It's not the biggest space but we got lucky in that all of our (secondhand) outdoor furniture fits really great and creates a cozy atmosphere that just needs a little nudge in the right direction to amp up that coziness and make it a bonified, outdoor living room.  

table and chair set //  The brand is Tropitone and is still made - we were given this set from friends who had it handed down to them.  So, it's probably 15+ years old and still looks great.  Needless to say, if you want to invest in an outdoor set that will last, grab something from this company.  Here's their collection on Patio Living.  
umbrella* //  If you don't mind waiting, check clearance at the end of summer!  That's how I found this one!
sofa //  similar from eBay  I've found that bamboo furniture like this is often found on secondhand sites, at least around here.  I got both of these for $45 total! 
loveseat //  similar*

It's always really helpful for me to use Photoshop to create a mock-up so I can visualize my ideas.  I'm not even close to a pro when it comes to Photoshop (I use an older edition so I'm definitely not a pro...haha!) but I'm good enough to create a good glimpse, even if I need to squint to make the after even more realistic.  ;)

Here's what I came up with for our patio:

About a Door


About a door that only took us a whole entire week to hang.  Lemme explain.

Outside on our back patio we have a small closet of sorts that houses our water heater.  Right?  A closet outside for the water heater?  I thought it was weird too when we saw it but it turns out it's actually pretty common down here in the deep south.  The door on that closet was in major need of repair or replacing though - the bottom part of it was all rotted from the elements and since we moved in, a couple of the slats had fallen out.


Not the prettiest sight.

Not even with our outdoor furniture and a quick power wash helping to disguise its falling-apart state.

It's never been a priority to replace it but when we were painting this part of the exterior trim a couple of weeks ago, we decided to just remove and replace the door with a new one.  Neither of us felt like painting a crumbling old door was a good use of paint.  We had braced ourselves to spend at least $150 on a new door to match the old but then, guess what happened?

Depending on how well you know us, you might have guessed it.

Flattening the Curve(s)

I wasn't sure if I should tippity-type that title or not...I didn't know if it would cause cringing considering the circumstances we all find ourselves in...but then I thought, what the heck.

I mean, it's the perfect title for what we've been up to so how could I not?

Remember when I said we got sidetracked with another project in the middle of painting the outside of our house?  Well, we got really sidetracked.  I'm still feelin' it too.

THIS, is what our backyard looked like when we first moved in:

A large tree stump with a pudgy camellia to the right and a random, non-working light pole to the left.

Pan even more to the left a smidge and you'd see another two tree stumps just hanging out in the middle of the yard.

You can see them just over that short brick wall in this photo, taken at the same time:

Here's what it all looked like two weeks ago:

Interior Tour | One Year In

HAPPY EASTER!  It was one unlike any other, right?  Since we couldn't go anywhere, we made the best of it with our little domestic church here and it actually ended up being an Easter we will never forget.  We forged some new traditions and, because it wasn't quite as busy as it usually can be, I feel like we were able to soak in the tradition and could be even more mindful of Christ's sacrifice for us.  I hope you felt that too.  There really is beauty to be found in this whole pandemic situation if you have the eyes to see.

There is also beauty in the fact that Lent is OVER!  We are obviously still very much living a pandemic lent of sorts but I feel a breath of fresh air has filled my lungs with the Easter season.  I gave up being on any form of social media during the day for Lent and, while it was surprisingly hard in the beginning, I'm resolved to make it my new normal going forward.  When I did take the time to post something at night during Lent, I felt like it was much more intentional and not based on some passing whim or obligation to show the internet something during the day.  Maybe that makes no sense at all but I feel like overall, I ruled social media instead of it ruling me...something that I think happens all too often these days with all of us.

Anyway, I'm here today with a big update - how we've progressed on our house thus far!!  We closed on the house a smidge over a year ago and so I've been slowly taking pictures of the current state of each room over the past few weeks to put together a slew of comparisons.      

Hopefully this barrage of before and so-fars is as fun for you as it is for us.  :D  A lot of times, we get stuck in the thought that we're not really making any real progress or we're not progressing and changing things fast enough.  Yes, our pace is slower thanks to the DIY nature of how we do things around here and the fact that we pay saved-up cash for every upgrade, but sometimes it's hard to accept that the before isn't going to be blown away by the after in a matter of days or weeks.  But then I write things like this post, where we can actually see the progress we've made from the start, and all of that not-going-quick-enough fades into the background because really, we've made some good progress over the past year.  Scraped, smooth ceilings are probably the biggest winners but also the most understated because the ceilings aren't usually the first to be noticed.  In their new state, they help bring more light into the house which amps up the after-factor.  Everything else is a matter of new paint in a lot of the rooms and just bringing in furniture with a little bit of styling on the side.  We've still got a long way to go (and really, we'll never be totally finished because you know those winds of change can getcha...) but we have had so much fun planning and making and designing in between that we're almost glad we're not there yet.  ;)

So, come on in!

The entry before:
It's hard to see, but there was wallpaper all over in here.  The pattern is too small for my older phone to pick up but it was straight outta the 80's.

So far:

Before:

Camo Utility Boxes

We are on a house painting ROLL!  Well, we were.  We got a little side-tracked mid-week this week with another project that kind of took precedence...more on that later.  Our goal was to start painting the exterior trim sometime this spring and thanks to the craziness going on, we got a head start and are halfway done.  I'll share more pictures when we're done but we started on the least seen side of the house last week and are now almost finished with the back (which includes the big car port).  This is what that first side looked like before we started:    

After painting, it looks like this:

Kids (and Toddlers) Making Art | DIY

I do not like crafting with my kids.  There, I said it.  I feel it so much I could probably have used stronger words.  I like the idea of it but when it comes down to physically getting down and dirty, nope.  But, I love my kids.  Love, love, love them with that I-will-die-for-you kind of love but crafting with them?  It a mess waiting to happen and one that I'd rather skip out on by just finding other ways of having fun.

The unfortunate part about that is that my kids love painting.  LOVE it.  I don't know if that love will transfer over to painting walls and furniture because you know one day they will get roped into that, but for now, give each of them paint, a brush, and paper and they will sit and paint allll day long.  But, like a lot of kids, they make a MESS.  Even with me right there (breathing into a paper bag...kidding...maybe) they still manage to make a mess.  You moms know.  You see me.  And I see you.  A lot of times I feel like the paint is fun to create pictures with for awhile but if they keep going, it becomes this thing where they keep piling paint on paint on paint just to see what happens and that's where things go awry.  It's like playing with mud.  They're cute at first making these pretty little mud pies and cookies and 20 minutes later, they're an entirely new, unrecognizable species.  That's painting with kids.

But, BUT, I pulled the paints out with a plan a couple of weeks ago and, not only wasn't there a huge mess to clean up at the end, but we actually came out the other end with two pictures that were worthy of a hammer and nail.

Gianna's:

Seb's:


(The twins were at school when I did this so it was just a project for the 6 and 3 year old.  Had I had four kids at one time doing this, I'm not sure it would have gone quite as smoothly.  Maybe.  Maybe not.  Probably won't ever try that because I'm not that much of a glutton.)

P.S.  I didn't plan on this being something you could do while being couped and socially distanced for (possibly) weeks on end but it totally is so I'll chalk one up on the coincidence chart.


House Exterior Update | One Year In

Whew!  March 2020, you are one for the books, right?  April and May etc etc will probably get the same association.  Yipe.  I hope you're tucked away from it all!  We are just trying to lay low and distant but have high hopes that this social distancing will allow us some good family time and maybe let us get a few more things done around here quicker than we expected.  For one, we grabbed exterior paint this morning so we're planning on a few weeks (or more) of sticking close to home and painting.  There's a bright spot in everything, right?  If you haven't never considered yourself a DIYer before, Covid-19 might bring it out of you!  :)  

In other news... 

We closed on our house one year ago!  That's seems wild to me.  Like, really.  And maybe it's because technically, we've only been living here for 10 months so we haven't quite hit the year mark there yet.  If you don't remember, we closed on our house a couple of months before we had to be out of our rental.  That gave us time to scrape all of those popcorn ceilings and paint before we moved in all of our furniture, which would've made scraping ceilings 100 times harder.

I'm going to write up a picture-loaded post of the inside and how it's changed in the past year but first, we're going to start outside.  The backyard hasn't changed much (here's a little update on some landscaping) but the back patio has and all with the addition of furniture and a little feng shui.  ;)

Before:

Currently:

How to Slim Down a Shirt | A DIY Refashion

It's been a good while since I took on a refashion so I revved that engine back up last week and finally started going through my small pile of to-be-sewns...the small pile that was a large pile before I counted my losses and donated half of the clothes before we moved last year.  Can't say I miss them...

Anyway, I found this shirt on a clearance rack at Target, oh, maybe two years ago, for something like $6.  I snatched it up even though it was two sizes too big for me because I loved the print and I knew I could easily take it in.  So, it went straight to the refashion pile.  Straight to that pile were it sat and sat...

I'm pretty sure I've written a tutorial on how to do this before but I'm also pretty sure it was a maternity top and I've gained some efficiency knowledge since then.  So, round two.  One of the easiest, beginner-level sewing things to do when you're talking refashioning shirts, is taking them in at the sides to fit you.  Really this is easiest with sleeveless shirts like the one I've got here today but sometimes you can follow up and along the sleeve of a shirt to get the same result with sleeved tops.  I'll make a mental note to do one of those someday too.

There are two easy ways to do this.  1)  Use a shirt you already have, and like the fit of, as a template or 2)  inch your way in little by little until you get the fit you want, following the existing edge.  For this post, I went the template route.

Things you'll need? 
Well, I wish I could slap a "no-sew" label on this one but alas, you'll need a sewing machine for this unless you're an Olympic hand seamstress.  If you're a beginner and just want to start slow and with straight lines, this Brother* is reasonable, has good reviews, and will do ya just fine for lots and lots of sewing projects.  This one* is even cheaper but without many stitch options.  If you've got a little bit of sewing skill under your belt or just want to jump in head-first and with a good machine, this one* is the newer model of mine.  I've had my dear Brother for oh, six or seven years now and LOVE it.  I've had zero problems with it.  It sews everything I've ever made and even embroiders so I've been able to make our Christmas stockings and then monogram them all with one machine.  Two thumbs way up.
You'll also probably need a sewing scissors* (I'd write "sewing" on it so no one thinks they can use it for anything else), a seam ripper* just in case, a sewing pencil* (I always use my kids' washable markers) and of course, a shirt that's too big on you.

Here's my shirt in it's original state:

It could've had a chance at flowy if the arm holes weren't the size of Texas on me.

Hand-Painted Curtains | DIY

One of the first rooms we set straight in this house was the kids' shared bedroom.  You can see the "reveal" here.  In that reveal though, I mentioned that it wasn't finished (is any room ever finished really?) and that I still wanted to add a little bit more flavor before we called it quits.  Fast forward several months to last week, I finally got around to it.  The kids are helping me with a couple more projects right now and then I'll post another (more complete) reveal, but this here is all about the existing curtains I painted.  

I bought these black-out curtains* for their room in the 96" length and they're really great, especially for the price (I got mine via the Warehouse too so they were even cheaper!), but it turns out that they're even better if you want to add a little bit of pizzazz in the form of paint.

Here's what they looked like right after we bought them last year and got them hung:
(We used curtain rods similar to these*.)

With the white walls, they were a little too boring for a kids' room but I had plans...it just took me awhile to execute.  Before I show you what they look like now, let's go into how I did it.