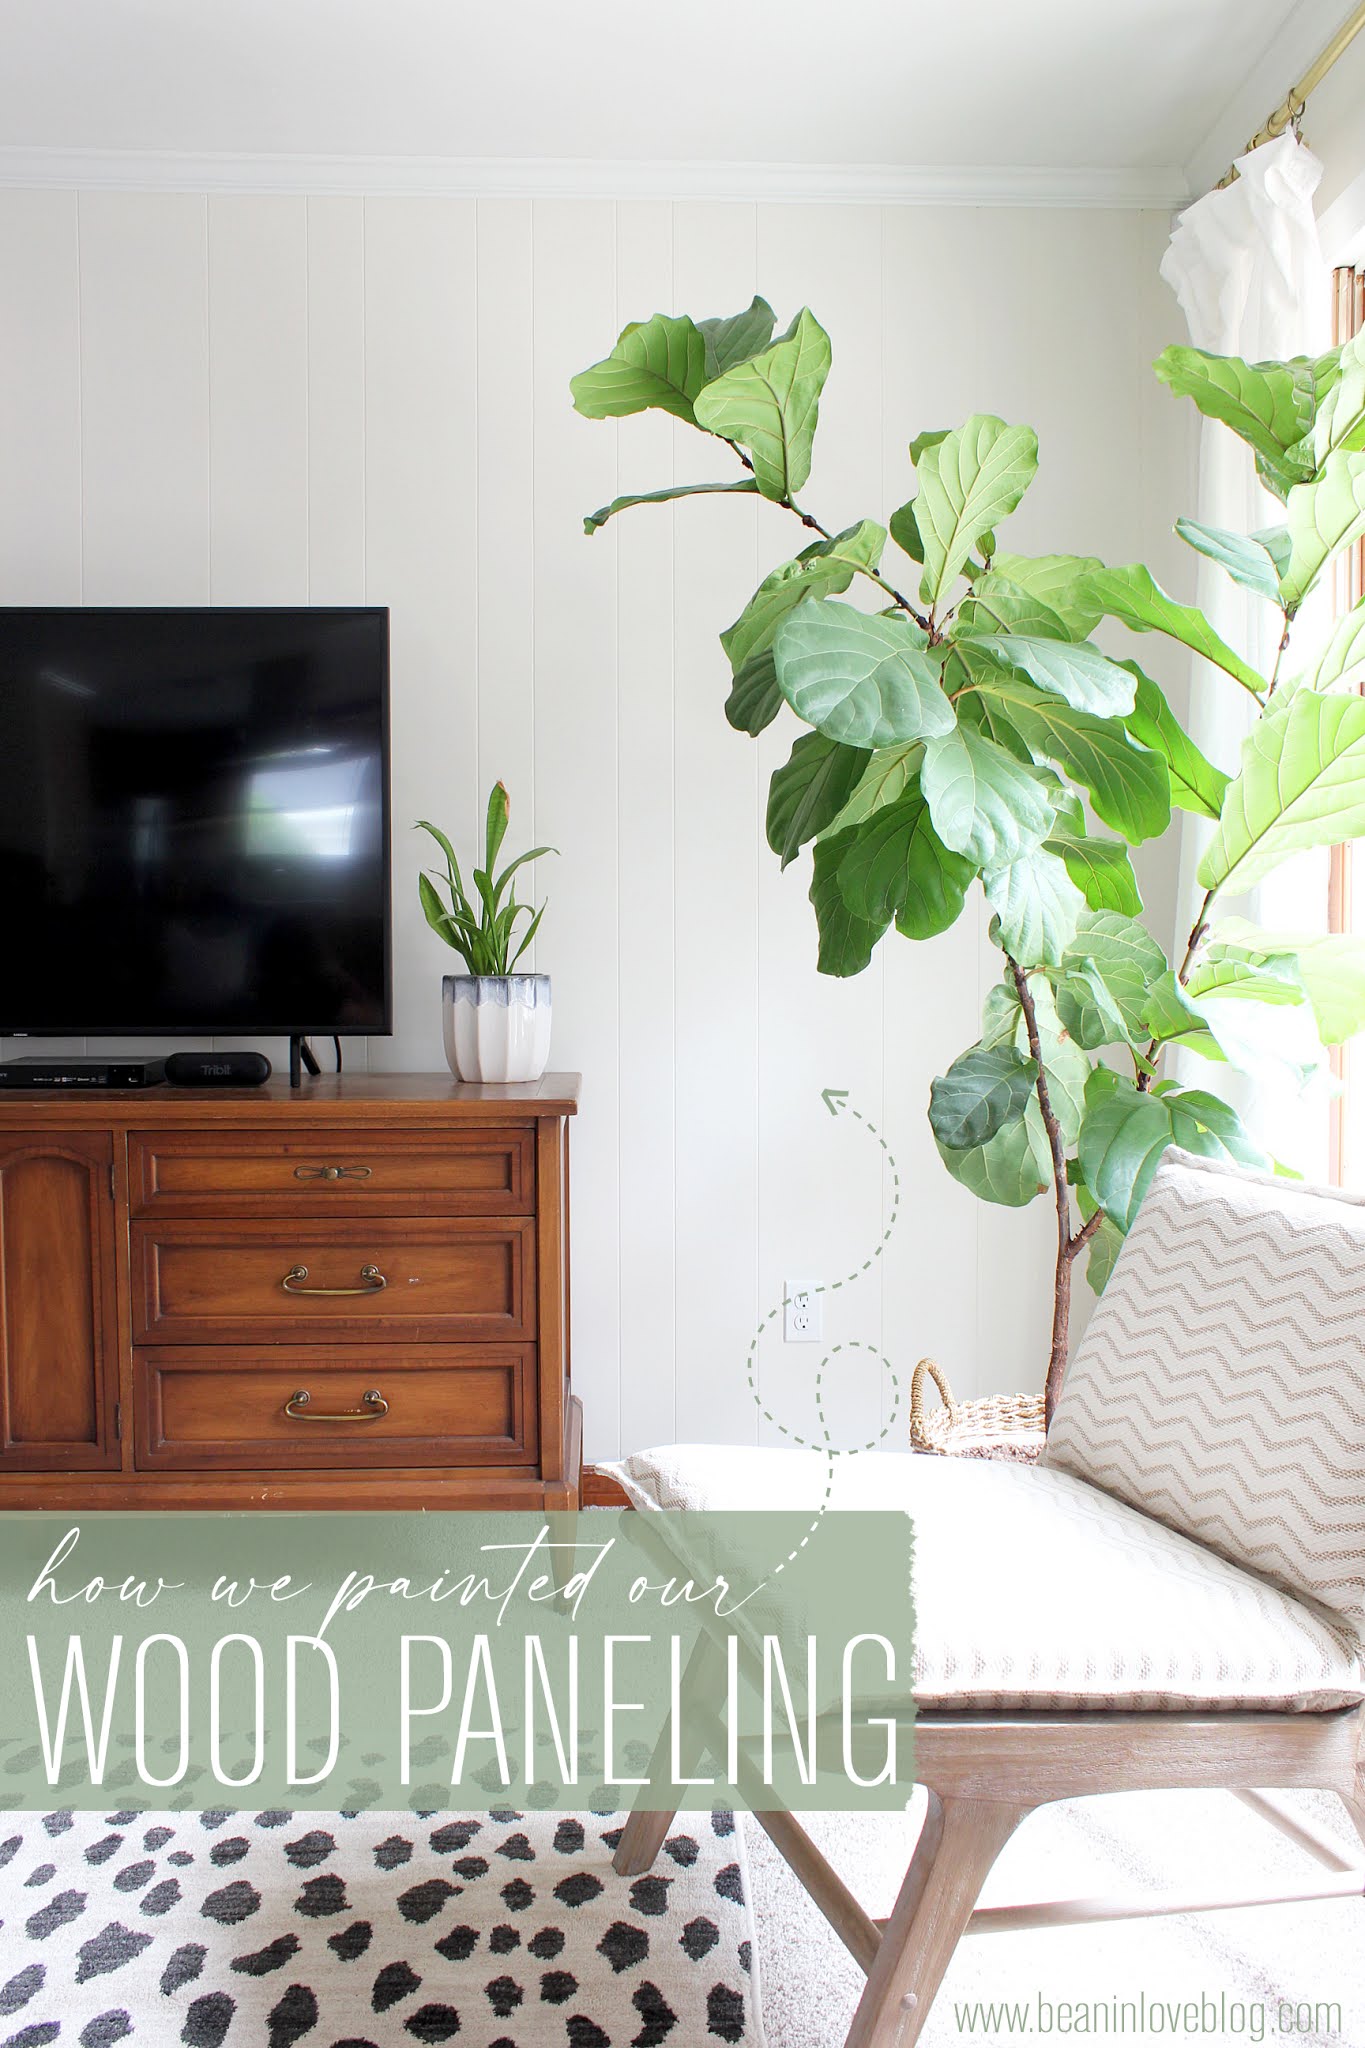
My fingers haven't been so excited to type out a title for a long time. It's one thing to be done painting the paneling but it's a whole 'nother feat to get up a tutorial about it - only took me a couple of months...HA! It's a hefty one with a lot of carefully ordered steps to help you along if you've been thinking about laying a fresh coat on the wood paneling you've inherited. We are certainly happy we took on the task. The end result has us heck-yeahing and has our living room looking a bit more modern.
We've painted painted wood paneling before in our rental, but we've never painted unpainted, stained and sealed wood paneling before so this was somewhat uncharted territory for us. There are lots of tutorials written out there but I'm going to let you in on a few tips and tricks and everything we learned to show you a really efficient way to unload some paint onto those dated, paneled walls if you've got 'em and want to bring them into 2020.
First things first, like I said above, this is a doozy of a painting project. It's not just slapping paint on a few walls and calling it a day. There is prep and more prep involved and it can get tedious, so before you start, search and scroll through the abyss of photos on pinterest or google of "painted wood paneling" to absorb all the inspiration you can. You'll need all that inspiration to turn into motivation. Ok, ok. Maybe I'm making this sound way harder than it is. It's hard but it is SO worth the effort. Take it one step at a time. You can do this! Here's our after (or so-far if we're including decorating) to add to the plethora you can log into that motivation bank:
Last, but not the least tweak in the living room, and over in that back door corner is a little yarn art. I’ve seen these made on Pinterest a hundred times but took a notes from Andrea at Harlow & Thistle to make my very own.
For a little bit, I struggled with what to hang on that door. Since it got painted white and kind of blends in with the wall, which is great, I still liked the idea of adding some sort of wreath or hanging decor. It had to be fairly simple and I didn’t want anything floral. I didn’t want to add any holes to the door so it also had to be something light enough to hang from one of these magnetic hooks*.
I know you can find this tutorial a thousand times over elsewhere, but hey, “Here I go again on my own...”
Within in the past several years, our family has become an avid recycling family. Reading statistics relating to plastic waste plus facts on rates of decomposition plus knowing our kids will inherit our waste as a nation and world have made moved us to try our best to not contribute to the throw-away society we’ve created. We recycle every single piece of plastic (paper and everything else…) we possibly can after we use them and, when I remember, I try to use reusable shopping bags. Every little bit helps, right? :)
So, when I came up with a solution to fill that little piece of empty wall space above our security system keypad and next to the new, framed picture of Christ that involved recycling something used and that was FREE (in that I didn’t have to go out and buy anything), I counted myself in.
Over the years, I’ve accumulated quite a few bottles of body spray from here and there.
After I emptied one recently, I realized it had a ton of decor potential…more than it had just sitting in our recycling bin.
Let me introduce you to my new favorite corner of this little house. It doesn’t really look like much but it’s my favorite because it’s chock full of fun diy’s I’ve been knocking out over the past couple of weeks. Still on the list is a hook system (just like this one) that I want to get up on that empty wall to the right of the door. Hopefully that will happen before school rolls in this fall so we have a place to park backpacks. :)
To jog your memory, here’s what that corner looked like just after we moved in:
We desperately needed a place to store shoes since this is the door we use most often and so we bought Ikea’s Mackapar, hacked it, and still love it. I finally got around to painting the living room last month too. Goodbye tan! With all of the orangey-wood trim and lack of light during the majority of the day, white was the clear winner. We went with Pure White by Sherwin-Williams. The door was in a sad state; dinged and stained. It was begging for a new coat of paint.
This is a post all about a white elephant. Not the Christmas party kind and not the circus kind. It’s the kind in a room. A kitchen actually. And did I mention it wasn’t an elephant at all but a dishwasher?! No? Let me tell you all about it.
Our landlord so kindly installed a new dishwasher in this little house for us before we moved because we are first-world, spoiled peeps who can’t not have a machine that does the dirty work for us while we wrangle four kids post-dinner. *eyeroll*
So awesome, right? Right. So, now we’ve got one and we’re SO thankful because, as you probably know, it really does make life just a little easier. Well, I got a few comments on how great the dishwasher looks painted after the big kitchen reveal and those words were music to my ears because that’s what I wanted everyone to think. But, listen. I am not inconsiderate enough to think I should go and paint a dishwasher that isn’t technically mine. But I really hated how it stuck out of our pretty green cabinets like a rowdy toddler at Mass. I sent the above picture to my sister right after I finished “tiling”.
Hey y’all! I have been spending all of my allocated blogging time (which translates to post bedtime once in awhile) fixing all of the links on my Projects & Ideas page! I haven’t changed anything…just fixed the links after a technological error and user agreement change on behalf of Photobucket (don’t ever use them ), but it has taken me hours and hours here and there to get them all up and running again. Phew! I still have a few to fix and they’ll eventually find their conclusion but I wanted to pop in quick with a tiny story and tutorial before I get back at the virtual housekeeping. :)
I’ve been trying to up my collection of dresses recently, on a budget of course, and so you can imagine my delight when I found this shift at Dirt Cheap for $10: It adds a little pizzazz to my winter white skin and ashy knees, doesn’t it? And the pink elastic around my wrist set for Phia’s noggin’ was the perfect accessory. Clearly, I was made to be a fashion blogger. A n y w a y, the dress hails originally from Target (the brand is A New Day) but it doesn’t look like they sell it there anymore. If you likey too, you can find it here on Blinq (for $10!…though I’ve never shopped there before) and I found some ‘used’ on Poshmark but they’re almost retail price. #dumb
Well, all was great until I slipped mine on for church one morning and noticed a big rip…right in front.
I have to give myself a reality climate check every fall down here in the South. It’s something like - H E Y, I know everyone and their cousin is posting pixels filled with spiced lattes and covered toes but you live down where it’s still, not technically, but actually summer. The humidity is still here to slap you in the face upon the exit of any a/c-filled abode and building and, your deoderant, yeah, it’s still working overtime. You’d think I’d be used to it by now but no, no, no. I actually grew up in the midwest where fall really feels like fall and summer stays back in summer. But, I’m not complaining. Sure, I miss the snow but I don’t miss the months on top of months of it and it’s great to not have to dress the kids up with 75 layers and then their Halloween costumes every year…you know, so they can actually go out as a little butterfly without looking like a stuffed butterfly.
Anyway, the past couple of weeks have seen a little bit of chilly weather (chilly as in under 70) and so I jumped at the chance to finish a little project had started last fall…and by started I mean, I pulled out the fabric one day, threw up an Instastory about it and then never got around to moving it to my sewing machine. But, with Gianna and Sebastian doing their synchronized napping thing, I was able to whip this up in a half hour and get the regularly scheduled homeschooling in with the twins one day last week. #werkit
Without further chatter, let me introduce my new, faux fur, infinity scarf:
jacket: hand-me-down, altered // similar button-down: Target via Dirt Cheap // similar jeans: Old Navy (I heard great things about the Rockstar Built-In Sculpt jeans from ON last year and was so excited to try a pair but when I did, I was sadly disappointed. I felt like they smashed my rear end down and were really uncomfortable. Darn. When I returned them, I tried their Rockstar Super Skinnies instead and LOVE them!) wedge booties: eBay // Amazon (I bought mine new off eBay three years ago and they are still going strong. They’re really comfortable too!)
Want to make a fur scarf of your very own? You know you do! And guess what? You could hand sew one in under an hour, maybe even in under a half hour.
My last post dove into my most recent thrift store excursion, as you might’ve read, and I noted somewhere in there that I had walked out with only one thing that day. This was that one thing: Only it didn’t look like that as I walked out the doors of Goodwill that day.
It’s going to get real original over here today yo. I’m not the first and I definitely won’t be the last to type about marble contact paper. There are a myriad of pinned projects using just the stuff and mine will be just another to add to the collection. There are a huge basketful of bloggers and DIYers who have written/talked about using the stuff and so I’ll just add my voice to the queue. BUT, I betcha that of all the marbled contact paper projects you find out there, mine will roll in as the cheapest. Not bragging…that’s just the fact. You know how I do. ;)
Internet, meet marble contact paper project…again.
Hallelujah! I got to do something “fun” whilst getting ready for this sell-our-house thing! I’m tired of painting the kitchen ceiling, touching up loads and loads of trim paint, cautioning the kids against touching anything (“Do NOT drag your toys along the walls pleeeeease!!!”), washing siding and trim, etc…
I got to make curtains!
If you’ve been a long-time reader, you might remember that once upon a time, I scored a long curtain rod at Dirt Cheap and flanked our living room’s french doors with some long curtains to make the room feel more “homey”, as I put it. I started out with some sheers and then later made some tan and white, geometric-printed curtains that I loved for a long time. Well, I wanted a change in pattern so I sold those and found some plain white, thick fabric remnants that I thought would be a perfect medium to do knock-off these curtains from West Elm with…but then I decided that I wanted the curtains to be more subtle and blend into the walls a little more so I just kept them white. There’s still a chance they’ll look like those West Elm curtains someday but right now, I am loving them as-is. Phew. That all sounded like a mind-making disaster, didn’t it? If you’re looking for someone to pick a design and stick with it, don’t look here. The winds of change blow quite frequently in this casa.
The parts I love the most though, are the grommets at the top. I’ve always used rings to hang curtains because it was the easiest to just sew a big rectangle and hang it up. But then a good friend of mine put grommets at the top of her living room curtains and told me how easy it was and I just had to. I mean, look at how they fall! I toyed with them a little before I took pictures but really, for the most part, the grommets create those big folds that go from top to bottom and they hold them there.
I bought these grommets at Walmart. They’re the exact same grommets sold at the fabric stores I looked at, only without the coupon mark-up (I’m convinced stores that always have running coupons mark their items up…these are $12.99 at JoAnn Fabrics.) You can also find them for a little bit more on Amazon.
So, let me tell you my grommet story. It’s so easy. You’ve gotta make some grommeted curtains.
Are you sick of me writing about a juvenile bathroom yet? (I’m pretending that was a nonchalant, no…color me oblivious.) Oh good. Because there’s more. I’d fill in space between these bathroom posts with something oh, I don’t know, not about a bathroom but one, two, three, four kids and they all nap at different times these days so, no. Not happening. Bigger fish are not being fried here…at least not right now.
Back to the subject matter though…
You might’ve read about the kids’ bathroom mini-overhaul, specifically everything that went on on the right side of the room but now let’s slide on over to the left side. Here’s what it looked like after a fresh coat of paint several years back (the lighting and poor photography make it look worse than it actually did):
I was set on a black & white rug to set down in the kids’ bathroom. Black & white screams “gender neutral” to me and since I needed all of that I could get in this little bathroom for two girls and a boy, that’s the direction I was headed.
Enter this little thing: Not black and white (even though it could argue the gender neutral case pretty well) but a great path to getting there since the other side was a blank slate. You probably read the post about this rug and how I sewed, cut, and frayed the edges to get fringe.
Now enter the Torres Kilim from West Elm…aka, my inspiration. I saw it first on an episode of Fixer Upper and knew it would be super easy to imitate since the lines are perfectly imperfect. Rug. Kids’ bathroom. Now.
I’ve been trying to add more plants to our house…I’ve probably mentioned that before. Luckily, they melt right in as easy decor so you really can’t go wrong with placement or type or anything like that. I don’t know if it’s just in the past few years or if it’s always been this way and I’ve just never noticed, but I don’t think there’s a picture in any popular home decor mag or blog these days that doesn’t have a plant in it. Aka, it’s super popular to have plants growing in your casa in the twenty teens. But, that’s not the main reason why I’m sneaking them in to our house. Anthony, who has always been against plants in the house (because he thinks they attract bugs…is he right? idk) all of a sudden changed his mind when he read an article about how they filter and clean the air in your home. I love the natural look plants bring to a space so you can bet your booty I grabbed a few to bring home as quick as I could after his change of heart. Certain plants clean your air more than others so I’ve been trying to be very intentional about the plants I buy – I really only want those that clean the air the most. The big Peace Lily we have is one of those plants. In the past few months, it’s been playing musical room, going from the kitchen to the laundry room and now to our bedroom – all rooms that get a good amount of natural light. I think it’s parked in our room for good though and I’m popping in today to show you exactly what it’s parked in.
Several months ago, I came across a couple of big planters at Goodwill. You could tell they were pretty old and had been well loved by the plants that had once inhabited them but, well, they were stuck together. Like, one was nestled tightly and seemingly-permanently into the other. But, they were both marked at $1.99. I didn’t feel like paying for two planters (even if they were cheap) if I coudn’t get them apart though. So, I pulled and wiggled and wiggled and pulled and even had a strong male employee try for me but the planters looked like they were stuck for good. Thankfully, Goodwill let me pay for one even though I got two, since we both figured I’d have to break one to end up with one. And then, I got home and my amazing, incredible, fantastic, what-a-guy husband separated the two planters without breakage! Huzzah!
You can kind of see one of the planters in this Instagram shot and here is the other:
This is after I cleaned it – it had some sort of grainy film on it that I had to painstakingly scrub off – but before I used up some old spray paint to liven it up a little. I thought I took pictures of the process but they are nowhere to be found. Basically, I painted everything but that little indented part on the bottom navy blue (Krylon), taped off the bottom of that big top part, and then painted that indented part on the bottom gold (Rust Oleum). You’ll see what I mean in a minute.
Today I just want you to tap into your memory store and think back to the year 2016…back to the post in which I introduced this new and improved dresser: You can get all the details on its new paint job if you click here but if you want to go inside, keep reading. I decided that adding some glam in the form of a gold dip wasn’t enough so I took it one step further and lined all of the drawers with some gold dotted wrapping paper by Sugar Paper that I found at Target for $6. (PS, I found it in the Christmas section but I’m hoping it wasn’t just part of a Christmas collection so that anyone who wants to follow suit can go grab some!)
I’ll tell you all about it, the good and the bad, but first, let me tell you how hard Sugar Paper made this decision for me. Their papers are gorgeous! I choose a gold dot because I thought it would appeal to more buyers since I was going to sell the dresser but, if it were my own dresser, I probably would’ve went with the black and gold feathers on the gray backgroud (which, btw, would look amazing in Grace’s dresser) and if I we were keeping the dresser for the girls, I would’ve went with the colorful striped paper on the right. So fun you guys! <3
But there will always be more dresser drawers to line I’m sure, so let’s move on to the how on the current ones.
Measuring
Before you line your drawers with whatever paper you’ve got, you’ll have to measure each drawer to figure out how much paper you’ll need. Stating the obvious, I know. You can grab the old ruler or tape measure and write down measurements or you can do it the easy way. :)
The easy way consists of grabbing a few sheets of computer paper, scrap paper, and/or used coloring book paper and laying it all out inside the drawer so that it overlaps, thereby making a template. Making sure the paper is covering every square inch of the bottom of the drawer, tape it all together along the seams. If you have any drawers that are the same size, just make sure the template you just made fits inside all of them. (I made this template inside the top drawer and hooray, it fit inside the next two drawers down too!) Chances are, it will fit just fine. On the rare occasion that the drawers are a smidge different, just make another template.
So easy, right?
Next, place your template on the wrapping paper, trace, and cut it out. (Note: Turn your template upside down and trace it on the underside of the paper so that there are no pencil/marker marks on the top of the paper that might be seen.) (It helps to place something semi-heavy on top of your template as you trace to keep it from shifting, hence the ink cartridge package.)
Template (if necessary for different-sized drawers), trace, cut and repeat until you have all of the pieces of paper needed.
Papering
As far as adhering the paper to your drawer, there are a few ways to do it. For a more temporary lining, you can just use double-sided tape at six-or-so inch intervals around the perimeter of the drawer to stick it down. Then simply pull it up when you want a change. For a more durable lining, I used some satin modge podge I nabbed on clearance. Nevermind the sponge brush though. I took this picture before I started which was also before I realized how much I hate sponge brushes. Just grab a small paintbrush instead.
Ok, here’s where things got a little dicey for me. I’m just telling you so you know what NOT to do.
DON’T brush the modge podge onto the entire bottom of the drawer and then proceed to lay down your template. It doesn’t matter how much painstaking effort you exert to lay out the paper so that there are no air bubbles and wrinkles, they will probably come. Think they’ll disappear once everything dries? Nope, think again. And then hold back tears as you rip out and waste a beautiful piece of fairly expensive wrapping paper. So maybe that’s a little dramatic but I can assure you, the frustration was real.
Now, let’s skip over to the greener grass. Here’s what you SHOULD DO.
Before you even think about laying the paper into the drawer, grab some clear acrylic or laquer spray and spray the back of each piece of paper. This will form a nice barrier between the modge podge and paper; the modge podge won’t saturate the paper causing it to get all soggy and wrinkly. (Random note: I used this Krylon clear acrylic I had on hand and look how *not*clear it sprayed! It’s a couple of years old so maybe it yellows over time when kept in the can but I guess I was just glad I wasn’t using it to spray something I wanted a clear coat on! I didn’t have much left in this can so I also used some clear spray laquer and that was still clear despite being a couple of years old too. Moral of the story, buy the laquer instead of the acrylic.)
I sprayed all of my pieces of paper one-by-one and then set them out flat to dry. Once they were all dry, I went back to lining the drawers.
First, I laid the piece of paper in the bottom of the drawer so that it was exactly where it needed it to be. Then, to hold it in place, I grabbed the kids’ pencil box (because it was the closest thing) and set it on one half of the paper to hold the whole piece in place. Next, I folded one half of the paper over so that I could brush modge podge onto one half of the drawer bottom. And then I slowly folded/rolled the paper back down over the modge podge from the middle to the far edge. It helped to grab a washcloth and rub it as I went.
See? No wrinkles! Once that side was done, I moved the pencil box to the other side and repeated. I wish I hand one more hand to catch a video of how I did this but with the washcloth, I just rubbed up and down across the paper as I was laying it down. I let all of the papered drawers dry overnight and the next day, I went in and brushed a thin layer of modge podge over the top of each piece. I was a little nervous that this would take away the shine of the gold so I held my breath but phew!…once the modge podge dried, the paper looked just like it did pre-modge podge.
I LOVE the added beauty the lined drawers bring to the dresser! It was definitely worth the extra steps to use this paper. It’s the perfect compliment to the dresser’s paint job! If you’re not in the mood to deal with paper to line drawers, check out this post on how to line drawers with fabric!
Also, you might remember that behind the doors on each side of the dresser, there are a couple of shelves that I set storage baskets on. I made paper templates and cut out wrapping paper to line the shelves with but then I decided against papering them. I was too afraid that, when sliding in the baskets, the paper at the front edge of the shelf might catch on the basket being slid and rip.
But then I had those rectangles of paper laying around. I could’ve saved them to wrap small presents but instead I stuck one inside our to-do list frame… …and the three others went into the three frames hanging in the living room, specifically because I thought they’d be pretty behind the wreaths I hung on each for Christmas. Which brings me to a tangent…Christmas decor. The weeks leading up to Christmas were super busy here so not much seasonal decorating happened here. :(
The plans I had to make Gianna a stocking never happened. And thankfully she’s too young to care this year anyway.
The rest of the decor was quick and simple.
I had a hankering to hang wreaths on the picture frames mentioned above so I grabbed some faux garland from the dollar store, unwrapped it to ruffle it up a little, and then wrapped it back up into a wreath shape. Then I grabbed some red glittery ribbon I also got at the dollar store and hung those wreaths. I also used some of the leftover strips of paper to disguise this almost-empty candle as a vase: I’ve still got a small piece left and I’m thinking I might wrap a book with it. It’s really hard to toss pretty pieces of leftover paper, ya know? Haha!
Anyway, that’s my drawer plus wrapping paper experience. Have you ever lined anything with wrapping paper or any other paper? If so, how’d you come out in the wrinkle department? Maybe it was just me or maybe you had the same problem. And maybe you’ve never lined any drawers but are now eyeing all the dresser in the house. I know I am. ;)
Happy New Year folks! I hope it’s been a good one so far!
Holy moly! I’m about to type up what was a whole month of work – an hour here, two seconds there, half hour here – in one post. I’m not sure if it feels like I’m cheating or just not giving this project justice but either way…
Remember this dresser? Well, that’s how it looked when we first got it.
Set inside the twins’ nursery, I gave it a two-toned look and some new, spray-painted hardware: And now, I look back on that two-tone decision and I think “what the heck was I thinking?” The french provencial style of the dresser married to a more modern, two-tone look probably wasn’t the best idea I’ve ever had. I mean, it didn’t look awful but it definitely wasn’t as pretty as I thought it was at the time. It’s funny how your perceptions change, isn’t it?
Well anyway, it doesn’t look like that anymore. I spent the last month turning it into this: I was inspired by a picture of this gold-dipped dresser I saw on Pinterest (pin’s link is broken) months ago and vowed to dip this one someday and that someday, or should I say somedayS, finally came around.
Over the past several years that I’ve been blogging, I’ve had several requests for a hair tutorial and I’ve always had intentions of obliging but whoa, let me tell you, it is hard to film anything with kids running around. After a few more requests flowed in last week though, I just threw caution and perfectionism to the wind and set up my phone while I was doing my hair one morning. My thought was that I’d throw up a quick video tutorial, nothing too eloquent, that showed the basics until I could invest more time in a better video. The filming went great despite two interuptions by kids asking questions but when I went to upload, that’s when everything got a little wrangled. I couldn’t figure out how to add text, how to compress the size, how to blah, blah, blah. Suffice it to say, I spent wayyyyy more time than I had intended on this video and it still is pretty awful. Haha! But hopefully you get the gist.
The original video was eight minutes long but the file was too big to do anything with or store in any of my available storage places so I ended up chopping it into pieces that come in at just under a minute. To make up for the cuts, I figured (and hoped) some written details would suffice.
First and foremost, it is painfully evident that I have no talent in video editing. Ahem…
From start to finish, it takes me about seven minutes to get my hair curled. It’s never perfect and because it’s curly to begin with, it hides that imperfection pretty well…and some people would dub the look “beachy” so I’ll just lean on that justification. If I’m going somewhere special, I spend a little more time on it so we’ll just say 15 minutes max.
After I wash my hair, I put a little bit of Garnier Fructis mousse in the bottom half and I blow dry my hair upside down, focusing on the roots, for about two minutes. I can’t stand wet hair on my neck and back so this gets me to dry at the top, damp at the bottom status. I usually wash it at night so by the time I’m ready to curl, it’s 100% dry. Also, about the mousse, I’m kind of a mousse snob. I don’t like mousse that leaves your hair super stiff and this stuff is the best at not stiffening for the price. I do think blow-drying after applying helps keep things soft too.
My hair isn’t thin but it’s definitely not thick. At the thickness it is, I divide it into two layers for curling. If your hair is thicker, you might want three layers. Also, my hair is cut with several layers. The way your hair is cut detemines how it will look curled…that’s probably obvious but I thought I’d mention it anyway. :)
When curling, it’s key not to adjust your grip at the base of the section you’re holding. Grab the hair and wrap. The section of hair will twist as it’s being wrapped and you want that to happen!
The iron I’m using in the video is this Hot Shot/Helen of Troy curling iron. It is amazing and I’ve had it since college (10+ years). I have it in the 1” size and a 2”. I’m using the 1” in the video. The link will take you to it at Sally Beauty Supply, where I bought mine. If you become an email subscriber with them, you’ll probably be able to nab a coupon that would make it even more affordable than it already is!
This is my hair after three days: In the summer with all the humidity down here, it usually looks a little crazier after three days but the hairs are faring pretty well in this gorgeous fall weather.
I only brush my hair after showering and that’s it. And actually, this past summer I tried something new where I brush my hair with a wide-tooth comb while I’m washing conditioner out and that’s it. When I’m done and while it’s still pretty soaking wet, I apply mousse and then I blow dry, upside-down, for the usual two minutes. My curls stick together more and humidity doesn’t hamper them as much as it usually does. You curly-haired girls should try it. :) Sometimes it looks great as-is and sometimes just adding a few wrapped-curls here and there adds a little more form.
I didn’t have time to tack this on at the end of the video (another reason why I need to make a better one) but I usually tease my hair at the roots when I’m done to add a little extra va-voom. On normal days, I just grab a fine-tooth comb or a pick and go at it a little bit but if I’m going to a wedding or some other special occasion, I sprinkle in some Powder Play and then tease it. My sister introduced me to this stuff a few years ago and it is A+. It holds and a little goes a really long way so it lasts forever.
I’ve never went Live with Facebook but I was thinking maybe it’d be fun to run through the whole process on there one day? Maybe? Maybe not? We’ll see how much courage I can gather and how much awkwardness I can ignore to try that…
Anyway, I know I’m no hair pro but I’ve gotten pretty good at making my hair look fairly decent in the very, very little amount of time that I have to do it. If anything, I hope I prove that it’s possible to lose the bed head with very little time and effort. ;)


")
")


![hardware 021_thumb[1]](https://blogger.googleusercontent.com/img/b/R29vZ2xl/AVvXsEimZEdqMncOKLK9lVQT0t0ejTpXYQ7NnuV56hM14lM0EzBSOCyUyLD1eSedvyOVjitu0Lo-X1g6RNEGdxdz7jGBKtAsTKri-ES1eiCYEPeXyB7p846xTuZTAINo6UjVb3UZ5TGHFdV3lfCc/s1600-h/hardware-021_thumb1.jpg "hardware 021_thumb[1]")


