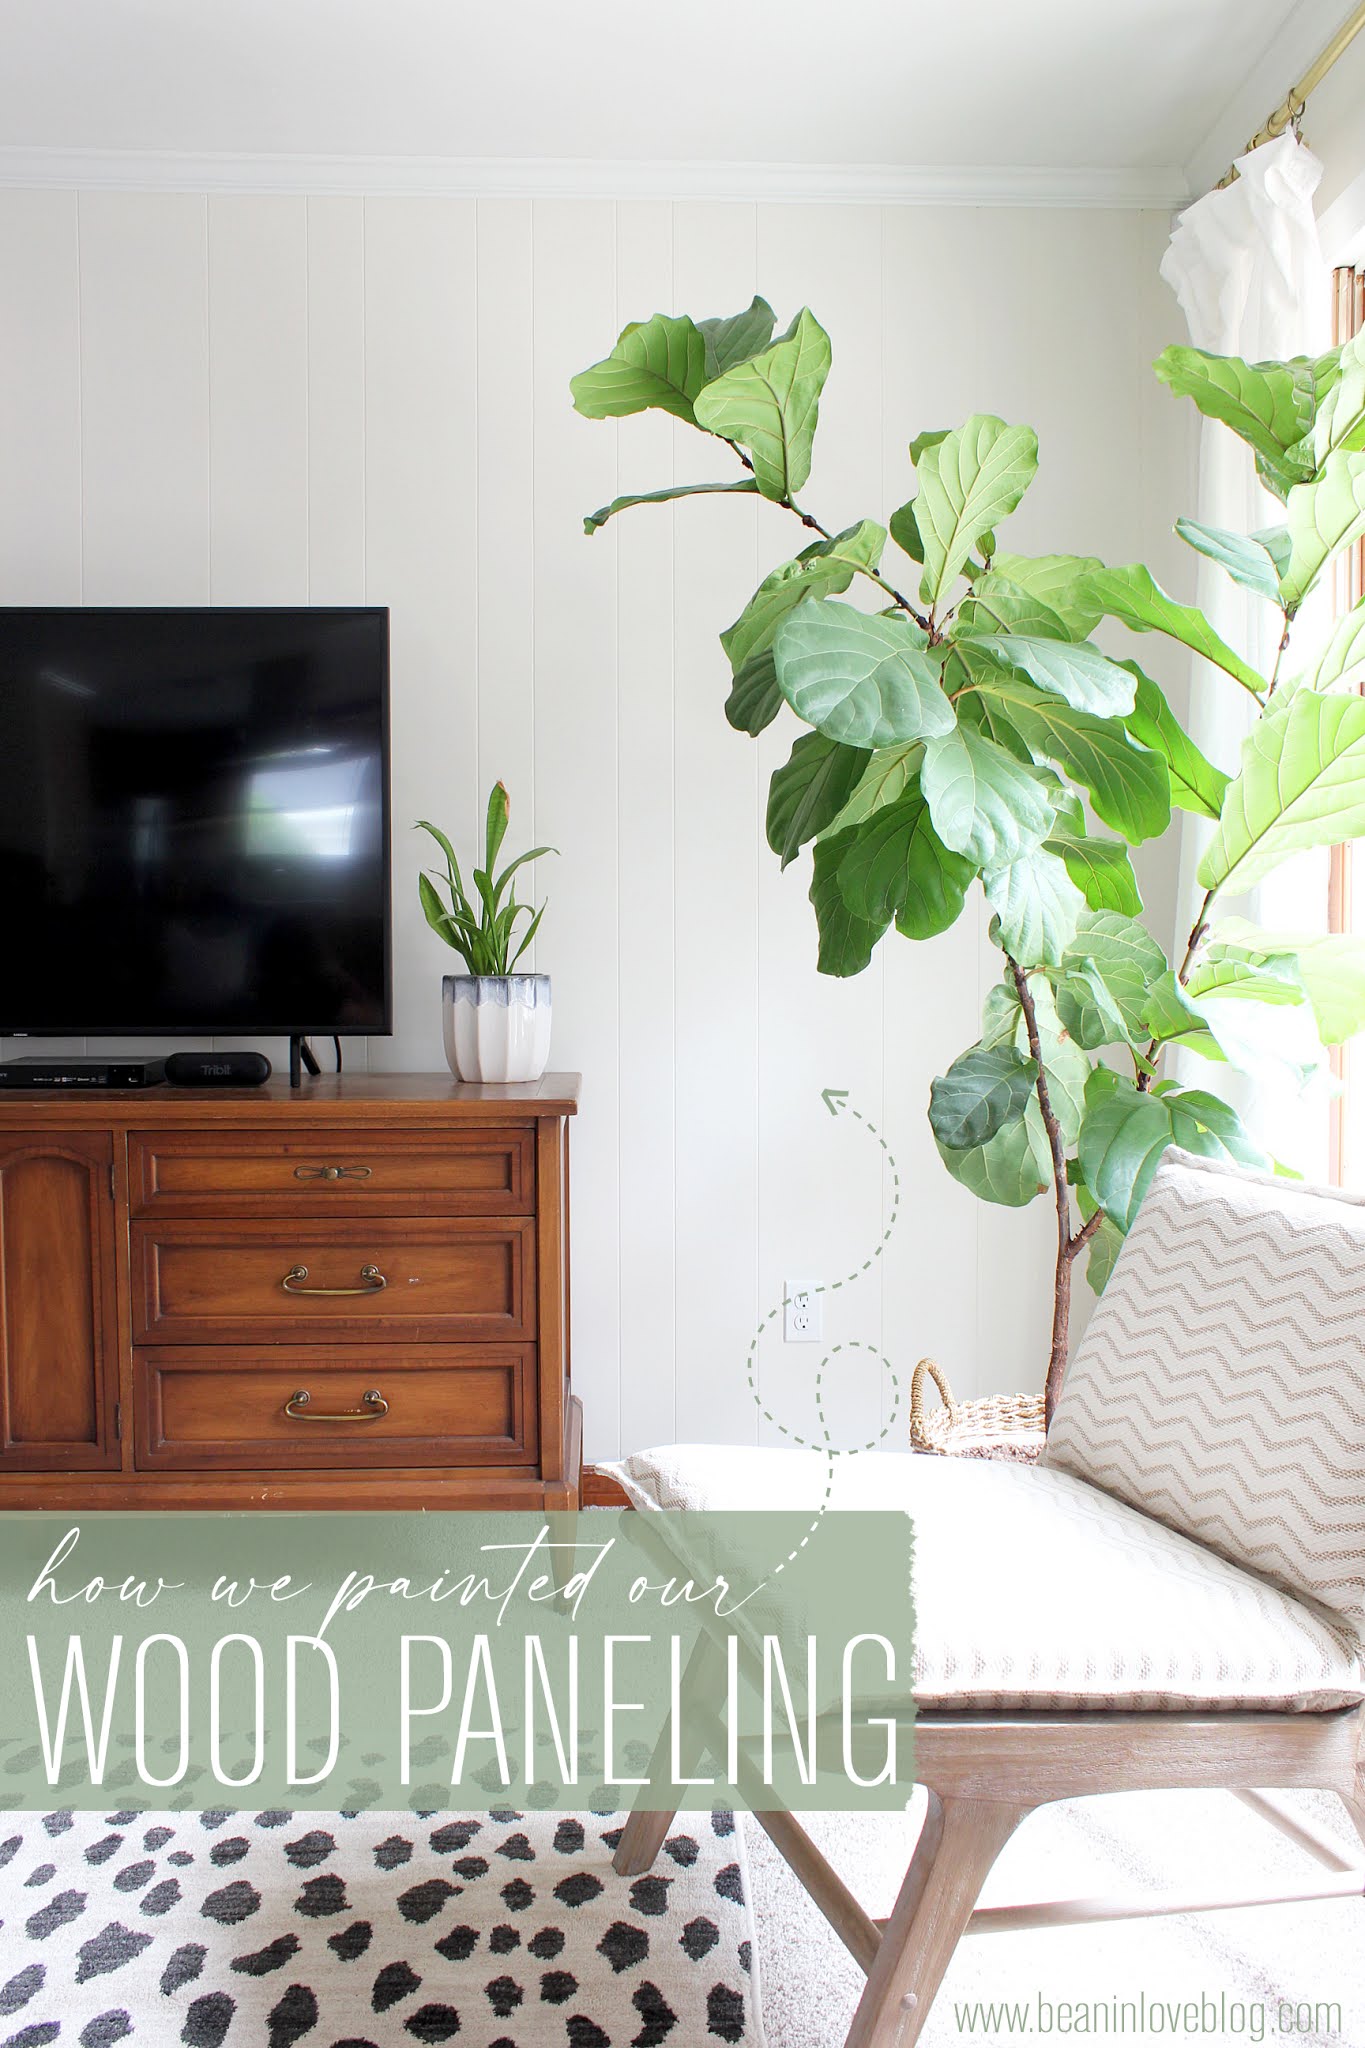
My fingers haven't been so excited to type out a title for a long time. It's one thing to be done painting the paneling but it's a whole 'nother feat to get up a tutorial about it - only took me a couple of months...HA! It's a hefty one with a lot of carefully ordered steps to help you along if you've been thinking about laying a fresh coat on the wood paneling you've inherited. We are certainly happy we took on the task. The end result has us heck-yeahing and has our living room looking a bit more modern.
We've painted painted wood paneling before in our rental, but we've never painted unpainted, stained and sealed wood paneling before so this was somewhat uncharted territory for us. There are lots of tutorials written out there but I'm going to let you in on a few tips and tricks and everything we learned to show you a really efficient way to unload some paint onto those dated, paneled walls if you've got 'em and want to bring them into 2020.
First things first, like I said above, this is a doozy of a painting project. It's not just slapping paint on a few walls and calling it a day. There is prep and more prep involved and it can get tedious, so before you start, search and scroll through the abyss of photos on pinterest or google of "painted wood paneling" to absorb all the inspiration you can. You'll need all that inspiration to turn into motivation. Ok, ok. Maybe I'm making this sound way harder than it is. It's hard but it is SO worth the effort. Take it one step at a time. You can do this! Here's our after (or so-far if we're including decorating) to add to the plethora you can log into that motivation bank:
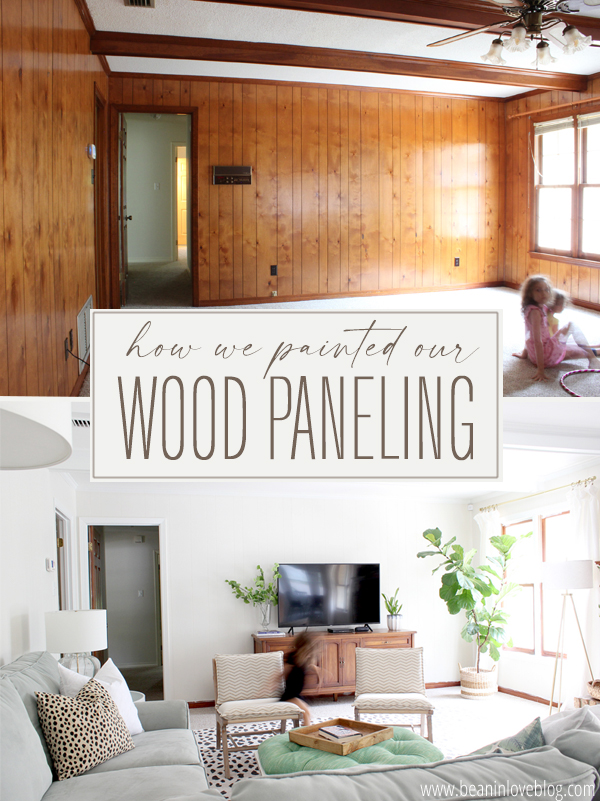
Here's what it looked like before:
Dark and woody and in time-capsule, 1985 condition. I had a few people tell me I shouldn't paint it and you know, that's totally fine with me. You do you. Embrace you. If you like the look, grab it by the horns and go! There is nothing that says you can't take wood paneling and magically transform a room with it as-is into a modern masterpiece. I am all for doing what YOU like and not paying any attention to the current trend. But in our case, we wanted light and bright in here and so the paneling was getting us nowhere in that regard. So, even though we wanted it a different color, we love the character the paneling adds with those vertical lines. That is where the treasure in paneling lies - that extra character. Someone reminded me during this process that, back when wood paneling was in and everybody was putting it up in their homes, it wasn't the cheap option. Drywall was the cheap option. Paneling was the splurge. It made me appreciate our walls so much more. ;)
Let's get started with that process.
I'll try to be as concise as possible but there is an important order of events here that we feel got us from start to finish the quickest and most efficiently. Depending on what kind of paneling you've got in your space, those steps might look a tad different but I'd say generally, most things will apply. Here's what our process looked like.
1) Wash down those walls and trim (and ceilings if you're going to paint them too!). Our house was home to a heavy smoker and wood is one of those materials that really soaks in that odor. So this room was heavy with it. Before we moved in, we washed down all of these walls with water and white vinegar and it really helped take the edge off, even though we were still left with a slight ashtray smell that we noticed when we walked into the house after being gone for a couple days. (The other thing that majorly helped with the smell was scraping off the popcorn ceilings - details and tutorial
here.)
If your walls are really glossy, I'd grab some
liquid deglosser and use it to degloss them so the primer sticks well.
We used it to clean and degloss the trim in this room. I've also used it on cabinets before painting them. I dilute it with water a little (that's not an official instruction but it still works for me and lasts longer) and just wipe it on like I'm cleaning. It's supposed to take the shine away without needing to sand and so far, the paint we've painted on after using it is still sticking so I'm going to give it two thumbs up. (I've also seen this brand recommended by some bloggers but haven't used it personally.) A quick sanding with a fine sandpaper block will help take the shine off too...just make sure you wipe the walls down after. It'll be an excellent bicep work out too.
Now that everything is clean...
2) Fill in knots and any holes in the wall. We had a lot. Fun times.
I used
this lightweight spackle*. I like it because you don't need to sand after. In some deeper knots, I had to layer it on twice (letting it dry between fillings) but it gives an easier process than the apply, dry, sand spackles. Post-painting, you can't even find a single knot.
Now we're ready for paint...
3) If you're painting ceilings first, like we did, prime (if they're bare drywall) and paint them before you start on the walls. Gravity doesn't stop for paint and so it splatters when you're painting overhead. You don't want those splatters getting on your freshly painted walls. Move from the top down. We used oil-based primer to cover up any lingering smoke odor.
4) Prime the trim in the room. If it's already painted, move along and celebrate in the fact that you don't have to do this because painting trim might be the worst, worst, worst.
Since our trim is stained wood, we went with that smelly oil-based primer again. (Pssst, we didn't prime or paint the baseboards because the floors in here will be replaced soonish and they'll need to be removed. Rather than scuffing up the new paint job, we thought it would be easier to paint them while they're off.)
5) Prime the grooves in the paneling - there's a bonified technique to use when painting grooves down in #9. Grab a paint brush and brush oil-based paint into every single one of them. I'm going to repeat one important point - OIL-BASED PRIMER. I know it seems only natural that we used it again since we painted it onto our ceilings and trim but with both of those things, you could probably get away with using latex. On wood paneled walls though, you'll want to use this.

We used
this Kilz primer* but only recommend it if you're planning on opening the can once and using it all. For some reason, we've had bad luck with using one can more than once - opening it to pour and then closing, storing, and reusing. Small globs are in the primer the second time we open it and they ruin the rest of the primer because they don't dissolve while you're painting or rolling. They just stick to the wall/trim and it is one of the most annoying things. After the first can did this, I thought we maybe just didn't close the lid all the way but then it happened to
two cans since and so it can't be user error. It's on my list of things to-do to write Kilz to ask why this happens...I'll post an update here when I do.
Oil-based primer? Yep. Unless your paneling is fake wood that hasn't been stained, it is crucial. Your grooves will look like this after priming if you use oil-based primer:
And here's what they will look like if you don't use it but go with latex instead:
Not only the grooves, but the knots in the wood too. All of the stain that was once applied to that paneling will just seep right through the latex primer and you'll cry yourself through another round of painting grooves which, by the way, is up there on the tedious totem pole. How do I know this for certain? Because I tested it and painted over a groove back when we were painting our breakfast nook and this is what happened. You do not want to have to do this twice. Trust me. Oil-based primer.
I know it might seem counterproductive to paint grooves when you're just going to roll over the walls but chances are, a paint roller won't fill in these gaps completely so you'll be left needing to work the paint in with a roller (annoying) or you'll just be left with unpainted spots that you'll have to go back over. When we primed, I primed the grooves and Anthony rolled the walls - it goes quicker if you have two people going at once.
Important side note: If you're using oil-based primer (chances are, you should be), make sure you ventilate the room - open windows and turn on fans - and keep the kids out if you've got 'em. We did this in the heat of the summer so we couldn't open all of the windows lest we have a $1000 a/c bill so we waited until after the kids were in bed and it was slightly cooler (probably still a sweltering 80 degrees), opened a window, and had a fan blowing the inside air out. We also have this mask* which filters the fumes incredibly - you can't smell them one bit. It's worth the $ when you're going to be using a lot of oil-based paint like us.
7) Prime the walls.
Checking off this box was a huge milestone for us because it meant that we were done with the oil-based paint and fumes and that we could finally get a glimpse of that lighter and brighter we were going through. Hooray!
8) Paint the trim in the room. We painted our trim Pure White by Sherwin-Williams (color-matched into
Valspar paint) in a satin sheen.
Here are our tips on painting trim. Again, if you don't have to do this because it's already painted, happy dance it.
One thing I will mention and recommend is that you don't paint the corner trim that most paneled walls have to hide seams the same color as you're painting the baseboards/crown/door trim/window trim. Paint those corner pieces the same color as what you're going to paint your walls. The people who painted the wood paneling in our rental kept the corner trim the same as the crown molding and baseboards and it really chopped up the walls in a not-so-good way. See that corner piece painted the same color as the walls? 
9) Paint the grooves. I mentioned above there's a technique to this. It seems uber simple and straightforward but here's the thing, if you just load up your brush with paint (or primer!) and brush up and down, you might be left with a raised edge where the paint ends. When I say "you might", the odds are pretty good, especially if you're rushing through this part because of it's tedious nature. Rush through, that's fine, but once you paint up and down, filling that groove with paint, go right over what you just painted at a diagonal to get rid of any raised paint line you might've left.
It takes a couple of extra seconds each section but it'll be worth not having those raised lines everywhere, especially since you can't really get rid of them easily once they're there.
10) Paint the walls.
This is when things get really exciting because
you're almost done!! We painted these walls China White by Ben Moore (color-matched to
Valspar paint -
here's the code) in eggshell.
11) Celebrate.
Lighter and brighter? Mission accomplished.
12) Vow to never paint that room again...well, maybe never. ;)
+ + +
If I need to explain more or you have a question, visit the combox or email me - beaninlove@gmail.com Or, if you used our tutorial to paint your paneled walls and you want us to see how awesome they look (because we really want to see!!), tag me on
Insta or
Facebook!
*These links are affiliate links which means that, if you click over and/or make a purchase through the link, we may receive a small commission at no extra cost to you. All of these links will lead you to things we actually paid for or that are similar to the item we paid for in case ours is thrifted/sold out/secondhand. This extra money helps us with the costs of running the blog and buying paint. ;) Thank you for your support and for fueling our love to share all things DIY!


Ahhh it looks so good! We have the same paneling in our living room, too, and I love it painted!
ReplyDeleteI feel like we live parallel house lives so often Marina! Glad you love it painted too!
DeleteSeriously so beautiful now!!! I love the look of painted paneling -- so bright now. :)
ReplyDeleteRight?! Move over plain 'ole drywall, there's pretty paneling coming through. ;)
DeleteHow did you remove your old radio?
ReplyDeleteHi Chelsea! We took it out of the wall (just unscrewed a few things and pulled out wires) and then Anthony replaced that whole piece of paneling (since there was now a gaping hole in it) with an extra piece we carefully removed from the wall across the room that got taken down. We were lucky we were removing a wall and had the extra paneling from that otherwise we wouldn't have been able to patch it like that.
DeleteWhat type of paint roller did u use?
ReplyDeleteJust a regular 3/8 nap roller. Ace Hardware sells our favorite ones ($10 for a pack of three) but really, they're all about the same.
DeleteDid you use latex paint over the oil based primer? I'm doing this job this weekend and have been trying to figure this out. Your room looks amazing!
ReplyDeleteHi Karen! Yep! Latex over the oil-based primer. Still looks like we did it yesterday. :)
DeleteMy ex was a professional painter and told me you NEVER paint over oil based paint with latex because it can cause adhesion issues that will rear its ugly head later. I’m not sure if this applies to primer, but because I understand coatings from my career, I wouldn’t use oil based primer with latex. If you use oil based primer or paint, keep using it for everything. Don’t try to mix and match.
DeleteDid you paint the beams with the same paint as the ceiling or the same paint as the rest of the trim?
ReplyDeleteSame as the trim. :)
DeleteI have 1 real wood wall (Pine?)with a medium dark stain, in a horizontal panelled layout. I love the slight variety in board sizes they used and I am toying with the idea of sanding it down and changing the stain colour. But to what?? I could just paint it out Cloud White from Benjamin Moore but I am thinking it might be nice to have the real wood look. Any thoughts?
ReplyDeleteIf you like the real wood look, it's worth a shot sanding and restaining. Painting would definitely be the easier route but go for the wood if you like it!
DeleteDid you remove the built-ins? We have one on either side of our fireplace, and I'm not looking forward to painting them.
ReplyDeleteWe did remove the built-ins but only because we removed part of the wall they were on. They do sounds daunting to paint though. Maybe buying a paint sprayer to paint them would be worth it? Then painting the rest of the paneling with a roller/brush combo. Good luck! Focus on the end result! Haha!
DeleteHas this held up well?
ReplyDelete1000% yes! Still looks freshly painted. :)
DeleteHi Sheena!!
ReplyDeleteHow many gallons of primer did you end up needing for your space?
We used almost 1.5 gallons, if I'm remembering correctly. :)
DeleteWe’re moving into a new house with the paneling already painted, but the grooves are still so prominent. Any tips on filling them in and then painting over it?
DeleteI feel like prominent grooves lends to the character you get just by having the paneling. Our grooves are still very noticeable. You could fill them in with wood filler but would be a super tedious, time-intensive job that I don't know would be worth it. But it would be possible.
DeleteHey there! If you mentioned this in the article, I apologize as I've probably lost a few brain cells from this oil based primer ha. I have one more wall to prime, exciting!! My question, how many coats of primer did you do? I'm thinking of doing 2, but boy is this a process! Oh I love the diagnol paint tip and plan on using that!
ReplyDeleteHaha! That oil-based primer will getcha. ;) Sorry for taking so long to respond as you've probably figured it out by now on your own BUT we only put on one coat of primer. That should be all you need to block whatever you want to block. :)
DeleteWe had the same kind of old panel walls. My husband was a contractor and insisted we always fill the grooves with spackle in a tube. It took forever but it looked pretty good. Just putting that out there!
DeleteThe paneling I am planning to paint is white paneling…do I still need to paint it with primer first? I plan to do a light green/sage color.
ReplyDeleteHuh, I wouldn't think so? Maybe just make sure you buy the paint + primer combo and I think you'd be just fine skipping that step. :) Good luck!
DeleteWhat is the paint color :)
ReplyDeleteChina White by Ben Moore mixed into Valspar paint.
DeleteI don’t mean to sounds dumb but what do you mean by China white by Ben Moore “mixed” into valspar paint?
ReplyDeleteVery valid question...that could be confusing. Ben Moore paint made the China White color but we like Valspar paint so we take the BM color to Lowe's and have the paint people mix that same color into Valspar. So we get the color but in a different paint brand. Make sense?
DeleteHow do you know if it’s real wood or not? We have wood paneling in the living room and we’re wanting to paint it
ReplyDeleteOoh, not sure about that. If it has knots, it's definitely wood (or so I would think). I would say to prime with oil-based either way just to be safe if you're not quite sure.
DeleteThis guide (along side your color profile) has single handedly helped me renovate at least 3 rooms in my home! I'll definitely post on my main account, but I just wanted to seriously thank you for documenting and illustrating the "time-consuming but absolutely worth it" process of renovating and repurposing wood paneling on walls! It's something I saw on Reddit and Pinterest, but I was hesitant because I hadn't seen any documented results that were to my liking (until they began popping up on Youtube). Low and behold, I stumbled on a properly organized and well presented blog that has everything I needed, could ask for and more!
ReplyDeleteIt's been such a difference maker, and it's spared us the financial upheaval of having to deal with either the plaster-lath behind it, and the cost of a fresh drywall installation. Once again, thank you! I'll make sure to buy off one of those affiliate links just to help with the bills haha.
Sincerely,
Juni
Hooray! So happy to help Juni! Your comment made my week!
DeleteGreat tutorial...I do not recommend the diagonal brush stroke to "remove raised lines" as this may cause pooling and runs in the grooves...simple up and down, working outwards (feathering) will be much more effective and easier to blend once rolled. Not nitpicking, just a simple offer of help. 🙂
ReplyDeleteThanks for the input! I didn't have any paint runs but it is something you'd definitely need to look out for when painting diagonally. :)
DeleteWhy did you paint the beans?!
ReplyDeleteWe decided to paint them because our ceilings are the standard 8' height and our beams hang down pretty low. If we kept them wood, we were afraid they'd stand out and make the ceiling look even lower. Instead of being a contrast, now they blend in and just add a little more character.
DeleteI mean... BEAMS!
ReplyDeleteI have half wall paneling and half plaster, and would like a bright and white affect as well. Do you have recommendations on the colors for the paneling vs. the top plaster half?
ReplyDeleteI would paint them both the same color, I think. We really like China White by Ben Moore. Or you could go a medium gray/beige on the bottom (Pale Oak by Ben Moore is a good one or Anew Gray by Sherwin-Williams) and the China White up top. It just depends what look you're going for.
DeleteWonderful post! Thanks for sharing your expertise. tnx
ReplyDelete