About a Door

Once upon a time there was a little flame burning inside me that made me really want to paint our front door.  Then our bestest friends Dan and Lauren painted theirs and it looked so awesome and so cheery and it fanned that flame into a roaring fire.  Except Anthony kept sprinkling drops of water on that fire because “There are too many other things we need to do first”, and “Eh, I don’t know”.  He was right.  There were a ton of things we had on our mile long to-do list that were way more important than our front door, which was navy by the way.  Not a bad color at all.  In fact, when we first bought this house I adored it with the green siding.  But then there were brighter, cheerier grasses on the other side that I was drawn to too (not to mention that the navy paint job was bubbling in a few areas).  So, when Anthony gave the go-ahead (or did I just make that up), I went for it.  I’m not quite finished with it yet…what I thought would be one or two coats is nearing five…so I’ll just share the thought process on choosing a color today in hopes that the door will be finito before the end of the week.

Here’s what it looked like before:
 houseoutsideaug13
[Picture quality:  Sharp as a dull tack.]

And then I had a little fun in Pixlr making a few (very bad, I know) mock-ups of a few colors I had in mind.  Which one do you think looks best?

Pale blue?
aquadoor

A subtle charcoal gray?
charcoaldoor

Bright cobalt?
cobaltdoor

A reddish-orange?
oraneddoor
Or cheery yellow?
yellowdoor

Which one do you think we chose?  I’ll give you zero hints and tell you it’s the color I’ve been wanting to paint the door since the idea popped into my head.  I had to be sure and test out a few other color choices but this one hit the jackpot…and the front door last weekend.  Stay tuned. 

P.S.  Ten points for a correct guess.  :)

How To Make Your Own Stencil

Well then, let’s get right back to regular programming, shall we?  Specifically, the how-to on the stencil I made for our new entry way rug.

IMG_4609

I got the inspiration for this pattern via this rug I found on Pinterest:
929ae361a3da2407bce48ffc0a285106
[Link from Pinterest done broke so if anybody knows the original source, lemme know.]

The first thing I had to do was create the design from the rug on my comp to be printed out and turned into stencil form.  To do that, I put together the basic design in Pixlr (my favorite, free online photo-editing program).  It’s a little difficult to explain that process but basically I pulled the most basic part from the design which, in this case, was a large circle encompassing a square with notched-out corners that were connected by lines.  (Did I lose ya there?  It’s okay because I’ve saved you from all that leg work by including a free download to the design below so you can skip-to-my-lou right over it all this mumbo jumbo if you’d like.)  I had to pay close attention to the x and y values in my Pixlr document to make sure everything was centered and equal but once again, don’t worry if that’s completely foreign.  Once I had the basic circle and square shapes aligned, I copied and pasted the design multiple times in a row to reflect the entire pattern in order to draw in those lines that connected the squares.  This is what the design looked like after that:
stencil
I didn’t connect all the squares because all I needed was one circle to make my design but you get the point.

To get the design for my stencil, I simply cropped the above image down to this:
rugstencil

And, like I said, the good news is that you don’t have to understand or like any of that because you can download the design below, free and clear.

So, the stencil.  (P.S. This method will work for almost any kind of shape and design you want to turn into a stencil.)  To get it from computer to plastic I first had to print it out.  The only way I could get it to print at the size I wanted and without it being adjusted to “fit the page” was to open the .jpg in Microsoft’s Paint.  Using the ruler in Paint as my guide, I sized it until it was as big as I wanted it and hit print.  Using paint allowed me to print so that the design would print at it’s original size which, in my case, utilized four sheets of paper.
   photo 1 (4)

Once printed, I had to cut off all the extra paper surrounding the design.  To do this I used a ruler to draw lines at the designs edges and then I cut along the lines.
photo 2 (9)
First grade difficulty level here folks.
photo 3 (5)

Then I taped the four sheets together to get the design in one piece.
photo 4 (3)

At this point I realized that I wanted my whole design a little thicker so I widened the lines by drawing around them with a sharpie.
photo 5 (1)
If you download the design for yourself, you might want yours thicker too or you may not.  Whatever cooks your dinner I say.  If you do, a marker will help you get there.

The last thing I did was cut my design in half.  I found the halfway point by folding the design in half and holding it up to the light to make sure both sides looked like one side/on top of each other.  Got it?  Super scientific over here.  Somebody call Bill Nye.
photo 1 (8)The reason I cut the design in half was because the whole design was a little too large to fit on the stencil blank I found at Hobby Lobby.  My entire design measured 13.5 inches in diameter but the stencil plastic only measured 18 x 12 inches.  While painting the design onto my rug, I worked by stenciling half of the design at a time, flipping the stencil around each time to do each half. 

To get the stencil onto the plastic I taped the paper design upside-down onto my it.
photo 2 (10)

Then I flipped the whole thing over so that the paper was underneath the plastic and I traced the design onto the plastic using a sharpie.  (You might notice the design in the picture below shows the white lines throughout the black design whereas they’re missing above.  I painted those in after I realized I’d need them to hold the different parts of my design together in the plastic.  The download includes them so you won’t have to worry about them if you use my stencil.)
photo 3 (6)
(Also, I drew the intersecting diagonal lines in the middle of the stencil to help me determine the very center of the stencil.  I used that point while centering the stencil on the rug by placing it right over the center mark of my rug.)

Once I had the entire design traced onto the plastic, I simply cut it out with a craft knife.  I have this Westcott one (affliliate link) and really like it because it has a cushioned grip.  I used a ruler to cut along the lines to make sure they were nice and straight.
photo 4 (4)

And that’s it!  Here’s my stencil all ready to go:
photo 5 (2)

While I was cutting out the stencil I realized that it had a plastic film over one side so I removed it before I started stenciling.  At first I thought it was covering an adhesive but it wasn’t and the package didn’t say anything about it so it’s function is unknown to me.  Enlighten me if you know.
photo 3 (8)

So that’s how I made my very own stencil.  You can get the tutorial on how I painted it onto our entry rug by clicking here.  It might seem like a rather tedious and challenging project but I promise you, it’s really not as hard as it may seem.  If you can trace and cut along lines, you can do this! 

Cost?  Under two bucks.  I bought this stenciling plastic at Hobby Lobby for $2.50 ($3.99 with a 40% off coupon) but the package came with three sheets of plastic so I’ve got two more to file away for future stencils.  In case you don’t have a Hobby Lobby close by, here are a few affiliate links to some stenciling blanks I found on Amazon:
 Set of three 12 x 8 in. stencils
Set of two 18 x 10 in. stencils

Last, here is are the downloads of my stencil in case you want to use it:
Click here to download the whole design.
Click here to download half the design (what I used).

Per the usual, please let me know if you have any questions!  If you use my stencil or use my tutorial to make your own stencil, leave a link in the comments, on our Facebook page, or you can send me an email or tag me in a gram!  I’d love to see what you do with it!

Have a great rest of the week!  I’ll be working on this:
photo (7)

All the details to come.  Until then, say a prayer for me.  I’m positive that my time in purgatory will be spent sanding.  :/ 

Watermark It

*Before I start, I really want to thank all of you who responded to our plea via the blog, Facebook, and Instagram and reported the Faux Facebooker last weekend!  The page is no longer functioning!!  It really means a lot to us that so many people were willing to fight with us and petition Facebook to get this crazy removed!  You guys are seriously the best!*

With that said, after the crazy recent events, I’ve gotten a couple of requests for a tutorial on how to watermark your photos.  In case you’re not familiar with the term, a watermark is a light, sometimes almost transparent image or text on your photo that identifies it with you and makes it difficult for other people to steal it and use it as their own (natural Webster over here).  I watermark my pictures by placing either a semi-transparent box with text or just semi-transparent text over each individual picture.  Doing each picture can be a little time consuming and I’m sure there’s probably another, quicker way to get the job done involving making a transparent image of a watermark and simply cutting and pasting or layering it over any picture you want marked but this here lady ain’t that savvy quite yet.  So, here’s how I do:

(Psst:  For some dumb reason, Windows Live Writer would not publish my post and so I had to settle on posting via Blogger (which is such a pain!) so my pictures are a little smaller than I intended which might make the text in them harder to see.  So sorry!)

 Using pixlr.com, a free online photo-editing tool, I first open up Pixlr Editor.

Then I click “Open Image from computer”, and select whichever picture it is I want to watermark.  You can select multiple pictures by holding down the ‘Ctrl’ button on your keyboard as you click <— possibly a “duh” comment.  Sorry.


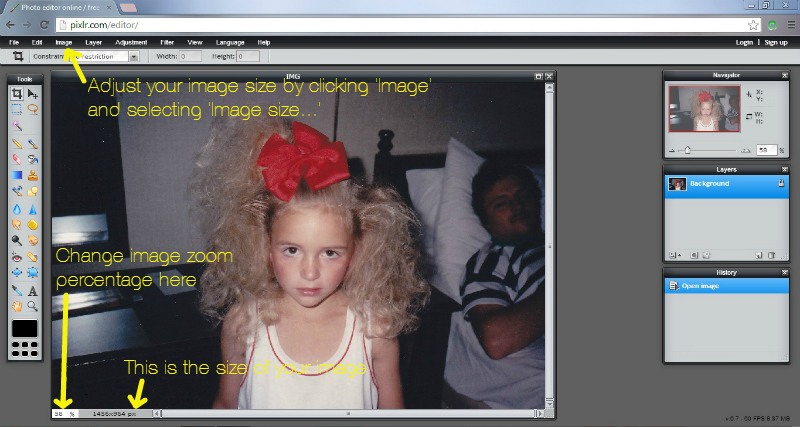
Once you have your photo up, you may want to change the size.  You do that under the ‘Image’ menu.  I usually adjust the images for my blog to be 600 px at the longest side.  You may also want to adjust the percentage of zoom (technical term…no clue) of what you’re working with.  Do that by changing the number in the box at the bottom left of your photo.  (I’ve found in Pixlr that if you’re not working with your picture at 100% (aka original size), any text you place on it might not be positioned where you put it after the image is saved.  Not sure why nor do I have a remedy.  So, if you’re working with an extra large file, it might be a pain to work with it at 100% and you might have to figure out how to get your text to stay put sans saving.  Make sense?  I hope so.)
[For example’s sake, I’m working with this throwback gem…you know you’re itchin’ to steal it, aren’t you? *wink, wink*]


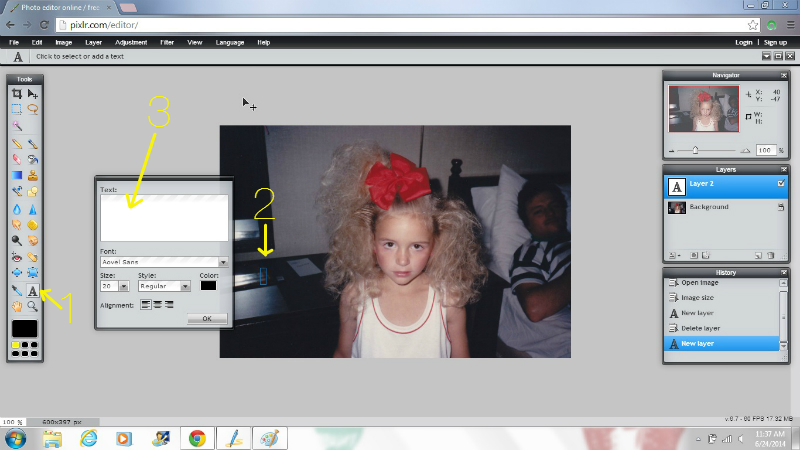
So, once you’ve sized and zoomed/unzoomed, it’s watermark time.  To make a simple text watermark, 1) select the ‘A’ button on the Tool bar, 2) click whereabouts you want your text on your picture which will bring up a text box, and 3) insert the text you want in the text box.
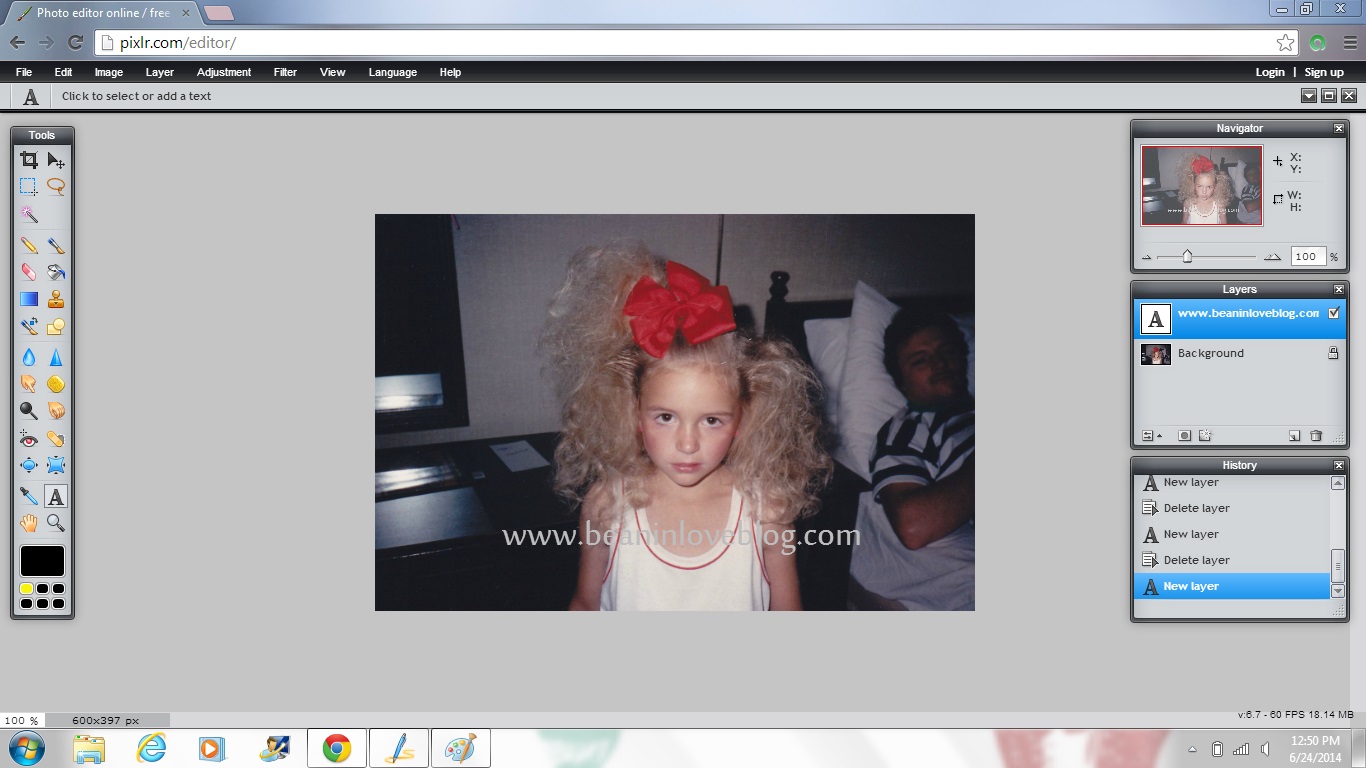
Next, type in whatever you want your watermark to say and click on the color button to pick what color you want your watermark to be.  (I typically go with either white or light gray as they seem to get me the most subtle looking watermark but you can use any color really.)  As you type, your text will come up on your picture.  To move it around, simply click and drag it.  Also, if you find you want to change the size of your text, click the size drop-down menu and either type in a preferred size or drag the slider.  To change the font, click the font drop-down menu and choose from there.  Pixlr uses fonts you have installed on your computer.  (Side note:  www.dafont.com and www.fontsquirrel.com are a couple of great places to get some free fonts.)


Once you’ve got your text set, go over to your ‘Layers’ menu and click on your text layer (if it’s not already selected).  Once it’s selected, click the little button on the bottom right of the layers box.  That’s where you can mess with the settings of that layer, including the opacity of your text, which is where we’re going next.

When you’ve clicked on the bottom-right button, the layer settings will come up.  All you’ll want to do here is adjust the opacity of your watermark so that it’s sort of see-through, making it subtle.  Drag the slider or type a number in the box to get the opacity you’re going for. 


You’ll be able to see the opacity adjust as you type/drag so you can experiment with higher/lower numbers until you’re satisfied.  The lower the number, the less opaque your mark will be and vice-versa.  Also, the lower the number the more subtle your watermark will be.  Am I being too obvious?  Probably.  ;)
And that’s how you get a text watermark on a picture.  Bada bing, bada watermark.


Then we can get all fancy-shmancy with text plus a box or shaped watermark like this one:


There are a couple of ways to add a shape to your watermark.  One is by 1) making sure the ‘background’ layer is selected, 2) clicking the drawing tool button on the ‘Tools’ menu at which point the drawing tool menu will pop up at the top of your Pixlr screen.  There you can 3) choose which shape you’d like to create, 4) adjust the opacity, 5) adjust the size of your shape’s border (‘0’ if you don’t want a border), 6) make sure this box is clicked so that your shape is filled in with 7) whatever color you want.  Once you’ve done all that, simply 9) click where you want your shape to be and drag to determine it’s size.  (Totally skipped using #8!  I blame it on the kids…who were napping when I wrote this…sooooo…)


If you don’t like it, you can always undo it and tweak your settings to try again.  Once you’re satisfied with your shape, you can add text by following the instructions above on adding a text watermark.
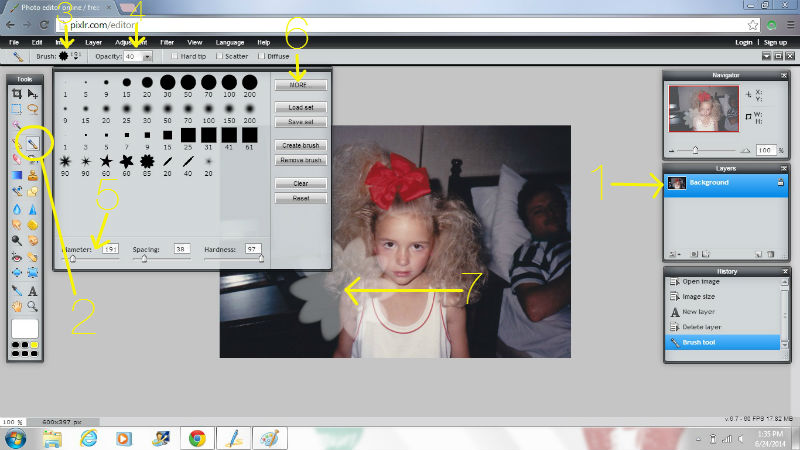
The other way to add a shaped watermark and the way that gives you lots more shapes to choose from is by using the brush tool.  Do this by 1) again making sure your background layer is selected and then 2) choosing the brush tool from your ‘Tools’ box.  When you click the brush tool icon, a menu will come up at the top of your Pixlr screen allowing you to 3) choose a brush shape and 4) choose its opacity level.  Once you’ve chosen a shape, you can change it’s size by 5) adjusting it’s diameter.  Also, you can upload a lot more shapes by 6) clicking the MORE button in the shapes box.  Last, 7) click the spot on your picture you’d like your watermark shape to be and you’re done.  Add text if you want.


Whew!  That’s it!  Super-detailed and maybe too detailed but in my opinion, when it comes to tutorials more is more, am I right?  :)  Let me know if you have any questions or if I need to explain something better!  Oh, and one more thing, if you’re a blogger and you use Windows Live Writer to write your posts, there’s a super-simple text watermarking feature included in the photo-formatting menu that takes all the work out of it. 


Happy watermarking!  :)

Violated

Hey all.  So…this happened:
10411312_761517197720_6435378793255068156_n

You might’ve seen it on the blog’s Facebook page or Instagram.  I have no clue who that person is and I highly doubt he/she is the Dezeree Corvello he/she is claiming to be.  I do know that they have been using pictures they’ve stolen off of our blog and some from Instagram to create a life that is not theirs for the past two years!!  Please, if you’re on Facebook, go and report this madness!  You can do so by going to this persons page (just search the name) and clicking the … button next to the message button, then reporting them for claiming to be someone you know - me.

I found out about this imposter Saturday and it really put a huge damper on my whole day.  I questioned blogging, sharing, and even being on social media at all!  I’m sure if you’re a mother or even human you can understand!  To see pictures of my family on someone else’s page as someone else’s kids and read their comments made me sick to my stomach and so angry at the same time.  I really love blogging but to have someone take the fun out of it really stinks. 

I’ve been questioning over the past two days whether to continue sharing my life with the virtual world, whether I just need to seclude my kids and myself from social media altogether, or whether I should just report them to whomever I can and take a break until the whole thing blows over.  What would you do?  Especially you bloggers out there who willingly share your kids on your virtual home.  What do you think?

Then there’s the issue of Facebook friends.  This ‘Dezeree’ actually had friends on Facebook!  How do you friend someone you don’t know?!  I’ve always had a fairly high standard when it comes to accepting friends – if I don’t feel comfortable dialing their number for a chat, they’re not on my Facebook list.  I see people with 1000, 2000, 3000+ friends and, seriously?  You know all those people?  Maybe I’m just not at the most popular end of society but for real people, guard your friend lists.  Know who your friends are, each and every single one, especially if you share a lot of your life on the book.

Anyway, end of rant.  Please go report this person if you’re on Facebook and go through your friends lists.  And then say a prayer for this ‘Dezeree’ person because in order to want to create a fake life, you must not have a great one of your own.  How sad.

Just Say ‘Yes’ to Rugs

I have a “figure it out” personality, also known as an “if you can’t afford it/it’s too expensive, make it yourself” personality.  You might’ve guessed that if you’ve been reading my blog for longer than a month.  That’s how this project came along…and pretty much every other project over here too.  I wanted a bigger rug with a cool geometric pattern in front of the door in our entry way but the budget wouldn’t give me much to work with.  So I made one and it only cost me $7.  Yep.  Only seven bucks.  Here’s the story.

IMG_4609pixed

Supplies:
*rug (mine measures 3 x 4)
*stencil
*paint (I used latex paint)
*foam pouncer/stenciling sponge or stipple brush (I used one of these <- and that there is an affiliate link fyi)
*plate for paint
*tape

photo 2 (11)

First, I made my own stencil.  I’ll detail how I did that in another post lest I stretch this one to novel status.  I started my stenciling in the center of the rug and worked my way out so that the entire design would be centered over the expanse of the rug.  To find the center, I laid two tape measures across the rug; one diagonally from one corner to the opposite and the other diagonally between the other two corners.  Where they intersected was the middle (I’m smarter than a first grader!).  I had already marked a center point on my stencil so I just laid the center of the stencil right over the center of the rug.  To make sure that my stencil was straight, I measured the distance of each end of the square pattern on the stencil to the end of the rug and when they were equi-distant, I taped down the stencil.

Next up was painting.  Before I started, I watered down the paint so that it was a tad more runny and would soak down into the rug a little better.  I didn’t add much water though, maybe one part water to eight parts paint.  Then I poured some paint on a plate and went along dabbing my sponge into some paint and then sponging along the stencil.
photo 2 (12)
As I went along I made sure to hold down the stencil with my free hand as I sponged with the other for a little added support.  The stencil I made had to be turned around/flipped over to produce a full circle/square design like so:
photo 4 (5)
All I had to do was line up the edges of the just-painted design with the stencil and continue sponging away.  Then I continued flipping the stencil until I had stenciled the entire rug.

When all the stenciling was finished, I wanted to fill in all the small lines throughout the pattern created from the stencil (their purpose was to hold the stencil together but more on that in the actual stencil-making tutorial).  It’s not necessary to fill these in but I was going for more of a cohesive look so I did.  With a flat paintbrush, I just went around and painted over the lines and filled in some imperfect spots like some of the areas where the stencils met.  So, it went from this:photo 5 (3)

to this:
photo 1 (10)
It might seem a little tedious but it only took me about 15 minutes and, if you’re like me and need a little mindless work to suck you out of the daily humdrum, it’s therapeutical.  :)

The only lines I didn’t go over and fill in were the ones at the intersection of all the circles in the pattern.  Over those I placed a simple square stencil and painted right over them. photo 4 (6)

Here’s what the whole rug looks like finished:afterlight (1)

Sooo, let me deviate a little and tell you it’s cool and I love it but it’s not exactly what I was going for.  The lines connecting the squares were actually supposed to be straight.  The aqua lines in the pic below show what I mean.rugcorrected

In order for them to be straight, I should’ve laid my stencil out the same way each time like this:shouldve

But instead I laid it out like this… did
…not realizing until I was halfway done that I was going to have a variation from what I initially wanted.  Does that make sense?  Luckily, it doesn’t look bad because there was no turning back.  I’m only writing this out in case you try this very stencil.  Lay your stencil out the same way each time (width-wise every time or length-wise every time) unless you’d prefer the accidental variation which is perfectly fine too.  :)

The last thing I did to the rug was add a non-slip drawer liner to the back.  The girls run past the entry way area a thousand times a day and the plastic backing of this rug made it slide all over the place.  Running toddlers and a slip ‘n slide rug make for surefire accidents.  So, I simply cut a couple of rolls of liner up so that I c0uld fit three strips along the back of the rug and attached them with some liquid nails like so:
photo 5 (4)

I let the glue dry for 24 hours before setting the rug down and away we/they went.  It ain’t going nowhere and trips to the ER for brick floor collisions we will hopefully never have…or at least they won’t be caused by a sliding rug.
IMG_4606

IMG_4609
[Sources and/or tutorials for –> the globe chandelier, the hook system, the roman shade, and the mirror.]

Cost breakdown:
Rug:  $5 (Old Time Pottery on sale from $7)
Paint:  free (Lowe’s with a free paint sample coupon from Real Simple mag – color is
Cathedral Stone by Valspar)
Foam Pouncer:  already had (Martha Stewart from Michaels – came in a pack of seven and purchased last year with a coupon for this project)
Rubber drawer liner for backing:  $2 (Dollar Store)
Tape:  already had
Total:  $7

[BTdubs…if making your own stencil doesn’t sound fun, you can find some fairly cheap wall stencils at Hobby Lobby that’ll run you back about $10 with a coupon or there’s always Royal Design Studio where you can find tons of amazing stencils with a little higher price tag.  Also, Target has some flatwoven kitchen rugs that just happen to be blank on the opposite side and perfect for stenciling/painting (not listed online).  My original plan was to sew a few of them together for an entry rug but then I scored the one I used at OTP.]

Here’s the view from the hallway:
IMG_4615
[Frame collage tutorial here.]

And a good ‘ole before and after/progress:
entry

Don’t forget, like I mentioned above, I’ve got a whole tutorial coming on how to make your very own stencil (mine cost me about $1 to make!!!) and I’ll include a free download if you want to attempt this one.  :D 

Have a great week!