*Before I start, I really want to thank all of you who responded
to our plea via the blog, Facebook, and Instagram and reported the Faux
Facebooker last weekend! The page is no longer functioning!! It really means a
lot to us that so many people were willing to fight with us and petition
Facebook to get this crazy removed! You guys are seriously the best!*
With that said, after the
crazy recent
events, I’ve gotten a couple of requests for a tutorial on how to watermark
your photos. In case you’re not familiar with the term, a watermark is a light,
sometimes almost transparent image or text on your photo that identifies it with
you and makes it difficult for other people to steal it and use it as their own
(natural Webster over here). I watermark my pictures by placing either a
semi-transparent box with text or just semi-transparent text over each
individual picture. Doing each picture can be a little time consuming and I’m
sure there’s probably another, quicker way to get the job done involving making
a transparent image of a watermark and simply cutting and pasting or layering it
over any picture you want marked but this here lady ain’t that savvy quite yet.
So, here’s how I do:
(Psst: For some dumb reason, Windows Live Writer would not publish my post and so I had to settle on posting via Blogger (which is such a pain!) so my pictures are a little smaller than I intended which might make the text in them harder to see. So sorry!)
Using pixlr.com, a free
online photo-editing tool, I first open up Pixlr Editor.
Then I click “Open Image from computer”, and select
whichever picture it is I want to watermark. You can select multiple pictures
by holding down the ‘Ctrl’ button on your keyboard as you click <— possibly a
“duh” comment. Sorry.
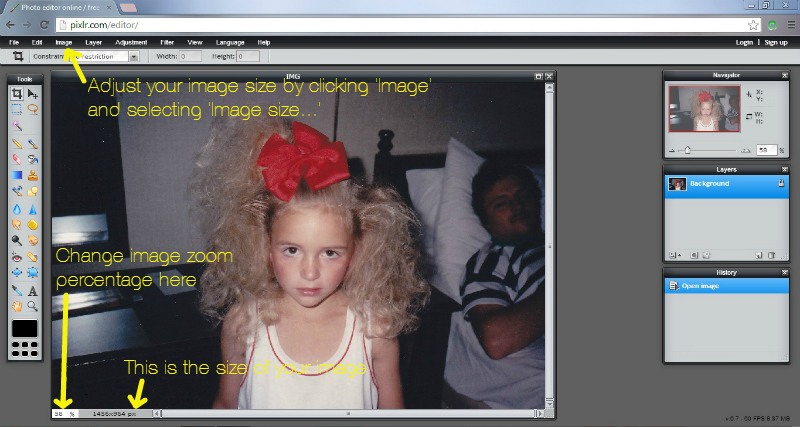
Once you have your photo up, you may want to change the
size. You do that under the ‘Image’ menu. I usually adjust the images for my
blog to be 600 px at the longest side. You may also want to adjust the
percentage of zoom (technical term…no clue) of what you’re working with. Do
that by changing the number in the box at the bottom left of your photo. (I’ve
found in Pixlr that if you’re not working with your picture at 100% (aka
original size), any text you place on it might not be positioned where you put
it after the image is saved. Not sure why nor do I have a remedy. So, if
you’re working with an extra large file, it might be a pain to work with it at
100% and you might have to figure out how to get your text to stay put sans
saving. Make sense? I hope so.)

[For example’s sake, I’m working with this throwback
gem…you know you’re itchin’ to steal it, aren’t you? *wink, wink*]
So, once you’ve sized and zoomed/unzoomed, it’s watermark time.
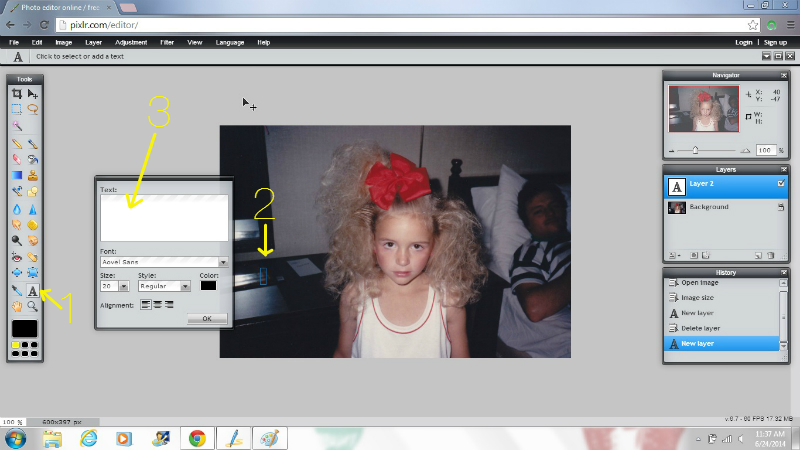
To make a simple text watermark, 1) select the ‘A’ button on the Tool bar, 2)
click whereabouts you want your text on your picture which will bring up a text
box, and 3) insert the text you want in the text box.

Next, type in whatever you want your watermark to say
and click on the color button to pick what color you want your watermark to be.
(I typically go with either white or light gray as they seem to get me the most
subtle looking watermark but you can use any color really.) As you type, your
text will come up on your picture. To move it around, simply click and drag
it. Also, if you find you want to change the size of your text, click the size
drop-down menu and either type in a preferred size or drag the slider. To
change the font, click the font drop-down menu and choose from there. Pixlr
uses fonts you have installed on your computer. (Side note:
www.dafont.com and
www.fontsquirrel.com are a couple of
great places to get some free fonts.)

Once you’ve got your text set, go over to your ‘Layers’ menu and
click on your text layer (if it’s not already selected). Once it’s selected,
click the little button on the bottom right of the layers box. That’s where you
can mess with the settings of that layer, including the opacity of your text,
which is where we’re going next.
When you’ve clicked on the bottom-right button, the layer
settings will come up. All you’ll want to do here is adjust the opacity of your
watermark so that it’s sort of see-through, making it subtle. Drag the slider
or type a number in the box to get the opacity you’re going for.
You’ll be able to see the opacity adjust as you
type/drag so you can experiment with higher/lower numbers until you’re
satisfied. The lower the number, the less opaque your mark will be and
vice-versa. Also, the lower the number the more subtle your watermark will be.
Am I being too obvious? Probably. ;)
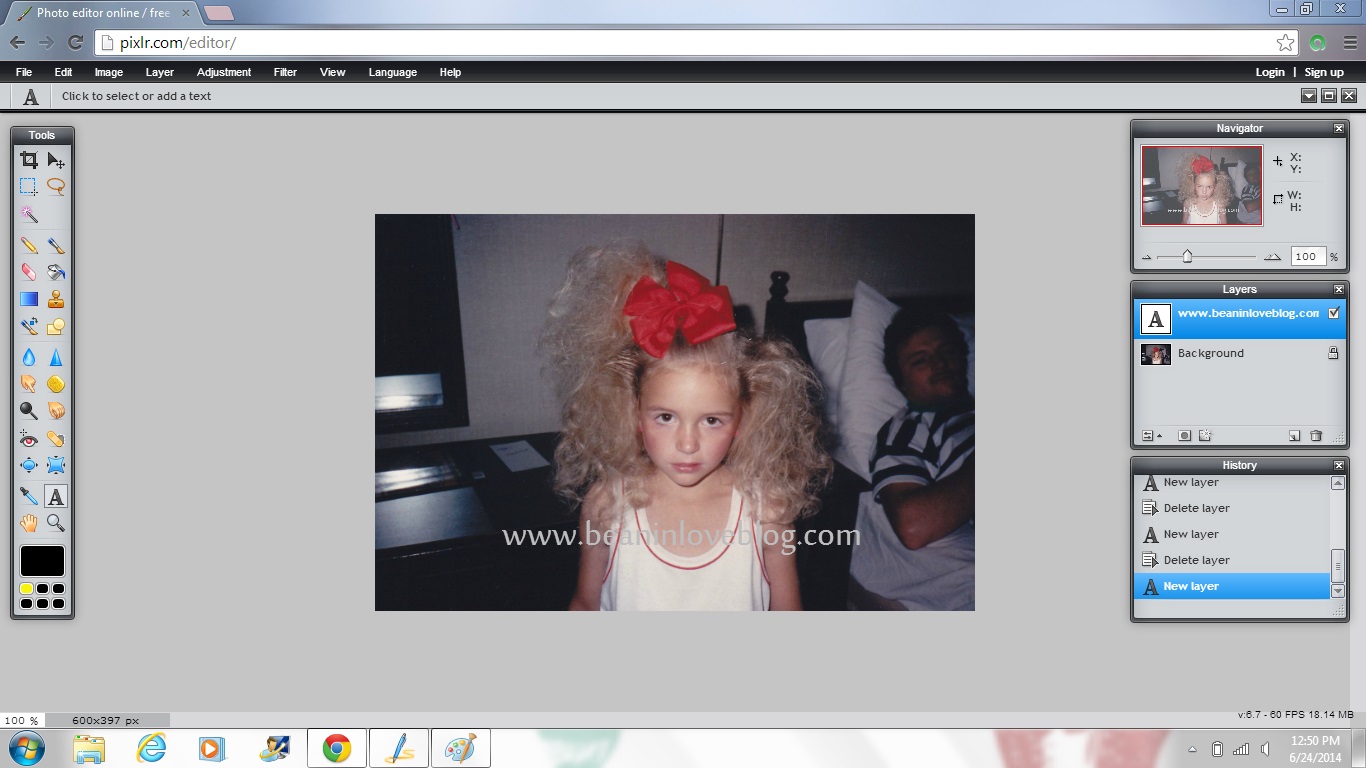
And that’s how you get a text watermark on a picture. Bada
bing, bada watermark.
Then we can get all fancy-shmancy with text plus a box or
shaped watermark like this one:
There are a couple of ways to add a shape to your watermark.
One is by 1) making sure the ‘background’ layer is selected, 2) clicking the
drawing tool button on the ‘Tools’ menu at which point the drawing tool menu
will pop up at the top of your Pixlr screen. There you can 3) choose which
shape you’d like to create, 4) adjust the opacity, 5) adjust the size of your
shape’s border (‘0’ if you don’t want a border), 6) make sure this box is
clicked so that your shape is filled in with 7) whatever color you want. Once
you’ve done all that, simply 9) click where you want your shape to be and drag
to determine it’s size. (Totally skipped using #8! I blame it on the kids…who were napping when I wrote this…sooooo…)
If you don’t like it, you can always undo it and
tweak your settings to try again. Once you’re satisfied with your shape, you
can add text by following the instructions above on adding a text watermark.
The other way to add a shaped watermark and the way that gives
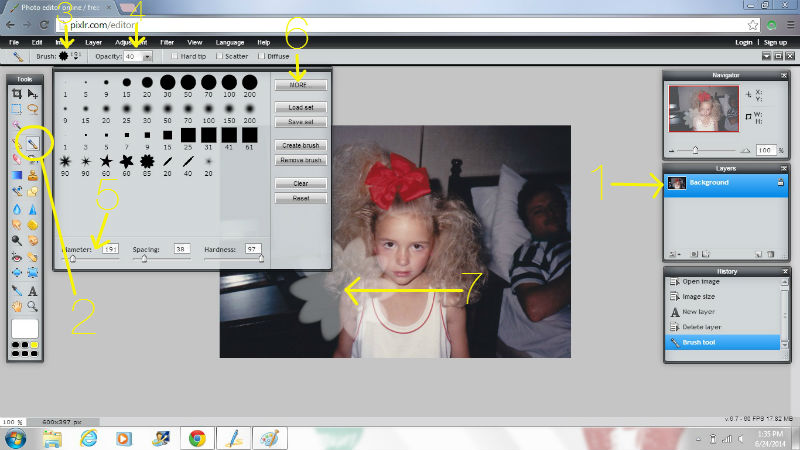
you lots more shapes to choose from is by using the brush tool. Do this by 1)
again making sure your background layer is selected and then 2) choosing the
brush tool from your ‘Tools’ box. When you click the brush tool icon, a menu
will come up at the top of your Pixlr screen allowing you to 3) choose a brush
shape and 4) choose its opacity level. Once you’ve chosen a shape, you can
change it’s size by 5) adjusting it’s diameter. Also, you can upload a lot more
shapes by 6) clicking the MORE button in the shapes box. Last, 7) click the
spot on your picture you’d like your watermark shape to be and you’re done. Add
text if you want.

Whew! That’s it! Super-detailed and maybe too detailed but in
my opinion, when it comes to tutorials more is more, am I right? :) Let me
know if you have any questions or if I need to explain something better! Oh,
and one more thing, if you’re a blogger and you use Windows Live Writer to write your posts, there’s a super-simple text watermarking feature
included in the photo-formatting menu that takes all the work out of it.
Happy watermarking! :)


