Showing posts with label Our Kitchen. Show all posts

$33 Marble Backsplash | DIY

Alright, alright, maybe that title deserves the eyebrow raises I'm sure it'll get and maybe I should've put quotation marks around "marble" because it's probably pretty obvious that you can't get a marble backsplash these days for $33 buckarooskees but it'll sure look like you can if you pick up what I'm throwing down here in this post.

This was a still of our kitchen a few months ago:


When we first bought the house, the backsplash was wallpapered with the same stuff that continued throughout the entire kitchen and breakfast nook area (see a before and so far house tour here).  We ripped that off and primed the wall for what would eventually go up, which leads me to that same spot last week:


More Painted Kitchen Cabinets...That Didn't Turn Out

 In case you were wondering, it takes about 193 steps to get from here:


to here:


Open for a Surprise

 Opening up a cabinet to grab a can of diced tomatoes is the most exciting thing ever, isn't it?

.

.

.

.

I know.  Feel free to laugh or wonder what the heck is in my water.

It's one of the things you can chalk up to monotony.  Well, for me, it still is monotonous, but it at least brings little tiny spark of happy with it because...

I wallpapered the backs of our cabinets!


Our Painted [Upper] Kitchen Cabinets

I've painted a thousand cabinets, ok, maybe not thousands...let's see - four kitchens now, four bathrooms, and more dressers and pieces of furniture than I can count - and each time, I've done things a little differently.  Each time, I learn a more efficient way, or a better way to get a smooth finish, or I use a new paint.  So I can't say that I have an ironclad, tried-and-true method to painting cabinets but I can say that I've had great success in the arena.  The same story follows the most recent endeavor of painting our current upper cabinets in the kitchen.

First, I removed all of the doors and the contents of the cabinets.


I wanted to replace the old cabinet pulls with new knobs so the next thing we had to do was fill in the old hardware holes and drill new holes.

DIY Concrete Countertops - Finishing

Alright, where did we leave off on the concrete countertops?  Oh yeah, the SINK!  I can feel that ugh feeling coming right on back...

(Pssst...click here to read about the Part I of our new countertops.)

In our first post about the prepping and pouring, I wrote about how much of a pain it was to install the sink form.  We hoped the pain would end once the concrete was poured but when we removed the form, we had all these big voids.

The frustration was real but we had to move on and start with the process of finishing the counters before we figured out how to make the sink look better.  So, let's talk about the finishing and come back to the sink.

With the concrete completely dry (about five days after pouring), it was time to grind them down so the tops were smooth.  Even with screeding and then floating the concrete after it was poured, the counters still felt rough to the touch, slightly more smooth than something like our sidewalk but definitely not smooth enough for a kitchen sponge to glide over.

DIY Concrete Countertops - Prep & Pour

Last year, I wrote a post all about our kitchen plans and in that post I mentioned concrete countertops were on the docket.  Well, here we are, many moons later excitedly crossing that off our list.  And boy, are we glad we can.  What. A. Process. it's been.

The kitchen isn't finished yet - we still have more painting and floors to tackle - but it's gotten to the point where it's skipped right on over the dated to modern line and our new countertops have a huge part to play in that.  


Here's where we started three long years ago:

I painted the cabinets a few months ago and I know that really helps up the ante too.  A post on those will come but today, I'm going to share the beginnings of how we prepped the kitchen for those new counters and poured them in place.  I was going to write a whole big post on the prep, the pour, and the finishing but just adding photos was a bajillion pages so we'll split it up so you can chew it all without choking. 

An Overdue Kitchen Update

 Oh how far we've come...in the kitchen.

I've been wanting to share our kitchen progress for awhile but when I think to do it, another voice says "just wait until you get a little more done and then post an update".  Well, we're slow (but sure!) and so if I wait and wait, you'll never get to see it.  

We are most definitely not done but we've jumped and skipped, more like leaped and bounded, our way to modern-day kitchen in the past three years (almost three years on the dot, can you believe it?!)

I give you...progress:


(More) Kitchen Plans

Putting this post together makes me SO excited to get this kitchen started...errr, finished!  We're zooming in on it next!  It won't be a super quick slide into the finish line since we're doing everything ourselves but we're hoping we can get it all in by summer's end, hopefully sooner.  I went into a little bit of detail about how we planned to open it up in the past but that's done and now it's onto the finer details of cabinet colors, counter tops, and a new backsplash.  Here's a peak of what we've nailed down so far:


Living Room & Kitchen Update

Last week, instead of typing on the old keypad here, we were spending our free moments knocking out some major (well, sorta major) progress in the living room, kitchen, and breakfast nook area - it's all one big room now thanks to a wall getting taken out.  

We still have yet to actually paint but we did spend a few nights after the kids went to bed priming.  The ceilings had to be primed along with the trim and the walls...it was quite a feat.  Not only did they need to be primed, but we had to use oil-based primer (the worst!) to knock out that smoker smell once and for all and because the wood paneling required it.  I'll write a whole post on why and how to paint wood paneling when we are all done and that will have all the details and explanations.  Until then, hows about a little update?

Warning, I did not clean up my house for you.  I just snapped these in-progress shots real quick like when the sun was shining.  I know you don't mind.  ;)

Starting at the beginning (for the biggest shock factor, of course), here's what the room looked like right after we closed: 
I know that, if you've been reading for awhile, you've probably seen this before a million times so I apologize, but nevertheless, a quick recap is always fun, no?

Now, things are a heck of a lot whiter and a heck of a lot brighter:

Kitchen & Living Room Progress


While we've been trying to focus all of our free-time and efforts outside, we have spent a few moments here and there trying to chip away at the kitchen.  It doesn't look like much since I last wrote about it, but we've actually made some good progress in here.

This is where we left off on the last progress report:

If you remember, we took out that wall and had a structural beam put into the ceiling (something we hired out) and then we put up new drywall and started mudding the joints.  After hours spent mudding ourselves, we realized that we just weren't that good at the whole process and it was taking us way longer than it would take a professional, so we decided to pay someone to finish that up.  Plus, we had an area between one of the beams in the den that was hastily repaired (we think there was water damage from the a/c unit in the attic that had to be fixed some time ago) and then covered with popcorn ceiling texture, which hid it's horrendous defects.  We had our guy mud the new joints and also do a skim coat over that repaired area.  It took him about five hours within the span of two days...something that definitely would have taken us hours over the span of weeks.  It was well worth spending the cash.

Anyway, enough talk about drywall mud, here's what the kitchen looks like today:

A Kitchen Progression

A few people have either come up to me in person or messaged me in the past few weeks and asked me if I'm still blogging and I have no clue why!!!  HA!

Yes, folks.  Not only have you few made me feel like a million bucks with your gracious cares but also, don't worry.  Typing just isn't a priority at the moment so I might take a few weeks off here and there (particularly around this wonderful Christmas season), but this blog will never die.  It is my virtual home away from home and you can always expect at least one post a year.  ;)  While we're on the subject, let's just squeeze one right in before the year ends...

The kitchen!

Those two words have so much of a punch behind them.  A punch of excitement for how far our kitchen has come plus that glorious vision of where it's going (see the original plan here) and a whole 'nother punch for how slowwwwwwly it's going.  And I know that kitchen remodels aren't typically the hare in the race but I guess I have high (now squandered) expectations after the quick,  jaw-dropping makeover in our last house and after watching a couple of awesome bloggers makeover their kitchen in two weeks...I won't name any names.  #coughcljcough  So, needless to say, there have been a lot of good opportunities for patience and prudence heaped on top of perseverance and persistence over here.

But this, this post will make me feel good about where we are right now, I just know it.  It's easy to feel like you're semi-stalled with halfway mudded ceiling joints and a plywood counter top but when you bring it all the way back to the start... 


darn, we've made some good progress.

Let's see it.

DIY Spice Rack

Let’s spice things up around here, huh?  Literally.  We’re diving into spice rack details today.  I keep calling our new spice rack a ‘rack’ but really, I should be calling them spice shelves.

My entire, home-owning existence, I’ve always stored our spices in an upper cabinet right next to the stove.  It was habit and because, usually, I was at the stove when I needed them so it just made sense.  In this little rental though, we only have one, quite narrow upper cabinet next to the stove and it’s stocked full of other things that I usually keep near the stove – large salt and pepper refill containers, corn starch, cocoa powder…basically all of our cooking and baking dry ingredients.  There’s zero room for spices.  So into a basket on top of the microwave on the opposite wall they went.  Not ideal.  Therefore, putting up this pair of spice shelves was gloriously satisfying.  For one, I can see all of our spices without having to move any around and two, they’re within arms reach when I need them.   

Another really great thing about these spice shelves is that you only need a handful of easily attainable and easy to use supplies to build them.  I still haven’t mastered using any of our big power tools so Anthony is always holding those reigns during any of our building projects, but this one I did all by myself.  It’s that easy.  Here’s what I used:

diy spice shelves

DIY Pendant Light from A Vase

Alrighty.  There are only two more things to write about in our “new” kitchen and then I’m done talking about it.  Promise!  I’m ready to move on to the next room too!  Today though?  Lighting.  Specifically, the ceiling fan and the new pendant over the sink.

Here’s a shot of the kitchen sink area with the header still up, hiding the simple, little light fixture behind:IMG_7312
Once we took that header down, even though I didn’t really mind the existing light, it wasn’t substantial enough to fill in that space.IMG_7348


So, we bought this pendant light kit* in antique brass and used a thrifted vase to make a new pendant.

How to “HIDE” A Dishwasher

This is a post all about a white elephant.  Not the Christmas party kind and not the circus kind.  It’s the kind in a room.  A kitchen actually.  And did I mention it wasn’t an elephant at all but a dishwasher?!  No?  Let me tell you all about it.

Our landlord so kindly installed a new dishwasher in this little house for us before we moved because we are first-world, spoiled peeps who can’t not have a machine that does the dirty work for us while we wrangle four kids post-dinner.  *eyeroll*

So awesome, right?  Right.  So, now we’ve got one and we’re SO thankful because, as you probably know, it really does make life just a little easier.  Well, I got a few comments on how great the dishwasher looks painted after the big kitchen reveal and those words were music to my ears because that’s what I wanted everyone to think.  But, listen.  I am not inconsiderate enough to think I should go and paint a dishwasher that isn’t technically mine.  But I really hated how it stuck out of our pretty green cabinets like a rowdy toddler at Mass.
  IMG_8042I sent the above picture to my sister right after I finished “tiling”.


The Big (Little) Kitchen Reveal!!!

Well, this has been FUN, hasn’t it?  Taking our little rental kitchen from what it was to what it is really had me going…for six whole weeks.  I’ve never gotten an entire room finished in six weeks!  It’s kind of a big deal.  And you know what else is kind of a big deal?

OUR KITCHEN!

IMG_8930pix


Subway Tile Wallpaper


ORC
It’s week FOUR of the One Room Challenge and that means that I’ve been working solely on this kitchen for five whole weeks.  Maybe that doesn’t sound crazy to you but I’m a jumper – I jump from room to room with projects and never spend more than a week or two in one so this is kind of a big deal for me.  While it feels so good to have an entire room almost finished, I have to admit, I’ve been feeling a little antsy and am excited to move into other rooms.  One more week…

One more week for me and for all of the other featured designers and guest participants.  I’m really excited to see all of those final reveals!  I have a date with an ice cream bowl and a studying husband to sit and browse one night next week!  :D

This week in our kitchen, I brought the boring backplash to life.  When I say “backsplash” what I really mean was a four-inch countertop lip and a painted wall.

IMG_7897This was taken in the midst of painting upper cabinets a few weeks ago.

Here we are today:

DIY Pot Rack from Towel Bars

You say pot, I say rack…

pot…

pot…

YES!  That’s it!  Let’s get excited over here!  We are the proud owners of a neeeewwww pot rack!

IMG_7471
Having a pot rack hanging on our kitchen wall wasn’t something either of us has ever desired.  But then enter small kitchen, very little lower cabinet space and oh, looky here, a big empty wall.emptywall

One Room Challenge–Week 3

Hey hey!  It’s week T H R E E of theORC
and over here, things are looking UP!!  No really, they are.  I got all of the upper cabinets painted this week and, oh my, it is CRAZY how much more light bounces through what I already thought was a fairly bright kitchen!

Check this out:IMG_7417


And then take a look at the same area pre-move:IMG_6824
The Almighty said it best with “Let there be light!”  Have you ever gone white in the kitchen (or any room really) and experienced the added light?  It’s great, right? 

I’ve written a few posts on how I paint cabinets in the past and time around the paint can wasn’t much different in the way of technique but I did use a new-to-us paint than I have in the past and got a little smarter as far as set-up goes.


One Room Challenge!!!


ORC


You’ll never know how excited I was when I found out that the One Room Challenge just started on April 4th!  If you don’t know what that is, check it out here.  Basically, you take on a room (entirely redo, refresh, remodel, whatever have ya) and you get six weeks to do it.  I’ve always seen it come up on Instagram and other blogs but I’ve been always the spectator and never the participant.  Not this year though!  I’ll be linking up and following along with other guest participants here

I’ve got until May 10th to take our kitchen from old to gold-winning and ironically, I started ripping down the wallpaper in our kitchen a week before I found out the challenge was happening so I’m right on time.  But *gulp* I’ll need every single one of those six weeks since I’m on a serious budget and I don’t have the luxury to just go out and buy what I need.  I’ve got to find it secondhand, on clearance, or on mega-sale…you know how I do.  Oh yeah, and I have four little kids running around. 

You might be wondering why I’m tackling a kitchen in a rental house.  Why waste time, energy, and money on something you’ll be leaving in a year or two?  Valid question.  Answer?  Because I love doing this stuff.  As a stay-at-home mom, daily life can get a little monotonous.  It’s a beautiful life and I’d have none other, but getting out my paint brush and planning decor is the equivalent to going out and getting my hair or nails done for me.  It’s self-care – getting to expand my diaper-changing and feeding horizons to project beauty onto the space that I’m changing diapers and feeding in.  I think it’s important to love the space you’re living in too so spending a little bit of money to make that happen here is well worth it, in my opinion. 

With that, here are the plans for the kitchen:
-take down the wallpaper
-paint the walls
-paint the cabinets and replace the hardware
-make a pendant to replace the light over the sink
-redo the fan shade
-repaint the rug (maybe?)
-hang a pot rack
-hang a spice rack over the stove
-install some sort of backsplash

The budget:  $150
Total spent so far:  $18

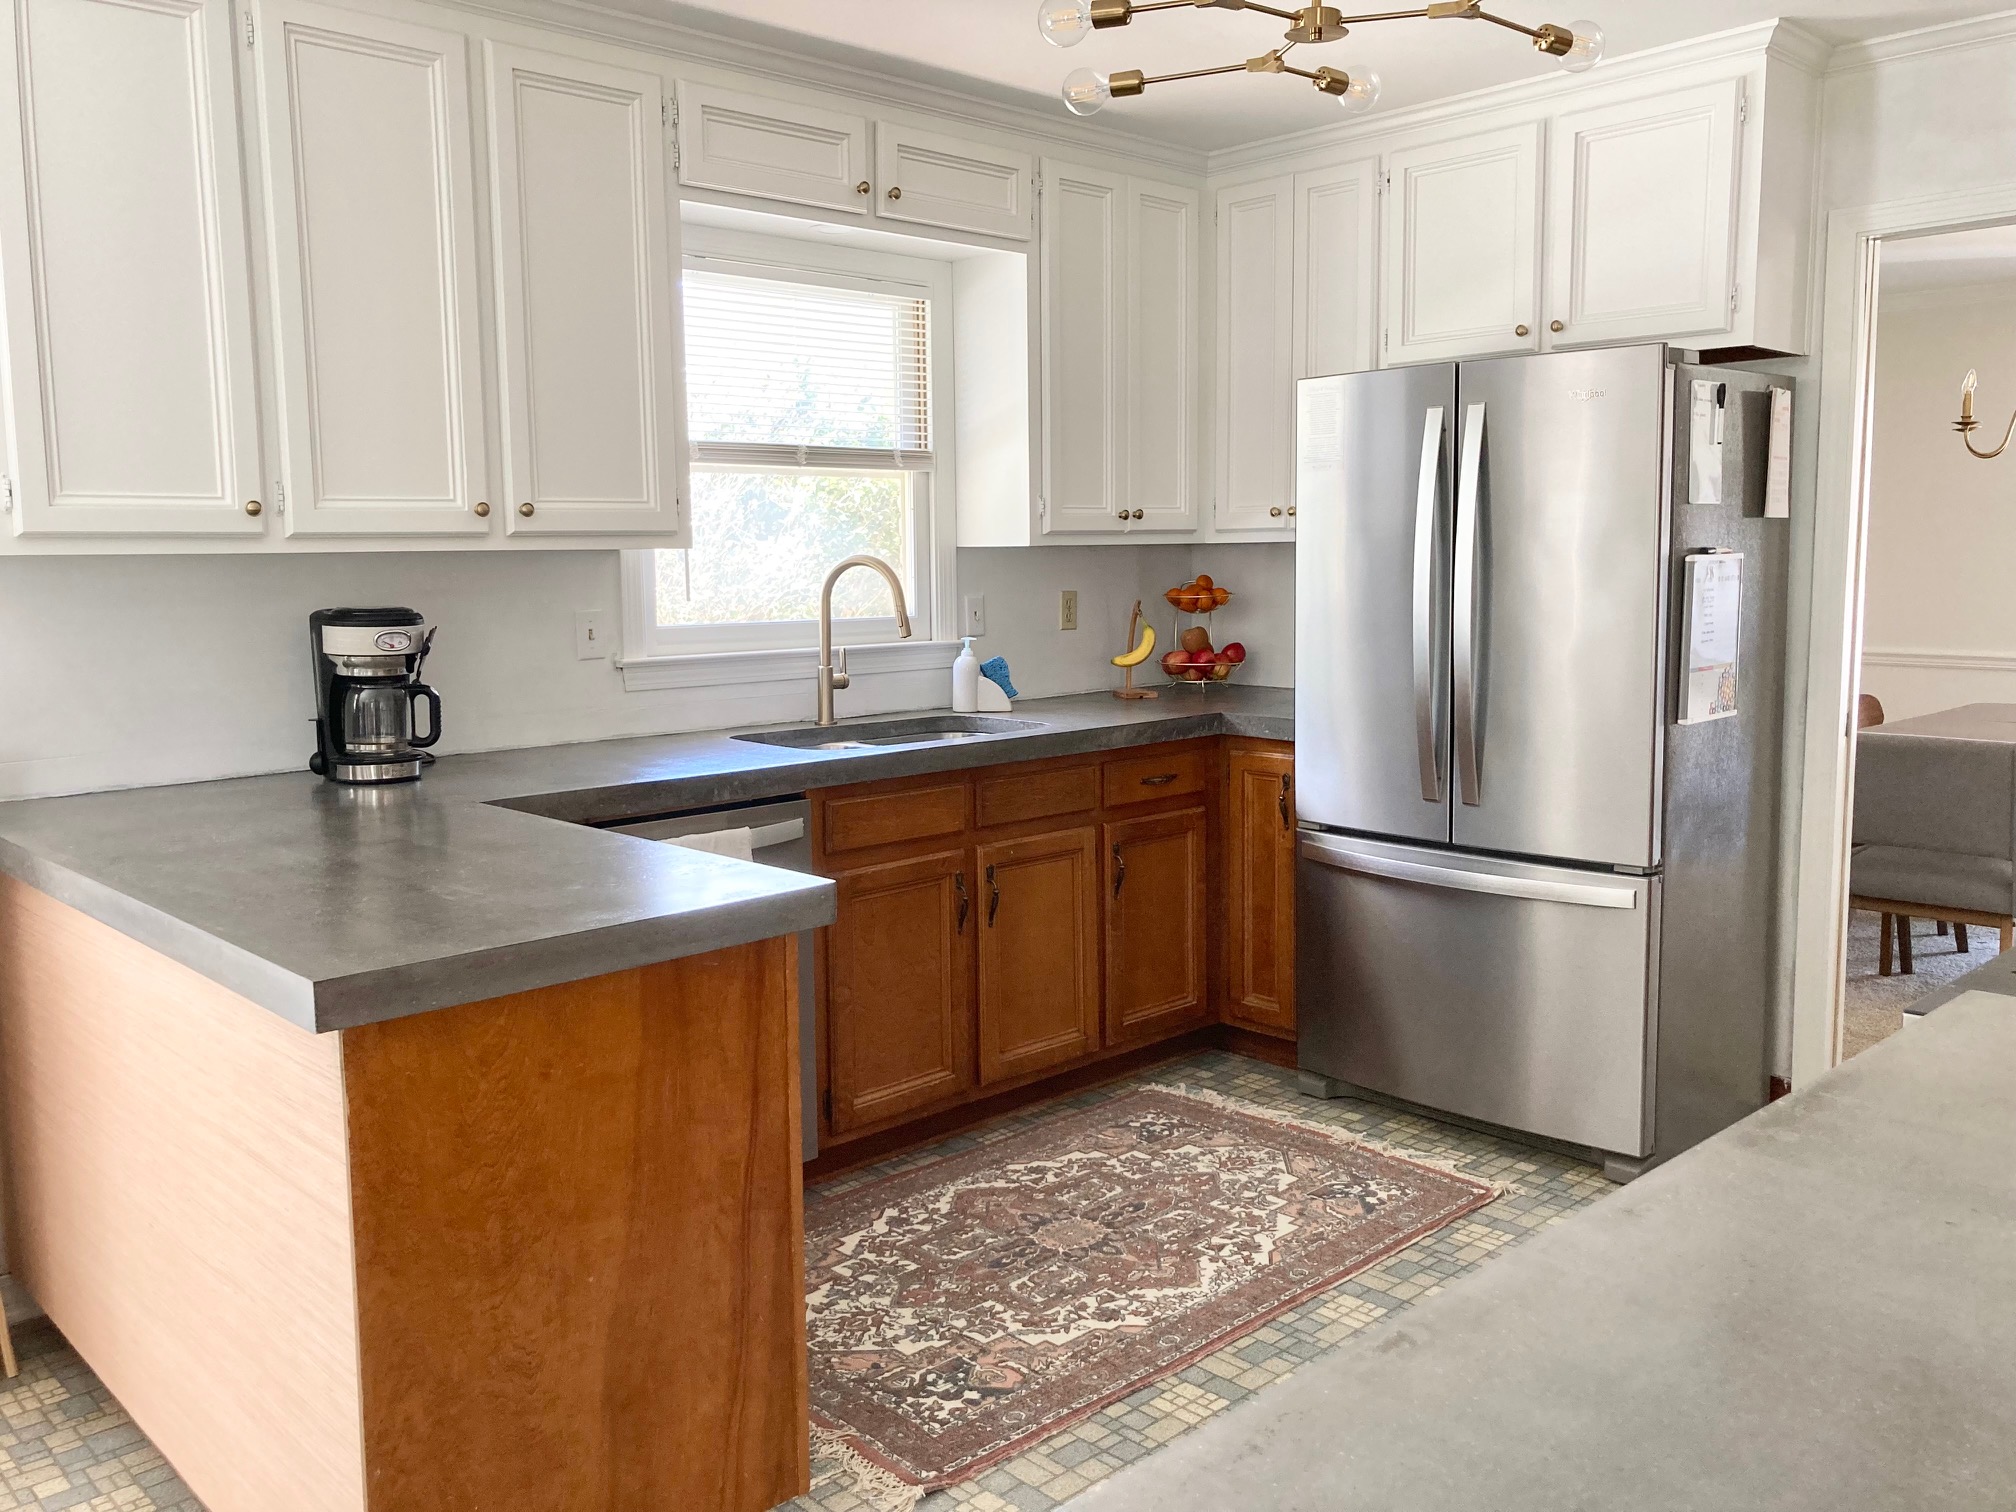
Here’s the a picture of the kitchen I ran in and took one day before we moved in: IMG_6823 Too bad I didn’t think to actually step farther into the kitchen to get a picture.


Hardware Swap

Sometimes I get this wild hair to do something and I have to do it rightthisminute.  Those wild hairs have really been rare since having kids but last week told a different story.  After seeing John and Sherry’s amazing kitchen renovation, we needed new hardware on our kitchen cabinets….okay, wanted…wanted knew hardware.  I loved how they placed knobs on their upper cabinets and coordinating handles on their lower and our kitchen was begging for it.

So, last week I plucked that wild hair and replaced all of our hardware with new, more modern handles on the bottom cabinets and coordinating knobs on the top.

IMG_8424
Our old pulls weren’t bad and truth be told, they were actually pretty nice as seen in these old pictures:
sept122012048_thumb1
jan202012 003
But, they were definitely a little more traditional than the new bar pulls I bought and I thought adding modern pulls would make our refurbished kitchen look a little more modern; not like the old kitchen it is that we set new appliances in and painted cabinets to make it look new.

Old on the left; new on the right:
IMG_1699

IMG_8428
Replacing the lower cabinet hardware was easy peasy.  All I had to do was remove the old and install the new in the same holes.  The uppers were a different story.  I had to remove the old pulls, fill in the holes they left behind, drill new knob holes, and then screw in the new knobs.  On top of all that though, I figured it was high time I touched up the paint on our cabinets.  After almost five years, there were a few places where the paint was chipped just from normal, everyday use.  It was a simple fix though.  I just washed down all of the cabinets (something that also needed to be done) and used a small artists’ paint brush and leftover paint to paint right over those small chips. 

IMG_8427
IMG_8431
Once everything was painted, I got to work filling and drilling for the knobs.  To fill the holes in, I used Bondo (purchased on Amazon because it was cheaper there than at Lowe’s) after seeing Chelsea use it to repair her dining chairs.  The stuff is great and perfect if you’re like me and want immediate results.  It dries super quick!  I filled the holes, sanded them down, and had them covered in paint in under a half hour.  The one thing I didn’t do though was pay attention to detail.  I replaced all of the hardware in sections over four days time and everytime I had a chance to get to work, it was a small chunk of time while the kids were playing or Gianna was taking a cat nap.  So, I rushed and I shouldn’t have because there are places where I didn’t spend enough time sanding the Bondo so that it was completely flush with the door and other places where I should’ve went back and added more, like on this door:
IMG_8436Can you see those two small indentations right where the old pulls were installed?  *sigh*  Lesson learned:  Don’t rush through a project.  I’ll probably go back over and sand or re-fill the next time our cabinets need a touch-up and thanfully, the imperfections aren’t all that noticeable but the fact remains, they are there and I shouldn’t have rushed.  My OCD self will suffer everytime she sees them…

Anyway, lets get to the best part of this little project.  It will end up costing me a few bucks or even be FREE!  How?  Well, because we’re going to sell the old hardware for what we paid for the new – just under $25 for 23 pieces.  The old hardware is still sold at our local Lowe’s for $3 a pop and we bought the new at a fantastic price from the same place I bought the hardware for the kids’ play kitcheneBay!  The knobs cost us 99 cents a piece and the pulls were $1.39 a piece – a fraction of what you’ll find them at in your local hardware store.  And, we can attest to their quality.  They’re heavy, brushed metal pieces of hardware that I’m sure will last just as long as the ones in-store. 
     IMG_8438
IMG_8439

If you have a hankering to replace hardware (or if you didn’t before, maybe you do now!), we highly recommend these! 

IMG_8422
Maybe it’s just me enjoying the change, but it kind of amazing how much of a difference hardware can make in a space.  We have original-to-the-house, ugly pulls on our master bath cabinets and I can’t wait to swap those out for these too.  Of course there’s a whole laundry list of updates we want to do in there eventually so you’ll have to stay tuned for those.  ;)

On another note relating to bathroom hardware, do you think it should match what’s in your kitchen?  I’ve seen lots of HGTV remodels where they install the same throughout the house.  Or is it better that it just coordinates?  Or maybe it doesn’t really matter at all and they can all be different and as long as they go with the rest of the decor in that particular room.  What say you fine readers?  I’m kind of asking because we were thinking of grabbing matching pulls for our bathroom, but in brass since a lot of the fixtures might be heading down the brass route.  Should we stick with the same or go different?  Of course this will all be happening months from now but it’s never too early to get a head start with plans, right?  :)

TGIF!

.           .           .

P.S.  I’m sorry this isn’t more of a tutorial!  We’ve been slowly tackling a lot of boring things around here like hemming Anthony’s pants, fixing broken toys and books, and doing an entire house purge so I didn’t have a lot of time to document this whole process while it was happening.  Let me know if you have any questions and I’ll be sure to answer them!

*affiliate links included in post*