Showing posts sorted by date for query paint cabinets. Sort by relevance Show all posts

Our Kitchen - Before & After

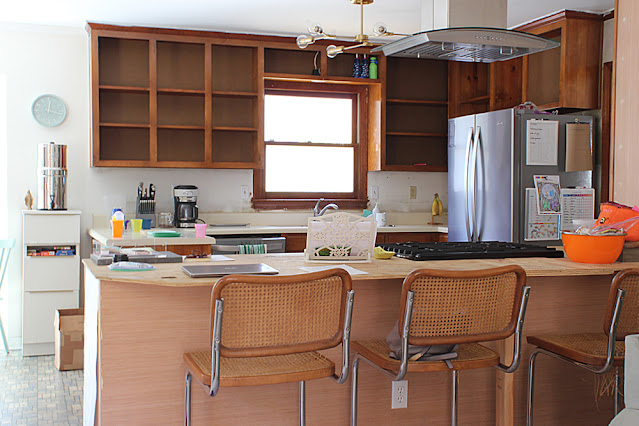
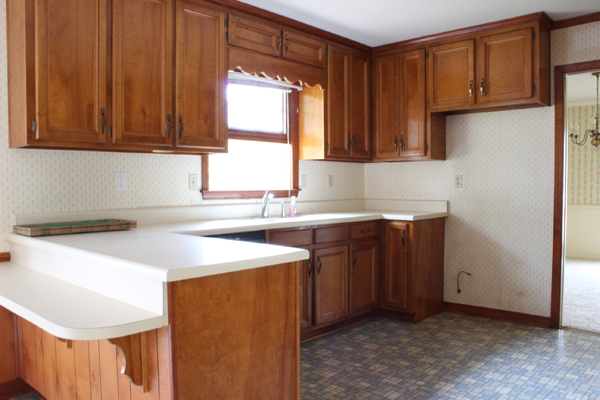
I almost called this a "Reveal" but we're waiting to get some cabinet doors made to fit over where the old wall oven used to go and there a couple of other tweaks that we want to happen so revealing our finished kitchen I am not, but I am here to show you how far we've come in five years.

Spoiler alert:  Things have CHANGED.  Big time. 

This was move-in day:

And this was last week:

Storage Room Reveal!

Before we pop into the storage room to see how it all checked out, I'll just say quick that it definitely isn't one of our more glorious reveals (I think this one still takes the cake), but there is still a pretty big leap from before to after.  It's another one of those budget-friendly makeovers that we hold firm to, coming in at just under $180.  It really helped that the large cabinet was a free hand-me-down, the shelves were already here, and the upper wall cabinet we moved in from the kitchen.  It was on the wall we took down.

So, let's just start from the very beginning - the day we got the keys - the blank slate.  If I told you I pulled this photo from a 1980s archive, you'd have no reason to doubt me.


We moved in in 2019 and this is what this functioning corner looked like for many moons:

Hardware + A Fun Cabinet Upgrade

There's lots of new hardware in the storage room (still thinking I need to come up with a much more charming name...ideas?).  Some, like these double hooks*, have been hanging out for awhile, waiting for a fresh coat of paint on the wall to make them shine.

Adding Faux Legs to Cabinets | DIY

Sounds exciting, right?  Well, maybe not but over here, I get excited about adding legs where there aren't any.  Dressers, nightstands, and now cabinets.  It just seems to take things up a notch...get it, get it?  Up a notch?  ;)

Last year around this time I found three of these cabinets* at Dirt Cheap for 15 bucks a pop.  They're technically "upper" cabinets but with a little reinforcement, I figured I could use them as base cabinets since they were the perfect size for the kids' little drop zone in our storage room.  They were priced as such because each has damaged backing, nothing major and who will notice that damage anyway?

Not a single human being.  For $45, I'm banking on it.

My then-pregnant self got them from the car to the house with some very careful dragging on a blanket and set them up so I could see what we were dealing with. 


It was a start...one that stayed put for a whole year.  #storyofmylife

Hey There 2024

Are you like me, wondering where 2023 went?!  It seem like we were just stepping off the 2022 Christmas season and experiencing some spring weather when all of a sudden, boom, Happy 2024!  Or maybe it was the longest year ever for you and you're just happy to have made it.  Either way, 2023 is out and 2024 is the new in.

2023 wasn't a great year for the blog.  Our biggest project was birthed (quite literally) in February and it seems we took the rest of the year to recover and savor.  While we did tackle a few small things around our home, only one made it into writing.  We're ok with it though because it lets us start the new year with a healthy (low) standard that we can surely build on...

in between food storage clean up, of course. 

rug* (<---These types of Loloi rugs are my favorites for bathrooms and kitchens.)

We have a few "we can definitely get this done" projects on our docket this year.

The Case for Matching Hinges to Cabinet Color

I've become very passionate about something.  It started out as something I tried in our first house down south years ago and since then, I've done it a few more times and I now won't ever deviate from not doing it.  It's maybe a small matter in the grand scheme of painting cabinets but I feel like it's not so small in the impact it makes.  

Hinges.  Specifically, like it gives away in this post's title, matching the color of your hinges to the color of your cabinets.  I know that these days, most cabinets are made with hidden hinges so this is a moot point for most truly modern kitchens but if you've got old cabinets that you're hankering to paint or have already painted, take note.  You might agree with me and you might not but here's my argument...

If you're doing a little kitchen makeover (or bathroom...or anywhere there are cabinets that could use a fresh coat of paint to modernize them), it's only natural to then replace the old hardware on them with new.  New pulls and knobs go a long way in updating cabinets.  You might even go a little farther and want to replace the hinges on the cabinets to match that pretty new hardware.  Makes sense.  It's logical.  But here's where things could go two ways.  You could get new hinges that match the hardware - you know, brushed nickel hinges to go with your new brushed nickel hardware -  OR you could scrap that idea and either buy hinges that match the paint or paint them to match.  If the color you're going with is black or white, you probably won't have the hardest time finding new hinges in those generic colors, making the switch fairly simple.  But, if you're going with the latest trend of green, blue, tan, etc...you'll probably end up having to paint your hinges.  Lucky for you, you can pretty much find every color of spray paint on the planet these days so finding a match may not be that difficult.  (I'd recommend this primer* first though along with several light coats.  Opening and closing the hinges between coats also helps them not to stick in the process.)

Do I sound crazy?  Or are you smelling what I'm cooking?  Let me give you a few examples...this is the fun part.  This whole idea of mine started here in our master bathroom back in our second house (click here to get a whole tour): 


It's hard to tell at this angle but it was the best I could find.  Can you spot the hinges?  They're the same color as the cabinets.  They're definitely not invisible but they don't stand out like a sore thumb either.

More Painted Kitchen Cabinets...That Didn't Turn Out

 In case you were wondering, it takes about 193 steps to get from here:


to here:


Open for a Surprise

 Opening up a cabinet to grab a can of diced tomatoes is the most exciting thing ever, isn't it?

.

.

.

.

I know.  Feel free to laugh or wonder what the heck is in my water.

It's one of the things you can chalk up to monotony.  Well, for me, it still is monotonous, but it at least brings little tiny spark of happy with it because...

I wallpapered the backs of our cabinets!


Our Painted [Upper] Kitchen Cabinets

I've painted a thousand cabinets, ok, maybe not thousands...let's see - four kitchens now, four bathrooms, and more dressers and pieces of furniture than I can count - and each time, I've done things a little differently.  Each time, I learn a more efficient way, or a better way to get a smooth finish, or I use a new paint.  So I can't say that I have an ironclad, tried-and-true method to painting cabinets but I can say that I've had great success in the arena.  The same story follows the most recent endeavor of painting our current upper cabinets in the kitchen.

First, I removed all of the doors and the contents of the cabinets.


I wanted to replace the old cabinet pulls with new knobs so the next thing we had to do was fill in the old hardware holes and drill new holes.

DIY Concrete Countertops - Finishing

Alright, where did we leave off on the concrete countertops?  Oh yeah, the SINK!  I can feel that ugh feeling coming right on back...

(Pssst...click here to read about the Part I of our new countertops.)

In our first post about the prepping and pouring, I wrote about how much of a pain it was to install the sink form.  We hoped the pain would end once the concrete was poured but when we removed the form, we had all these big voids.

The frustration was real but we had to move on and start with the process of finishing the counters before we figured out how to make the sink look better.  So, let's talk about the finishing and come back to the sink.

With the concrete completely dry (about five days after pouring), it was time to grind them down so the tops were smooth.  Even with screeding and then floating the concrete after it was poured, the counters still felt rough to the touch, slightly more smooth than something like our sidewalk but definitely not smooth enough for a kitchen sponge to glide over.

Easter / Spring Mantel

We are not so great at all-out decorating for every holiday, big or small.  Christmas is the one holiday we do more than usual; this year we even managed to hang lights outside and we felt really accomplished.  But holidays like Easter don't see much of a change around our casa.  (I mean, Easter baskets sitting around and crosses already hanging on the walls count, right?)  But this year, I pulled a Bonnie Engstrom and decorated the mantel for Easter.  It needed a good dusting last week and one thing led to another and by the end of cleaning the mantel shelf, I had a whole new set up.


It doesn't scream bunnies and eggs (because in all honesty, I'm not a huge fan of that dang Easter bunny) but it's a simple nod to the reason for the season.

DIY Concrete Countertops - Prep & Pour

Last year, I wrote a post all about our kitchen plans and in that post I mentioned concrete countertops were on the docket.  Well, here we are, many moons later excitedly crossing that off our list.  And boy, are we glad we can.  What. A. Process. it's been.

The kitchen isn't finished yet - we still have more painting and floors to tackle - but it's gotten to the point where it's skipped right on over the dated to modern line and our new countertops have a huge part to play in that.  


Here's where we started three long years ago:

I painted the cabinets a few months ago and I know that really helps up the ante too.  A post on those will come but today, I'm going to share the beginnings of how we prepped the kitchen for those new counters and poured them in place.  I was going to write a whole big post on the prep, the pour, and the finishing but just adding photos was a bajillion pages so we'll split it up so you can chew it all without choking. 

How To Make a Rug Stay In Place

Rollin' in here quick with a spotty internet connection to tell you a little bit about a rug and how it was driving me nuts.

Last year, when I did a quick little makeover on the kids' bathroom, I laid down this rug* to top everything off.


Still love, love, love the rug but don't love, love, love how much it slid around.

Save My Seat

 Or, rather, seatS.  From my kids.  And maybe from myself too.  

We bought these chairs* several years ago when I was going through a big mid-century phase (haven't quite grown out of that one yet because it's a w e s o m e).  I found two of them at Dirt Cheap and two more on Amazon Warehouse - each pair a different color but at the time, I didn't mind because they were so cheap.  Sometimes logic leaves me when I see a good deal, what can I say?  So one pair had a gray upholstered seat and the other, an ivory seat.  The gray held up, the ivory?  With kids?  Chairs that we use every single day during meals?  Not so much.


Built-Ins - Fake It 'Til You Make It

 Hey!  I wish I was sitting here typing up a big kitchen update but alas, I'm not.  I'll blame it on fully enjoying our summer and I'm not mad about it in the least.  Actually, the drier fall air and milder temps will serve us better anyway when it comes to painting cabinet doors outside so you could even say that our lack of kitchen progress this summer is a blessing in disguise, paving the road for efficiency later.  Orrrr maybe that's just wishful thinking...  ;)

Anyway, I'm not here to talk about what we haven't done but something we did do.  It was a little project that only took a few hours one lazy Saturday afternoon.  Not only was it quick but it also itched that scratch that not doing anything creative for a few weeks can create.

It all happened in the reading room (music room?  library?  study?  We're not sure what to call it.)  We've known for at least a year that we want to line the back wall with bookshelves atop cabinets but that's a back burner project as we focus on other things.  For awhile, we improvised with a built-in we moved in from the living room (when we removed the wall between that and the kitchen, this built-in had to be moved) and an old secondhand shelf but that left a bare corner that we just used to store stuff like the vent hood that had to go up in the kitchen.


Not very aesthetically pleasing.  But then time marched on and I found chairs, the vent hood went out and up, supplies were relocated, I moved  in a small bookshelf from the kids' room, and topped it all off with some DIY art in a thrifted frame (tutorial here).

(More) Kitchen Plans

Putting this post together makes me SO excited to get this kitchen started...errr, finished!  We're zooming in on it next!  It won't be a super quick slide into the finish line since we're doing everything ourselves but we're hoping we can get it all in by summer's end, hopefully sooner.  I went into a little bit of detail about how we planned to open it up in the past but that's done and now it's onto the finer details of cabinet colors, counter tops, and a new backsplash.  Here's a peak of what we've nailed down so far:


Small Cabinet Makeover

Something I've had on my to-do list for a good long while now is to paint a small cabinet that's main function is to hold our Berkey water filter*.  The Berkey is awkwardly large as far as water filters go and if it weren't the best at filtering all the things, we'd probably ditch it for something smaller.  But, here we are with this big, chrome, bullet-looking thing in our kitchen. 


There isn't really a good place for it on our kitchen counter because it's so tall and takes up too much space so we kept hoping to find a small cabinet at just the right height that we could set on this small expanse of wall right beside the kitchen counter and obviously, found one.  


It was for sale on Facebook Marketplace for $10 and not only was it not the prettiest cabinet in the wide world, but the lady who sold it to me used it to store makeup and so it smells...like makeup.  It's a weird smell to have a cabinet giving off.  I knew the smell would eventually go away but that faux wood finish had to be dealt with.  Fast forward months and months when only this #letsroomtogether challenge could provide the motivation I needed to get this thing looking a little more like it fits in with it's surroundings.

Guest Room + Home Office Combo

We've only ever lived in three bedroom houses.  Our first house was a 3/1 (with a fourth bedroom and second bathroom finished shortly before we sold and moved), along with our second, third, and fourth houses.  It's great when you're newlyweds because then you have two extra bedrooms (we had a guest room and an office...spoiled) but with four kids, three bedrooms fill up quick with no space left for anything else.

So, we were excited this house around to find something with another bedroom.  The fourth bedroom in this house affords us a guest bedroom, which is fantastic since the closest family members we have live seven hours away.  But, with the right situating and set up, it also affords us a home office - something I really wanted so that I could have a designated place to sew.

We got really lucky in finding furniture secondhand for this room - furniture that is multi-functional so that we can fairly easily switch from home office mode to guest bedroom mode.

Home Office Mode


Pity Project

Sometimes our lives are so busy with keeping kids alive and thriving that we don't have time to take on or even complete any in-progress bigger house projects...like right now.  Although I will admit that there are a hefty amount times when I really have to convince myself to vacuum/cook/wash when what I really want to do is paint something.  When the imprudent thing is to project big, that's when I start to get antsy and seek out little ten minute projects I can do to satisfy that hunger.  This is one of them.  We'll call it a pity project.  :)

A couple of months ago, our coffee maker broke.  If you're anything like us, you love your morning coffee.  It's a routine; a ritual even.  For us, it's about the taste and feel of those moments when you can sip in peace in the morning before everyone wakes up (until they do and you're still sipping, just not in peace).  Maybe it's a little bit about that slight jolt caffeine gives you to start your day too.  So when our coffee maker breaks, well, uh-oh.  Chaos.  Shame too because it was so cute.

Ok, ok, there's really no chaos that follows a broken coffee maker.  It's really just a small thorn in the side.  We weren't left completely hanging though because we have a french press* we pull out once in awhile and it got pulled out daily until we got a replacement.  But there is nothing like the simplicity of an automatic maker, right?  But french press coffee just tastes so much better.  I know.  I've heard.  I drink my creamer with a side of coffee though so I really couldn't tell you the difference.  Anthony however, the black coffee drinker, will tell you that's true.  That's why we splurged a little bit this time around (we usually go for the $17 maker at Walmart or Target) and bought ourselves this coffee maker*.  I found it on Amazon awhile ago and saved it to one of our lists.  It has a shower sprayer, which we've heard is the best way to brew and a reusable filter which doesn't steal all of the oils in the grounds.  (Our friends run a coffee shop and I learned a ton about coffee this past summer talking with them!)  Well, when I went to buy, the red option was the cheapest (as compared to the white* that we really wanted) and there was a one like-new, on Amazon Warehouse for $35.  I jumped on it because I knew that I could probably either deal with the red for a lower price or remedy it.  Enter this pity project.

Here's our month-old maker:  


Except now it looks like this:

How to Paint Wood Paneling


My fingers haven't been so excited to type out a title for a long time.  It's one thing to be done painting the paneling but it's a whole 'nother feat to get up a tutorial about it - only took me a couple of months...HA!  It's a hefty one with a lot of carefully ordered steps to help you along if you've been thinking about laying a fresh coat on the wood paneling you've inherited.  We are certainly happy we took on the task.  The end result has us heck-yeahing and has our living room looking a bit more modern. 

We've painted painted wood paneling before in our rental, but we've never painted unpainted, stained and sealed wood paneling before so this was somewhat uncharted territory for us.  There are lots of tutorials written out there but I'm going to let you in on a few tips and tricks and everything we learned to show you a really efficient way to unload some paint onto those dated, paneled walls if you've got 'em and want to bring them into 2020.

First things first, like I said above, this is a doozy of a painting project.  It's not just slapping paint on a few walls and calling it a day.  There is prep and more prep involved and it can get tedious, so before you start, search and scroll through the abyss of photos on pinterest or google of "painted wood paneling" to absorb all the inspiration you can.  You'll need all that inspiration to turn into motivation.  Ok, ok.  Maybe I'm making this sound way harder than it is.  It's hard but it is SO worth the effort.  Take it one step at a time.  You can do this!  Here's our after (or so-far if we're including decorating) to add to the plethora you can log into that motivation bank: