Living Room Update + Some Fireplace Ideas
Patio Plans
About a Door
About a door that only took us a whole entire week to hang. Lemme explain.
Outside on our back patio we have a small closet of sorts that houses our water heater. Right? A closet outside for the water heater? I thought it was weird too when we saw it but it turns out it's actually pretty common down here in the deep south. The door on that closet was in major need of repair or replacing though - the bottom part of it was all rotted from the elements and since we moved in, a couple of the slats had fallen out.
House Exterior Update | One Year In
In other news...
We closed on our house one year ago! That's seems wild to me. Like, really. And maybe it's because technically, we've only been living here for 10 months so we haven't quite hit the year mark there yet. If you don't remember, we closed on our house a couple of months before we had to be out of our rental. That gave us time to scrape all of those popcorn ceilings and paint before we moved in all of our furniture, which would've made scraping ceilings 100 times harder.
I'm going to write up a picture-loaded post of the inside and how it's changed in the past year but first, we're going to start outside. The backyard hasn't changed much (here's a little update on some landscaping) but the back patio has and all with the addition of furniture and a little feng shui. ;)
Before:
Updating an Old Dresser | A Makeover
The Best Painting Tools, Say Us
I didn't know the first thing about painting an interior room growing up (and neither did Anthony). My dad made my siblings and I scrape and repaint our white farmhouse when I was ehh, maybe middle to high school somewhere (I hated it so much I must've blocked out the time frame) and that's the most painting I did until we bought our first house and dove headfirst into changing the color of 90% of the walls in the house...and then 100% of the walls in our second house, 100% of those in our rental, and now what will eventually be the walls (and ceilings!) in this house.
All that's to say, you don't actually have to have any experience in painting to start. It's not that hard! Yes, it takes a little bit of time and effort but as far as I'm concerned, the time you spend is money saved and the effort counts as a workout. Win, win. :D
Breakfast Nook "Reveal"
Tiny, Tiny Home
Hey friend! So, uh, yeah. I know. I’m supposed to be revealing the kids’ room. That’s what you should be reading right now. But you’re not. I gave a short explanation over on Instagram the other day but if you missed that, basically, I ordered something for their room a month ago, got an email it was shipped from Virginia (or at least that a shipping label had been created) on October 30th, and that still have not yet received it. I know I could just go ahead and share the final result but that thing is going to be a part of a big piece of design in the room and I just can’t show the room without it. Sorry! Hopefully when I get the reveal up and can explain a little further, you’ll understand. I’ve since ordered from another company (and just got a shipping notification yesterday!) after contacting the first company multiple times without a response. SO, the silver lining in this little mess is that the new thing will be here by mid-week and a reveal will be up on the blog by week’s end. Huzzah! Look for it!
I know I missed the deadline for the big One Room Challenge reveal but I’m not too sad about it. I wasn’t in it for recognition or blog fame so there’s nothing lost in the delay and only a cute kids room gained in a six-week motivational scoot to a finish line.
Enough about that though, how about this little house?!
I had been very casually hunting for a dollhouse for the girls for the past year or so and, while the four kids and I were traipsing through a local thrift store here at the end of the summer, our eyes beheld this little house and it’s fine $15 price tag. It was in great condition besides being a little dusty and VERY heavy. Phew!
Oh, and a little too frilly. I realize that someone once painted this sweet little thing for some little person they loved and you can tell that A LOT of love and elbow grease went into it. But, all of that love came in the form of lots of scrolls and sponge paint and that’s just not my language. So, I changed things up a little.
One Room Challenge–Week 2
Week 2 of the ORC is here and, amazingly, I’m right on schedule (all the thanks to the two chicklets who have been taking awesome naps)! My goal was to get the kids room painted before the week was over and bada bing, bada
BOOM! Here’s what their room looks like right now!
Yep, week 2 also saw me, not only painting their room but “bedazzling” their wall with diamonds.
I CANNOT WAIT to show you how those diamonds came to be and I will in my next post (pssst…it’s CHEAP & EASY!), but before I could even get to that fun part, I had to cover up the tan walls. If you’ve ever painted a kids room before while it was being inhabited by said kids, you know, it’s muy inconvenient. To get to the walls you have to completely upheave their room – move beds, dressers, whatever else they use on the daily. For us, that meant moving the furniture from one side of the room to the middle one day and the other side the next day. It also meant moving the kids into the play room and our room to sleep for a few nights. (This is why, if I get the chance to paint before we move into our next house, whenever that is, I WILL.)
Swing Arm Lamps
Once upon a time we were having dinner with some friends and one of these friends asked me if I had any use for a pair of lamps she didn’t need anymore. She had seen what I had done with some hand-me-down lamps before and thought maybe I could work wonders on these. But before I could even get a word in, Anthony piped up with a resounding “NO”.
So maybe at the time, we had too many lamps. I was going through this cycle, which really wasn’t a big cycle, of rehabbing a couple of lamps, finding more lamps to rehab, and listing the former ones. So sometimes we really had a bunch of ununsed lamps sitting in our house because some were awaiting a little love and some were awaiting a new owner. And I was totally ok with it.
Anthony though, well, he was not. Understandable.
Why do you care? Well because one day during those lamp-hoarding days I was walking through Goodwill with all (three at the time) of the kids and what did I spot? These:
They were marked at $8 for the pair. Argh, I had to have them. But I resisted the temptation because I love my husband so much. But then those lamps haunted me and the headboard was a dream waiting to happen and I thought they might look so great with that headboard and so…I went back to Goodwill the next day, bought them, and immediately stuffed them under our bed when Anthony wasn’t looking.
And they stayed there for the next couple of years.
Doh.
Where We Eat
Rooms are starting to flow a whole lot better around here and I feel like it’s just added a greater sense of (superficial) peace when we’re constantly moving from room to room…which we do A LOT. Of course that sounds ridiculous and you can’t really gleen peace from a house, right? Or maybe you can? Who knows. Either way, I might be crazy but here’s the old view into the dining room from the “new” kitchen:
It’s like there was an invisible line at the doorway in which all the fun stopped and all the boring started.
But now, NOW it’s one continuous space where decor harmony flows in, out, and all around:
White walls did the dining room good. I painted them the same Pure White (Sherwin Williams) as the walls in the kitchen which was key in getting this pretty choppy room layout to feel, well, not quite so choppy. Maybe cohesive is the word I’m looking for…
Here’s a better view of the whole dining room taken before we moved in:
Old, heavy curtains, tan walls, and all.
And here’s what we’re currently working with:
Living Room Tour
Recently, I’ve been thinking a lot about why I really enjoy decorating our home. I’ve always found a good bit of fun in decorating – my mom decorated my room when I was younger based off of one of my favorite characters, Minnie Mouse, but I didn’t really play a starring role in the whole process. She bought everything and was really good at styling and so she did it all and I lived with it for several years. I tweaked things here and there though, nothing major, but what I really loved is that feeling when it was spotless. Don’t get me wrong, I was very good at leaving my clothes scattered on the floor for days/weeks and clutter on my dressers and desk but I thoroughly enjoyed decluttering and placing the 3957 pillows I had on my bed perfectly once in that blue moon.
Fast forward to college when I really got to take decorating my own dorm room by the reins and went all out. I spent $70 of my own, hard-earned money on a comforter I had to have at Linen’s and Things (now defunct) and made sure any other accessories I bought for the room coordinated.
That passion for decorating still stands but I’m finding that I’m enjoying the process a little less than I did before. I don’t think it’s that it’s just not as fun anymore though. I think it’s kids. Haha! I decorated my entire dorm room in two whole days, ceiling to floor, and now it takes me weeks to get one room done. Kids. The satisfaction of decorating for me is more in the end result than the process anyway so when that end result is akin to the tiniest light in the longest tunnel, it feels overwhelming at times. BUT, I wouldn’t have it any other way. I know that’s cliche but it’s truth. These four chicklets have given me more satisfaction than the final reveal of a million decorated rooms. :)
On the same note, my reasons for making our spaces pretty have changed a lot. Whereas before I just wanted a pretty dorm room/first-home-before-kids to come home to, now changing up spaces breaks up the monotony that my life can sometimes be. I’m a big routine kinda gal. Growing up I would have said I leaned more towards the unplanned/spontaneous side of life but I think having twins pulled me full circle to the other side. No routines/structure when you have newborn/toddler twins = lots of stress. I can’t say that’s a fact but I can tell you that the days where we at least tried (even if we failed a little) to stick to our routine were a heck of a lot easier than days where we completely disregarded it. And so, structured and rigid I’ve become and that I’m guessing I’ll stay until we’ve got four independent children running around vs. the current dependent ones. The routine-based life is wonderful and I thrive in it but it can get boring day after day after day after day. So, adding some new pillow covers here or slapping up a new paint color there, spending naptime making something to hang there or building this to fill this space brings a much-needed surprise visit to that routine and a happier mom makes me.
With all of that, we’re switching gears! Strap yourselves in for a living room tour!
I took this before we moved in and started tweaking things:

I couldn’t get those curtains down fast enough! Let there be allll the light there can be, I say! Here’s where painting the walls white and adding in our furniture has us so far:
Quite a Distressing Situation
We’ve been storing all of Gianna’s clothes in two drawers of Anthony’s dresser and two fabric boxes in the kids closet and, the older she grows, the bigger her clothes are getting, and the more that that’s just not working. We had room leftover galore when we were talking newborn clothes but lately I’ve been just digging and storing excess stuff in a large tupperware bin…in the kids room. Not efficient and definitely not pretty.
So, for the past couple of months I’ve been keeping an eye out online for a tall dresser that could fit in the kids room to house her things and then some. Mid-century dressers are some of my favorite things and so I’ve been looking with that aesthetic in mind and coming up short. The few that I’ve found had either been sold right before I messaged the owner or the owner just never messaged me back. Well last weekend, my luck changed and I found one. It didn’t really fit into the mid-century category but I loved the thick molding detail on the doors and the drawers themselves were simple enough that I flew in with a $50 offer (down from the $75 asking price) and they were sold.
Here’s the picture from the listing:
The listing noted that the piece was solid wood and that all of the drawers “worked properly”. I could tell it had been painted from the listing and the paint job didn’t look that bad via pictures so, if anything, I figured it might need a touch-up or I could totally go a different color with it. Either way, it was painted white and with the addition of some new hardware, I hoped we could as least live with it as-is until I get around to making over the kids’ room.
Well, when I showed up to pick up the dresser, the owner had all of the drawers extracted and set by the door (which I thought was great since I figured we’d have to do that anyway to make it easier to carry). At first glance of it, I could tell the owner used a semi-gloss or gloss paint and so I knew at that moment that I’d be repainting. I also noticed that the paint job was really poorly done – there were brush strokes everywhere and it looked like maybe some spray painting mishaps. But, like I said, I had already prepped myself for a possible repainting so that didn’t scare me away. When we went to lift the dresser, the owner said he’d carry the lower side (we carried it horizontally) since it was heavier. At the time I was like “Dude, the top is clearly the heaviest part with these doors that weigh a ton…” but I didn’t say anything because I wasn’t really worried about not being able to carry it. (Four babies over the years has given me quite the biceps. Ha!) We got it outside and slid it into the back of my van and I remember seeing that the underside of the dresser, the side he was closest to carrying the dresser, was pretty beat up. Immediately after he saw me looking at the bottom, he distracted me by stepping in front of it and telling me it would be helpful if I got into the back seat and pulled. And ok, this is me adding a little bit of assumption in saying he distracted me because maybe he was really in a hurry to get this thing gone (even though after he talked my ear off) but it all happened in the matter of a few seconds and dawned on me afterwards. I thought about it the entire drive home (ten minutes) and really, I wasn’t too deterred by the state of the bottom of the dresser – I mean, it still stands perfectly and is sturdy and the bottom isn’t seen whatsoever. But then I got home. And we pulled the dresser out of the van and into the car port. And I noticed a few things I hadn’t before because I didn’t take the time to really look it over. First of all, it wasn’t “solid wood”. Argh. The sides of the dresser and drawers are all particle board…not the cheap kind but still, not wood. There were a couple of screws – one in the top of the dresser and one on the bottom trim on the same side – that were definitely not meant to be there. Also, one of the “properly working” drawers was missing an entire track so that it literally just falls out of the dresser if you pull it out more than six inches. I was annoyed. Annoyed with shady sellers and annoyed with myself for not taking the time to look over the dresser better before I pulled the trigger.
Either way, it was now ours, I was happy I didn’t pay the $75 asking price (I wished I would’ve offered more like $30), and something fun and unexpected happened after I cleaned it out (there was so much dirt and dust in the drawer slots!) and sanded it down. It was somewhat of a redemption for the whole situation.
Bold(er) & Beautiful(Ler)
Calm down, calm down. I know beautifuller ain’t a word. Well, unless you ask Anna because she definitely tossed the term of endearment at Elsa without a fuss being raised so…
Switching gears and stories…
Once upon a time, I bought some secondhand furniture, like I often do. I nabbed a pair of end tables and matching coffee table off a secondhand resale sight for $30 for all. I added some fun to the coffee table and sold it and the end tables have been living here ever since – one out on the screened-in porch and one on the front porch. You can see one in the upper corner of this shot post-stenciling the porch floor:
Rewind a couple of years to a Goodwill trip whence I stumbled upon this set of four bamboo chairs for $40 and grabbed them as quick as I could:
Raise the Living
I’ve been trying to add more plants to our house…I’ve probably mentioned that before. Luckily, they melt right in as easy decor so you really can’t go wrong with placement or type or anything like that. I don’t know if it’s just in the past few years or if it’s always been this way and I’ve just never noticed, but I don’t think there’s a picture in any popular home decor mag or blog these days that doesn’t have a plant in it. Aka, it’s super popular to have plants growing in your casa in the twenty teens. But, that’s not the main reason why I’m sneaking them in to our house. Anthony, who has always been against plants in the house (because he thinks they attract bugs…is he right? idk) all of a sudden changed his mind when he read an article about how they filter and clean the air in your home. I love the natural look plants bring to a space so you can bet your booty I grabbed a few to bring home as quick as I could after his change of heart. Certain plants clean your air more than others so I’ve been trying to be very intentional about the plants I buy – I really only want those that clean the air the most. The big Peace Lily we have is one of those plants. In the past few months, it’s been playing musical room, going from the kitchen to the laundry room and now to our bedroom – all rooms that get a good amount of natural light. I think it’s parked in our room for good though and I’m popping in today to show you exactly what it’s parked in.
Several months ago, I came across a couple of big planters at Goodwill. You could tell they were pretty old and had been well loved by the plants that had once inhabited them but, well, they were stuck together. Like, one was nestled tightly and seemingly-permanently into the other. But, they were both marked at $1.99. I didn’t feel like paying for two planters (even if they were cheap) if I coudn’t get them apart though. So, I pulled and wiggled and wiggled and pulled and even had a strong male employee try for me but the planters looked like they were stuck for good. Thankfully, Goodwill let me pay for one even though I got two, since we both figured I’d have to break one to end up with one. And then, I got home and my amazing, incredible, fantastic, what-a-guy husband separated the two planters without breakage! Huzzah!
You can kind of see one of the planters in this Instagram shot and here is the other: 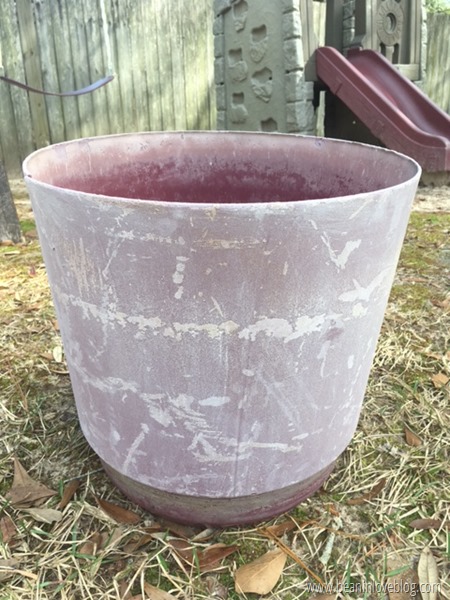
This is after I cleaned it – it had some sort of grainy film on it that I had to painstakingly scrub off – but before I used up some old spray paint to liven it up a little. I thought I took pictures of the process but they are nowhere to be found. Basically, I painted everything but that little indented part on the bottom navy blue (Krylon), taped off the bottom of that big top part, and then painted that indented part on the bottom gold (Rust Oleum). You’ll see what I mean in a minute.
Spotted: Goodwill
Last weekend I had to make a run to Lowe’s and just down the street from Lowe’s here is a Goodwill. I left Anthony at home with all the kids and don’t tell him, but I did a quick swing by that thrift store. ;)
I left without buying anything but I did grab a few pictures of things I liked and so, once again, we have yet another post in the ‘Spotted’ series (you can read more if you click ‘Spotted’ under the drop-down, archive menu in the sidebar).
I don’t know what it was about this picture but I really loved it.  I might nix the existing finish of the frame, painting over it with a creamy white but then again, maybe not. I think it’d be pretty in a little/preteen/teen girl’s room – I’d pull the bright coral color out for curtains or bedding or maybe both.
On the docket over here is turning two coffee tables into tufted benches (stay tuned!) and so, of course, that’s what popped into my mind when I saw this coffee table. I have a thing for bamboo and the bamboo on this thing was in pristine condition. It was only $4 (!!!!) because the glass was missing. I’d remove that thick top part and replace it with a piece of plywood. Stick some foam, some creamy white linen, and some tufting over that and it’d warrant all the heart eyes.
At first glance, these tables weren’t anything special beyond their mid-century modern vibe. 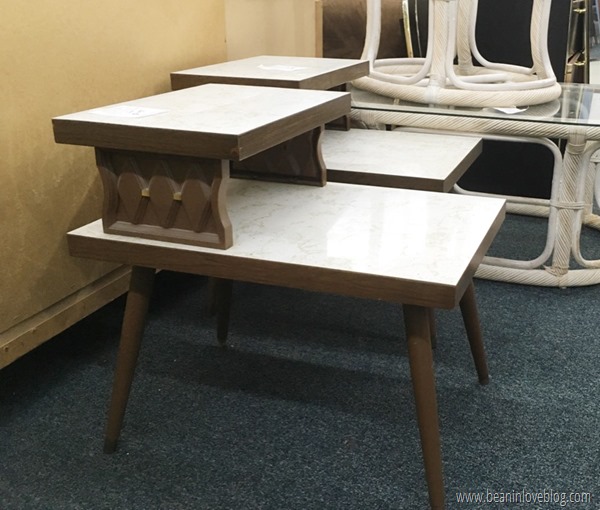 But, had I the time, I’d have swooped them up and dolled them up. The white tops were a faux marble that I might try to extend or paint down around the sides of the tops to make them look like they were slabs. Then I’d probably paint those sides with the diamonds and the legs (white? gold?) only because I’m pretty sure they weren’t wood. But, I didn’t look close enough to know for sure. If in fact they were wood, I’d sand them down and stain them a light, ashy brown.
This chair. Gosh, I wanted it. But, I’d have an entire houseful of furniture with no room to walk if I grabbed every good piece I saw. But, it might’ve been perfecto out on the screened-in patio. Either way, I walked out without it. It was marked at $34.99 and in great condition. The cushion was boring so I’d probably make another but the bamboo (how I love it) looked incredible. And I don’t know if it came off the base or not but how awesome would it be if you took it off the base and hung it? Swoon…
This was a fancy map of the Rocky Mountains: I loved it because I have all the sentimental feels for the Rockies; lots of great childhood memories. I also loved the colors in it; the minty green was so pretty. I’d ditch the frame and find another though and it could be hung anywhere – office, playroom, bedroom, bathroom, etc…
I had a hard time walking away from this little hexagonal dish: I couldn’t think of a place to put it off the top of my head and now I’m wishing I’d have just grabbed it. Our bathroom counter is crying. My first thought was to stick some succulents in it to add a natural element to a space.
I have absolutely no use for teacups and saucers but these were so pretty.  There were only two anyway and if I were to start a high tea tradition here in this roost, we’d need just a few more. The teacups might’ve made cute little succulent planters though.
I’m really not much of a dog person (hello allergies) but this little guy was cute.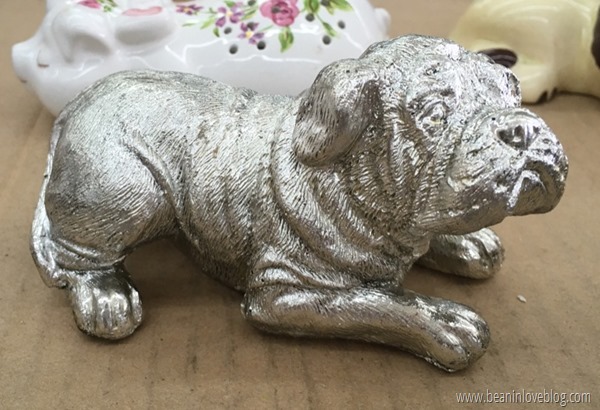 Sometimes styling shelves can be ruff but the addition of this pup would make any shelf quite fetching, ya know?
And last, I spotted this gem: ’Reconstructive Plastic Surgery’ – this one would be the star in a frame collage. Hang it somewhere prominent and you’ll forever have the perfect ‘statement piece’.
*wink wink*
Two-Toned Down
Two weekends ago, our church had a yard sale filled with lots of donated treasures; the proceeds of which went to a bunch of our youth group teens who are going on a mission trip this summer.
Among those things donated was this solid wood table and chair set:
And actually, it was donated last year for the same fundraiser but didn’t sell. It’s seen better days and a picture doesn’t really acknowledge that – peeling paint and a slightly warped top. It probably had a really cheery life though considering the fun paint job, no?
Well, who shows up at the smell of great potential that apparently no one sees? You oughta know by now…yes, yes I did.
I helped transform the table into this to be (hopefully) sold to benefit the mission trip: (For some reason the fabric seat on the chair on the bottom right looks darker than that of the chair on the bottom left but they’re the same fabric so it must just be the angle of the camera on the geometric print. Also, the table top was removed for delivery and so it’s a little off-center in the picture simply because it was just set on top for a quick pic. In case you were wondering about those things, which you probably weren’t, I thought I’d fine-print them.)
However, I can only take a little bit of credit because, even though I had the vision, I didn’t do all the work. Some of the teens going on the mission trip sanded everything down just enough that the peeling paint was gone and what was left was nice and smooth. Another teen (hey Duncan!) painted the big ‘ole base of the table and the love of my life painted the top. I finished painting the chairs (the teens started), did the distressing, and added a little flavor to the table top.
But let’s break it down a little more than that, shall we? Of course we shall.
The Chairs
Like I mentioned above, they were rocking lots of peeling paint and some slick vinyl seats that were in need of replacements. First, we took all the seats off. Since they were nestled right inside the chair frame, no screws were holding them in place nor did any need to be, so they just popped right out with a little pressure from underneath. The chairs were then sanded and two or three coats of chalk paint (this in ‘Kid Gloves’ from Lowe’s) were applied. We decided to go with chalk paint mainly because I had heard there was no prep or primer needed to apply it so we thought it easiest since multiple people would be working on the chairs. I’ll go into more in a little bit, but I probably won’t ever use chalk paint again. Half of the chairs were painted with a brush and the final coat was done with two cans of spray chalk paint because we ran out of the canned stuff and thought spraying them would be quicker, which it was.
Once they were painted and completely dry, I went over some of the edges with a palm sander paired with fine-grit sandpaper to give them a slightly distressed look.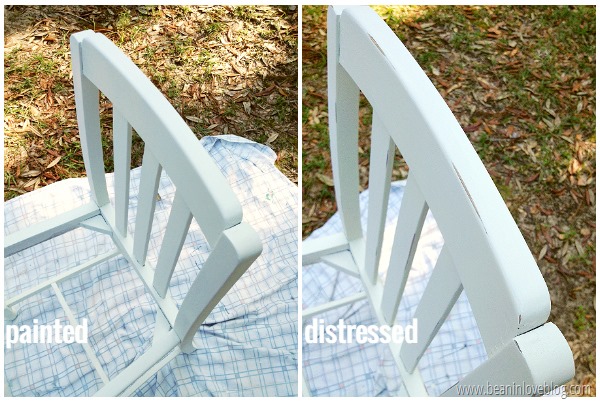
A palm sander is a lot quicker than sanding by hand but it requires a bit more care as it can easily get away from you if you’re not paying attention. After sanding, Anthony put a coat of polycrylic on each chair to seal the chalk paint.
The fabric that we recovered the seats with was a remnant donated by someone to be sold at the yard sale and it ended up being perfect for these chairs. It’s a heavy-weight upholstery fabric so it’ll hold up great. The boards that made up the seat on a couple of the chairs were broken, so Anthony grabbed some thin plywood and replaced them. The seats were made of a wood frame that was curved at the front (you can see the that curve in front in the pictures) so the plywood was placed right over the frame. We used thin plywood because it needed to be able to bend to the shape of the frame and chair once attached. I’m sorry I didn’t take more pictures but I wasn’t around when a lot of the refinishing was happening. :(
Each chair was the same but also a little different since the distressing was done in different spots but they turned out so great, didn’t they?
The Table
To help straighten out the table top (it was slightly warped), we laid it on the hard tile floor of the youth center for a day and piled some weights on the underside (and when I write “we” I mean Anthony…don’t go all freaking out on me because you think this preggo lifted some weights). It didn’t completely straighten it out but helped and it made it far less noticeable and luckily, it wasn’t set-your-plate-on-it-and-watch-it-slide-off bad in the first place. The base was painted with the same chalk paint we used on the chairs and the top was painted a gray color, mixed at 50% intensity (I think the color was “Woolen Stocking”, but in the paint can form).
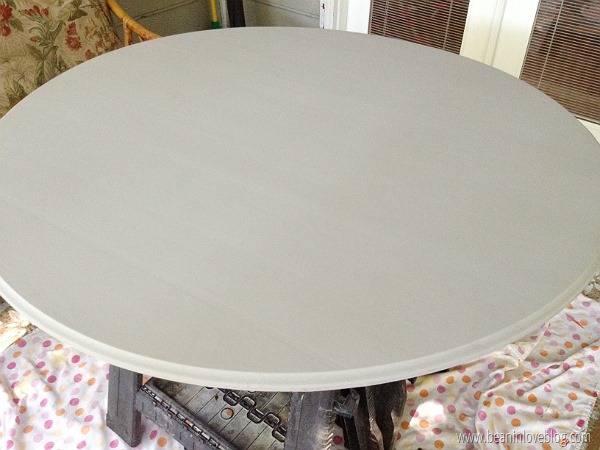
To add a little more character, I added a layer of this stain on top of the dried and quickly sanded chalk paint (sanding chalk paint with a fine sandpaper after it’s dry makes it really smooth). Using a foam brush, I brushed on one coat, making sure I brushed in the same direction as the grain of the wood and/or the placement of the boards that made up the table top.

Halfway done:
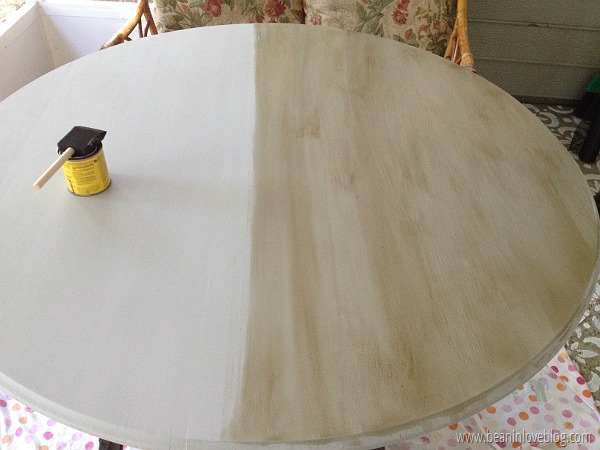 Imperfection is completely okay with this step and really, the more imperfect, the more character after.
I actually had to do this twice because, the first time around, the polycrylic layer we put over the stain bubbled because of the foam roller we used. So we had to sand the entire top down and repaint, restain, and reseal. This picture was taken after the first time I applied the stain. I loved how it looked before I had to wipe it off and I was tempted to leave it that way.

But back to round two, after applying the stain, I let it sit for two minutes and then wiped it off with an old t-shirt. I made sure to wipe in long sweeps and once again, with the grain of the wood. (I did stain around the edge too and along the small lip underneath, in case you were wondering.)


It took a whole day for the stain to dry and then, once it was, I brushed on (vs. rolling on like the first time) two coats of polycrylic, allowing the first coat to dry completely and be lightly sanded before the second coat went on. I like using polycrylic instead of polyuerathane 1) because it doesn’t yellow near as much even though it still yellows a teeny-tiny, possibly unnoticeable bit when painted over white and 2) because it’s soap and water clean-up.
So here’s the thing about the chalk paint. I see it being used EVERYWHERE around here. I’m guessing the no-prep feature makes it a hit because it definitely isn’t the price. That stuff costs $$$. The chalk paint we bought from Lowe’s cost $30 for a quart and, for us, that covered one coat of paint per chair, three coats for the table base, and a couple of coats of paint on the two small doors and three small drawers of a hutch that’s also being refinished to sell. I feel like we could’ve gotten more painted with a quart of $15 latex paint…but maybe I’m not factoring in primer which I know helps a ton when we’re talking coverage. Even still, it’s double the price of the latex paint I use to paint furniture and the coverage seems to be less or not that different without a primer. Also, while no-prep sounds appealing, the thing with chalk paint is that you have to seal it. I mean, you HAVE to…unless you’re painting something that will never be touched post-paint. I know this because, while they were painting this table, another teen was painting another table and that table got water on it. The water made it so that you could literally take your finger, swipe it over the surface of the table, and watch the paint come off with your finger – not something you want happening to your furniture ever, ever, ever. A lot of people seal chalk paint with a wax and some with a polycrylic or even polyuerathane. Wax sealer doesn’t harden so, while it prevents liquid and fingerprints from getting to the paint beneath, you can’t place anything hot on it because, like wax does when it gets near heat, it’ll melt and stain. Also, I’ve read that it wears off over time so anything sealed with wax will eventually have to be resealed. So, in the end, you don’t have to prep by sanding or priming but you do have to seal so really, you’re doing extra work whether you use latex or chalk paint. It’s in the beginning with latex (primer) and in the end with chalk paint (sealer). For me personally, the cost will probably deter me from ever using chalk paint again. I mean, we spent close to $50 alone on paint for this table! I can get the same distressed, antique look if I want with latex and I feel like, in the end, it’s a lot more durable. But, that’s just me. You painters out there, what do you prefer? What are your experiences with chalk paint?
Anyway, back to the object at hand, which once was a fun table that is still a fun table, just a little toned-down.
We all need that sometimes, right? Maybe it’s called entering adulthood…or maybe just parenthood. Supposedly that’s when all the fun stops. Supposedly.
I beg to differ. ;)
. . .
P.S. The table ended up selling before the day of the yard sale and while it was half finished. A lady came in to buy something else that we had posted online to profit the mission trip team when she saw the table and fell in love. Next up is french provincial-style hutch that’s awaiting a makeover that I’m going to help with…hopefully before this baby gets here.
My Couch Baby
Ever since the screened-in porch on the back of our house was just an idea, I’ve been keeping my eyes peeled for a great wood or bamboo couch to settle in back there. The tough thing though, is having the idea and then actually finding something that would be perfect, only to realize that you have zero room in your house to store a couch to put in a space that may or may not happen. Sometimes I feel like that’s the story of my decor life, I find something that would be perfect in some space in my mind but a space that I don’t have or don’t have yet in my house. Womp. Two years ago when we were searching for the perfect entertainment center to turn into the girls’ play kitchen, we stumbled upon the coolest wood frame couch in a thrift store in town and man, I wanted it for the porch we had just started saving up to build. Like, I wanted it bad. It was marked at $60 and it had clean lines and a concentric, cut-out circle pattern in wood on each side and in white, it’d would’ve been amazing! I left a piece of my heart with it when I walked out those thrift store doors that day.
But it all turned out okay and I have no regrets because right after the screened-in porch was built, I was at another of my favorite thrift stores here and out on their front stoop they had a wood frame couch with a piece of computer paper taped to it that said “Please take. I’m free!” 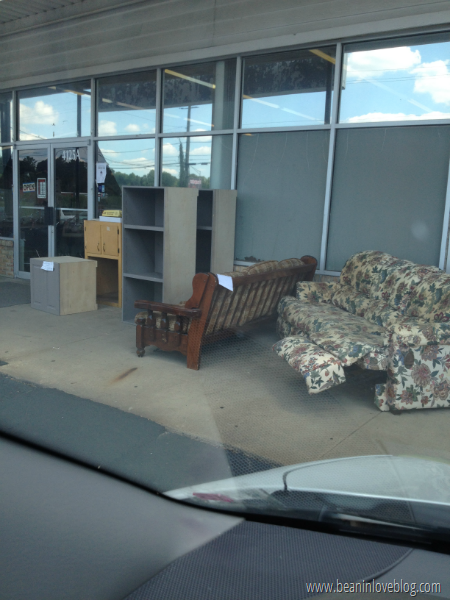 I guess they had tried and tried to sell it but nobody wanted it. I can’t imagine why…
It wasn’t my style at all – too many big curves – and the springs holding the bottom on were broken. The fabric was awful (but I planned on reupholstering whatever I bought anyway) and the wood faded and in need of a good sanding and paint job. But, it was FREE. I was so torn. Either way, at the moment I saw it, I had all the kids with me and no way to get it home so I snapped the picture above and home I went to later bring it up to Anthony.
Then, as fate would have it, we drove by a few days later on our way to church and the couch was still there. We decided that, since we really wanted to get our porch put together, that’d we’d go grab it and see what we could do about making it look more ‘our style’. Better than in a landfill, right?
Here she was, home and in all her vintage glory: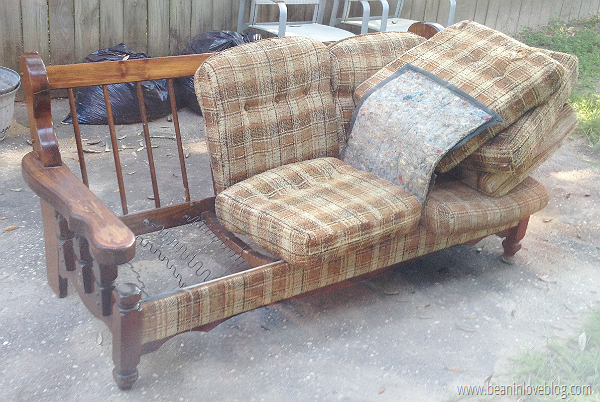
And this is the story of how we made her a little, or a lot, happier…
First, Anthony removed all of the springs/metal rails that held the bottom in. Like I said above, many of them were broken which made sitting in this thing impossible or dangerous at very best. Then, I unscrewed all of the metal loops that held the springs in place along the inside of the couch. 
Now since there weren’t any springs, there wasn’t anything besides the two support bars left to hold seating. This is where holding onto pieces of construction material for long periods of time comes in handy. We have had a sheet of plywood stored away from our previous home (yes, we moved down the country with it) just in case we ever needed it. Well, that day came. Anthony cut it to fit down into the recess of the couch seat where it sat snugly atop those two wood support bars.
It’s so much more firm and sturdy than springs; nobody’s falling through now. Stay away Dumbo.
To reign in slivers and to keep up appearances though, I grabbed some thin cotton fabric at JoAnn Fabrics and upholstered the side of the plywood that would be facing up. It was as simple as laying my fabric out on the floor, cutting it so that I had a few inches of extra fabric all around, wrapping it around the plywood, and stapling it down.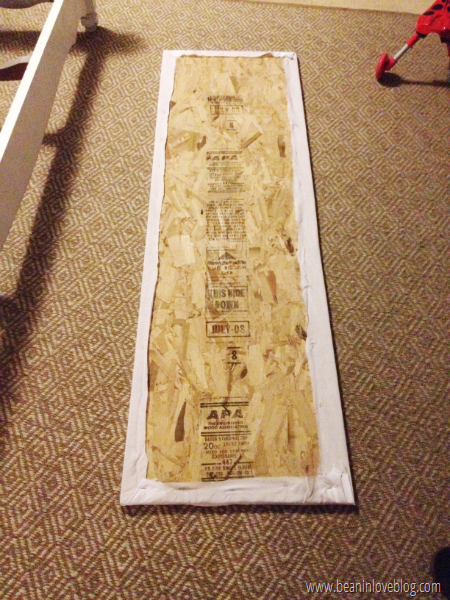 Since no one was going to see the underside of the couch lest they were a feline or pup, I wasn’t too particular about making straight cuts.
Lazy? Maybe. Efficient? I vote yes. ;)
Next up was prepping for paint. After I had all of the looped screws out, I had to pry the fabric-covered piece off the front of the couch. I didn’t know what it looked like underneath but there was no way on God’s green Earth I was keeping it there so find out, I would.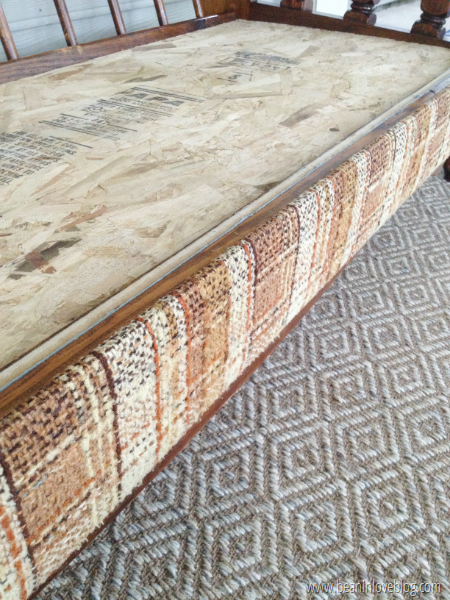
A flathead screwdriver did the trick nicely followed by a needle-nose pliers to get any remaining nails pulled out. Luckily, all that remained was the flat piece of curved wood at the front of the couch and some nail holes. After filling all the holes left behind by those nails and giving the entire couch a good sanding (a workout, let me tell you) to roughen it down to a matte finish, I was ready for paint.
Because it was wood and wood can bleed through latex paint, I opted to prime the couch with two cans of RustOleum spray primer in white. Spray paint is typically oil-based (or maybe it’s all oil-based?) and better at inhibiting wood-bleed. (Don’t ask me where I read this little rule but I’ve found it to be true in both following and not following that direction. I’ve seen wood bleed through latex paint and primer and so I’ll stray from that combo as long as I live.)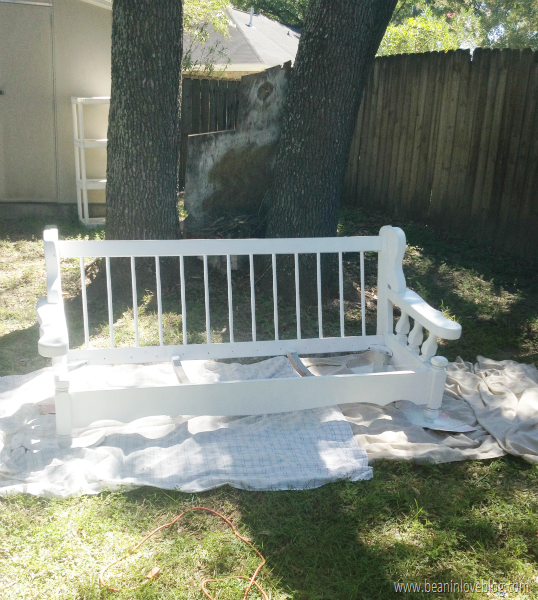
To paint, I used a latex paint (Swan White by Glidden in an eggshell/satin finish) sprayed on using this paint spray gun*. My friend Jesse let me borrow her Critter paint gun I had read great reviews about and then, at Christmas, I used some gift cards to buy my very own on Amazon. It’s really as awesome as I had heard! My favorite part is that it uses mason jars to hold the paint so, if you’re doing a big job, all you have to do is have a few mason jars lined up to be screwed on and you’re good to go until you’re done. There’s no stopping because you have to refill the paint canister. My other fave part is that it doesn’t cost an arm and a leg…it’s under $50 (I paid $41.97). (However, it does need an air compressor to run so if you can’t borrow one from someone, you’ll have to tack that onto the cost.)
A few days after painting, I ruined the paint job. Okay, not really. I just upped the ante by distressing it a tad. This part was the most fun of all. I grabbed a hand-sander and some light-grit sandpaper and went around sanding down some of the edges of the couch. Nothing to crazy. Just a slight distressing for a slightly old piece.
So, the couch was painted and distressed and looking quite jolly but the cushions? Even though the white couch made them look like they might convert to a cute outfit (distressed white jeans below with a plaid button-down up top), they did absolutely nothing to help aesthetics on the couch. Plus, they were so old and worn that if you rubbed them, they’d start crumbling into tiny pieces. Ewww…
I’d never reupholstered couch cushions before so the task ahead of me was very (very, very, very, very…) daunting but then I found this tutorial on how to sew box cushions by Christy from Confessions of a Serial DIYer. I ordered 5.5 yards of this Robert Allen outdoor fabric (it’s says chocolate but after seeing it in person in JoAnn Fabrics, I’d say it’s more of a charcoal gray) from fabric.com and I followed Christy’s directions almost to the T; the only difference is that I wanted to make mine zipperered so I removed the zippers from the old cushion covers using a seam ripper and re-inserted them into my new covers. I inserted the zippers first and then sewed the side seams and corners. The foam cushions were in good shape, albeit a tad smelly and minus a large stain one had that looked like a big glass of wine was spilled (or at least I hoped it was just wine or coke or something not gross). Oh the foam; cleaning it all was an ordeal. I scrubbed and swelled with soapy water and squished and repeated that process with each individual cushion in our bath tub and then, when I was done scrubbing, I threw each one into the washing machine with some clorox. My guess is that they had never been washed (because who washes couch cushions? I know. Not me.) and, even though they still held their shape, I didn’t want to recover them with brand new covers much less sit in them without knowing they were oh-so-fresh-and-so-so-clean. Washing those was a labor of love, let me tell ya.
After washing, I cut the top cushions so that they were a tad shorter and only just hit above the back of the couch by sawing a few inches off the bottoms with a serated knife. The bottom cushions, even though in good condition, had seen fluffier days so I wrapped some one-inch thick batting (from JoAnn Fabrics) around them to fluff them up. Butttt also, I made the mistake of sewing the covers for the bottom cushions a little too big so the fabric was really loose and wrinkled once on. I tried to figure out a way to resew and take them in so that they fit more snugly but, with the zippers, I couldn’t, so batting was the answer for that too. Win, win.
Anyway, in case I lost you on all the details ten paragraphs ago, here’s the 1000% better after: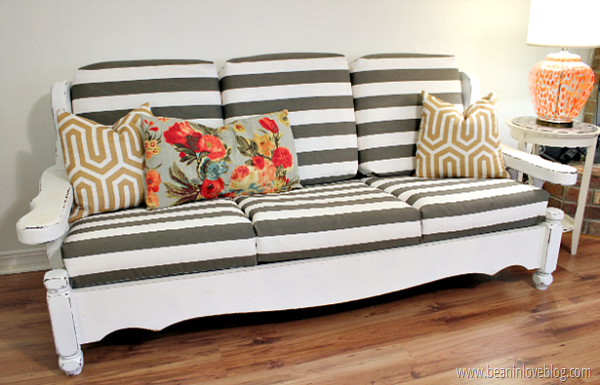


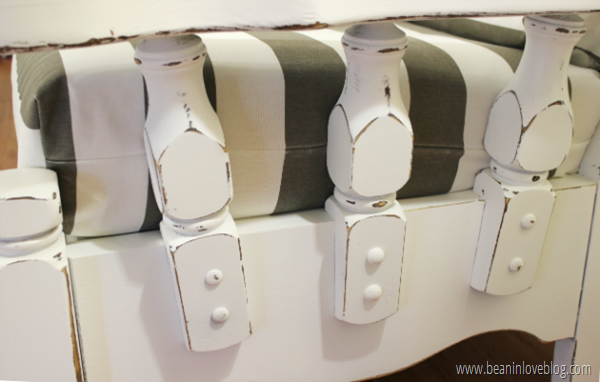
It’s not pictured outside in the screened-in porch because, in the time that’s passed since I finished this piece, we found a bamboo set for $40 on a resale sight and that couch and loveseat are currently waiting to be snazzed up. I love you old, vintage, wood couch, but the bamboo really has my heart and so my heart I must follow. We don’t really need the loveseat from the set so my plan is to fix that up and sell it but the couch will be my resting place all summer so you can be sure I’ll have all the details on that makeover. I’ll be sure to write some better tutorials on how I sew the new cushions and wash the foam (if need be) on that since my first try was successful and now I kinda know what I’m doing...kinda. Stay tuned.
As for this wood couch, we staged it for a blog and sale picture and sold it within four hours of listing it. It’s a little bittersweet but the sweet lady who bought it is putting it in an old building in her backyard that she’s fixing up to be a little retreat; pinterest-style. It sounds so delightful and this mom’s happy my couch baby went to a good home. Okay, couch baby Sheena? I know, forgive me of my unhealthy attachments to furniture…
But, it’s yet another furniture project in the books; quite possibly the most demanding furniture project to date. I’ll be taking a short break from those to recover and working on some simpler stuff. If you’re sitting back wondering how I got this thing done with three four kids under my belt, know that this took me weeks to finish. I know it all looks like I did this in a day or a weekend but let’s be realistic, shall we? Things around here happen slowly. Just ask Dwija.
. . .
So, let’s talk Labor of Love’s: Home Edition? What’s been yours recently? Maybe painting a room? Sewing? Remodeling? Give me all the details! It’s my love language. This week I’m deep-cleaning the kids’ bathroom and you know what that means…project in the bathroom time! Here’s a sneak peek if you’re interested. :)
Have a fantastic week eeerbody!
*affiliate link to paint sprayer gun I purchased


