Showing posts sorted by relevance for query painting wood furniture. Sort by date Show all posts

Bold(er) & Beautiful(Ler)

Calm down, calm down.  I know beautifuller ain’t a word.  Well, unless you ask Anna because she definitely tossed the term of endearment at Elsa without a fuss being raised so…

Switching gears and stories…

Once upon a time, I bought some secondhand furniture, like I often do.  I nabbed a pair of end tables and matching coffee table off a secondhand resale sight for $30 for all.  I added some fun to the coffee table and sold it and the end tables have been living here ever since – one out on the screened-in porch and one on the front porch.  You can see one in the upper corner of this shot post-stenciling the porch floor:

IMG_7757

Rewind a couple of years to a Goodwill trip whence I stumbled upon this set of four bamboo chairs for $40 and grabbed them as quick as I could:bamboochairs

Your Bum Will Thank You

I’m baaack!  Fevers are gone (for now) but we’re heading to the doc anyway because Seraphia broke out into a rash (I think it’s a fever rash – roseola)…it’s never ending with kids I guess.  But, this cheers me up:dandc 016light
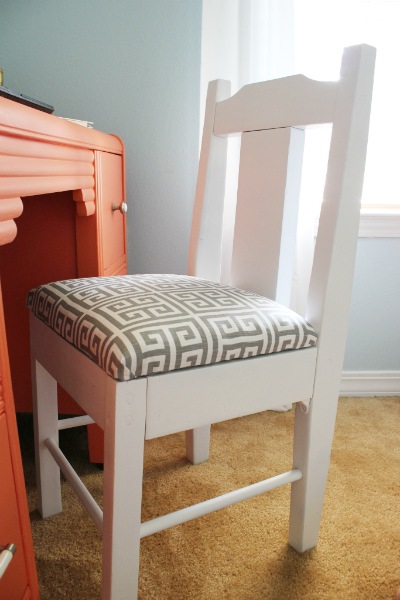
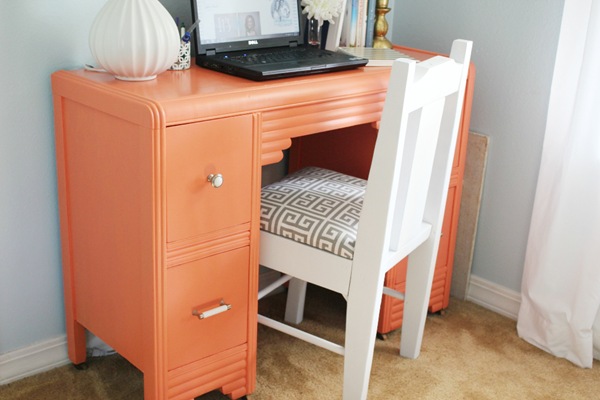
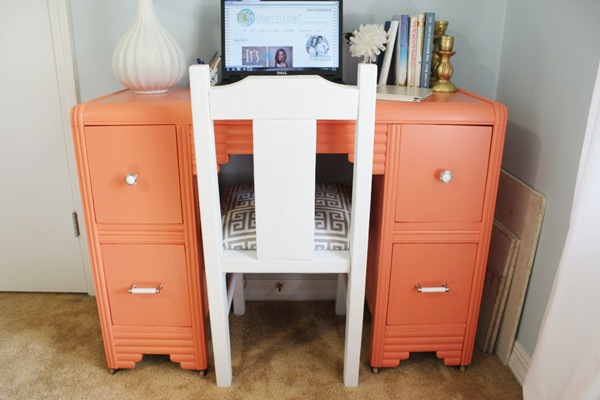
The desk and chair I’ve been working on for the past two weeks are DONE!  If you missed it, you can read all about the desk here.  For the chair, keep reading.  :)

The previous owner of our home left this old chair in the backyard shed.  It’s upholstered cushion was all nasty-nast and so, needing a chair for the desk in our guestroom, we dusted off the chair, took off the cushion, and sat it with the desk sans cushion thinking we’d put a new one on any day.  Well, that any day turned into almost four years.  I’ve literally had to tell every guest we’ve had, “Oh, and don’t sit on the desk chair.  There’s no seat.”  That’s because I was smart and put a pillow over the empty space to make it look like there was seat…perfect prank chair, not so perfect if you want happy, healthy, injury-free guests.  So anyway, free chair, moral of the story. 

It’s looking a ton different than the day we drug it out of the shed because we painted it and paired it with a brand new, upholstered seat.  If you’re looking to revive a chair yourself, read and learn.

First things first, prep.  If you’re planning on painting a chair but it has a slick coat of poly or any sort of sheen to it, you’ll probably have to sand it down first.  Depending on how glossy that baby is, you’ll have to sand less or more until all the shine is gone and you’ve got a good matte base to paint over.  Our little chair just had the slightest sheen to it, so I gave it a quick, light sanding with some medium-grit sandpaper (I used an electric sander because I was feeling especially impatient but a piece of sandpaper coupled with your hands would work just as well).  Then I primed it with white, Rustoleum spray primer (cheapest at Wal-Mart).  I used white primer because I was going to paint it white.  If you’re going for a darker color, it’d be better to use a darker primer like gray.
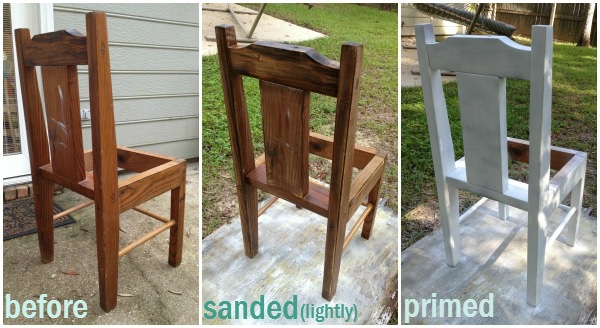
chair prep

After the primer was dry, I gave the chair a few thin and even coats of white spray paint (satin sheen, Valspar from Lowe’s).  After running out of spray paint and having to back burn this chair for a few days until I got more, I finally finished.  Moral here:  Always make sure you have enough spray paint for the project and even if you think you do, double check people!

Next up, the seat.  If your chair has no seat, like ours, you’ll have to cut one out.  If it does, like our dining room chairs, well, lucky you.  To make a new one, you’ll have to cut a piece of wood to size.  It’s as simple as making a quick template out of some printer paper and using that as a guide or doing like we did and tracing the outline of the old seat onto a piece of new wood.  Always set the new seat on your chair just to make sure it fits before you go to town on it.  You don’t want to go through all the work of upholstering only to find out it’s a tad big or too small…that’s kickyourself worthy.
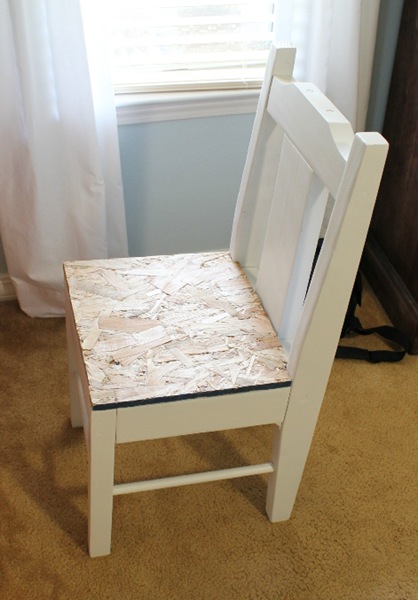
 dandc 001

I made one little alteration in the name of character to our chair seat since the seat back sank back further than the sides - I had Anthony cut notches in the back of the seat so all sides of the upholstered seat touched all sides of the chair.  The arrows in the picture below show what the heck I’m talking about:
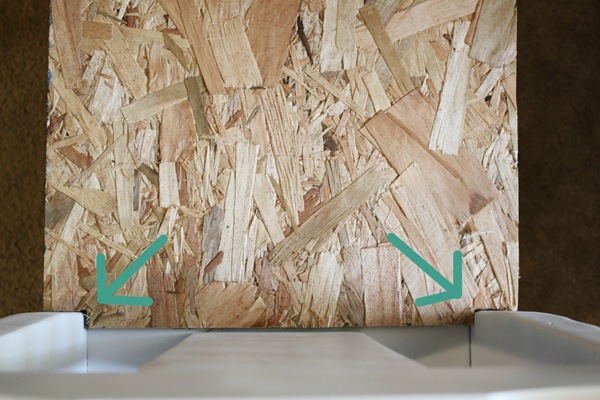
  dandc 002

The old seat cushion just went straight across from side to side, leaving a half-inch gap between the back sides of the seat and the upright part of the seat back.  With the notches cut in, the seat looks a lot more tailored.  See?
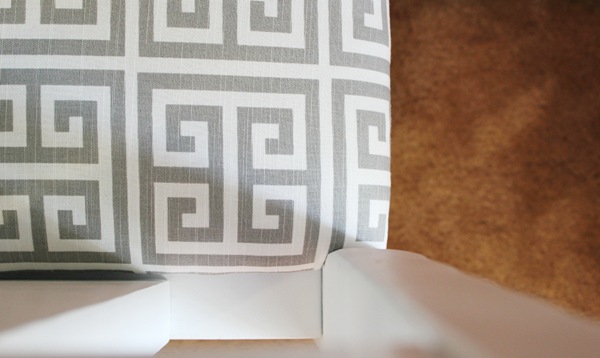
dandc 024
I’m pretty sure the notches are my fave part.  I love the perfect fit.  :)

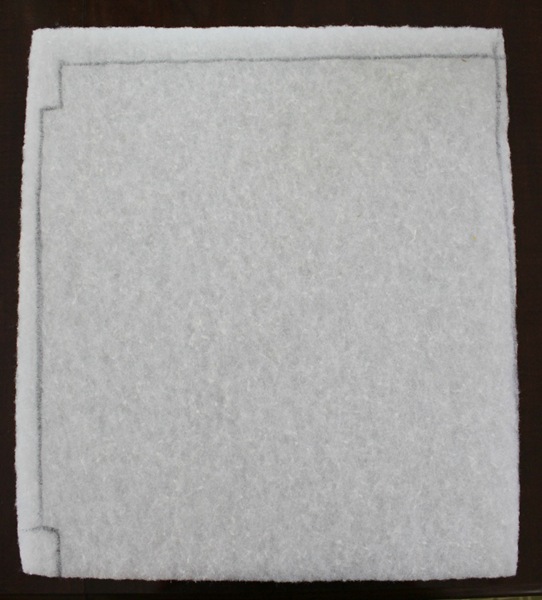
So, let’s back up.  After you’ve cut the wood for your seat, you’ll have to cut a piece of foam for cushioning.  I use the white, dense stuff…???…can’t think of what it’s real name is but I got mine at Hobby Lobby and I bought a three inch thick piece.  I use it instead of the light yellow or green foam because I think it’s cushier and my bum likes cushy.  :)

To cut the foam, trace your seat onto it…
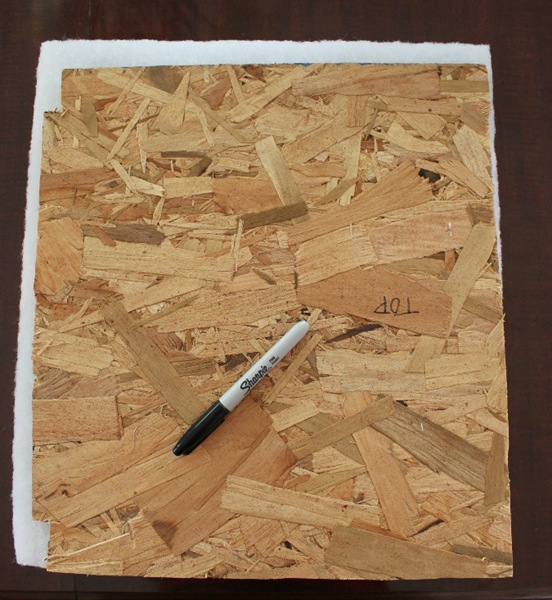
dandc 004

like so…
 dandc 005

and then cut it out.  The cushioning I use is really hard to cut and you can’t take your scissors to the whole thickness at once (for the three inch thick stuff anyway), so you’ll have to cut it in layers.  Just stick your open scissors into it and clamp down over and over and over… dandc 006
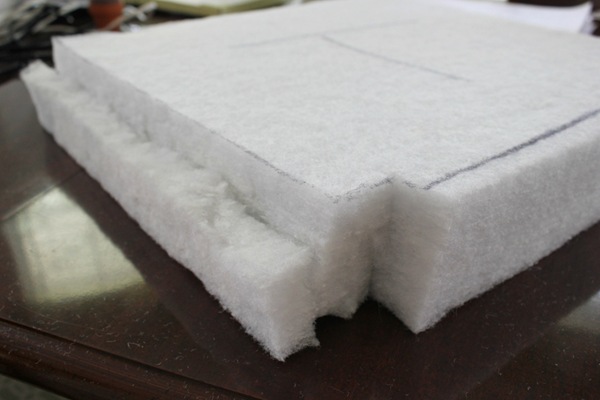
This is probably the worst part of the whole process.  Your hand will get dented and tired and little pieces of fuzz will be everywhere but it’s worth it, I promise.

Next, round off your corners and edges just by going along and cutting diagonally along them.  (In case you’re wondering, the sharpied “T” stands for top.  With the chair seat not being perfectly square and the notches, I wanted to make sure the foam matched up with the seat the way it was dry fit to.) dandc 008

This picture might explain what I mean by rounding the corners and edges a little better:
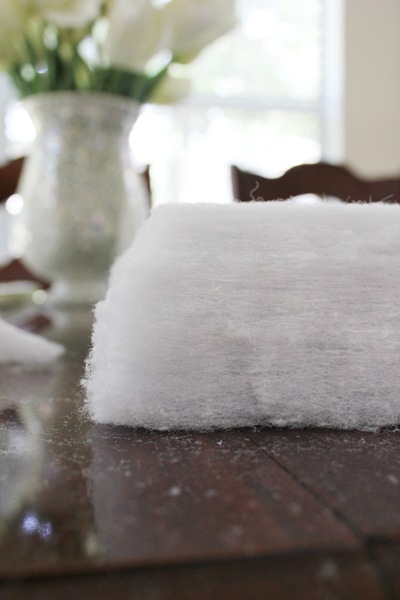
 dandc 007
See how the top corners are rounded?

Now grab your staple gun and the fabric you’re planning on using to cover your new cushion.  Smack your cushion and wood seat together on top of the fabric, which you’ve made sure is laying under your cushion STRAIGHT – so important!!!!  It’s not as big of a deal with a solid fabric or even a random patterned fabric but with geometric like mine, so, so important!  Starting with the middle of the sides and making sure your fabric is super tight (I knelt on the seat while stapling), start stapling towards the corners. dandc 009
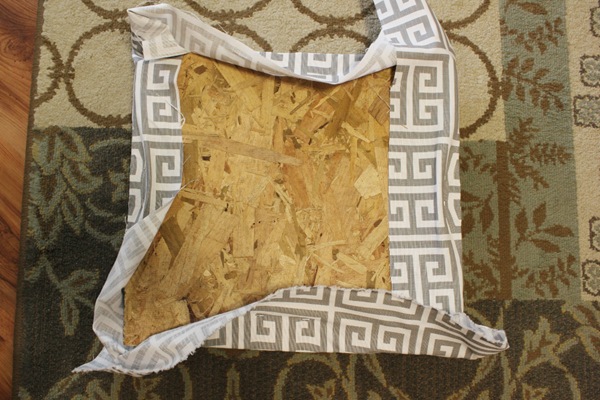
I didn’t get a lot of pictures of this process, sorry.  Anthony was helping me (it’s a little easier with two people – one pulling fabric and one stapling/taking pictures) but the needlets stole him from me and I had to finish on my own…

So anyway, staple until you get to the corners and just pull the corners until they’re snug, twisting and tugging (but be careful not to pull too hard over the corner edge or you’ll rip them!).  Check to see what they look like from the top of the cushion and staple when you’re happy.  Don’t worry if the fabric looks like a total wreck underneath, it won’t be seen.  :)

Here’s a closer look at my finished corners:
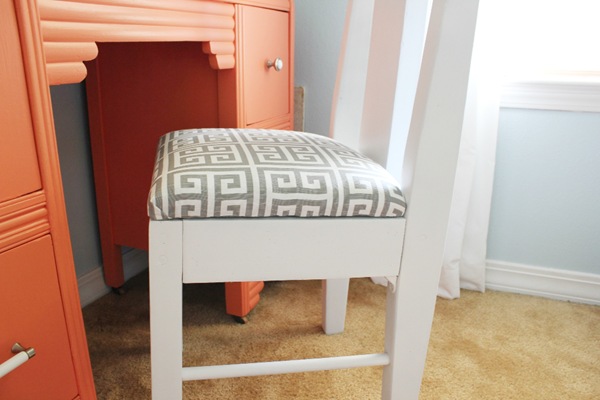
dandc 014

And here’s what the underside of my seat looked like after I was done pelting it: dandc 011
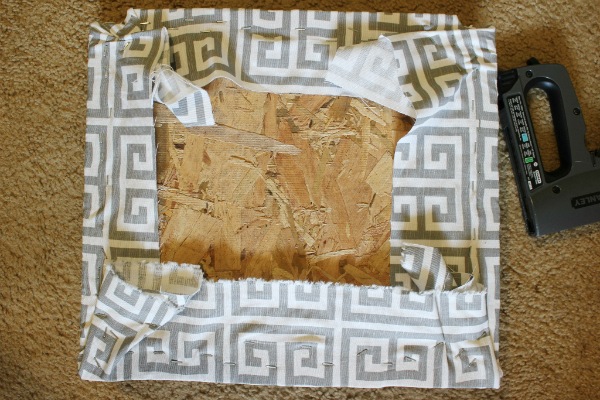
You may or may not want to cut off any excess fabric.  I did.  Here’s how it looked after that: dandc 012
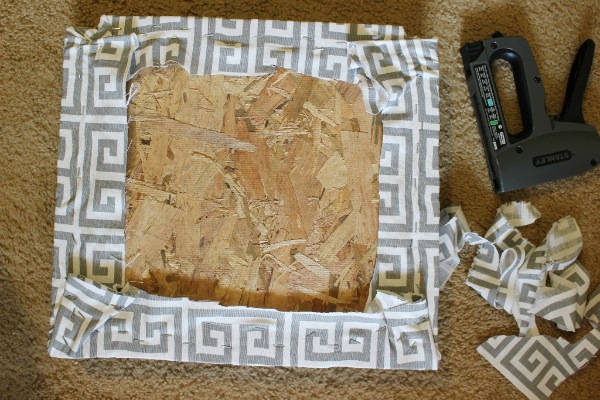
Last, attach your seat to your chair.  Most chairs will have pre-drilled holes so it’s as simple as replacing the screws you took out to remove the old cushion (if there was one).  Ours didn’t.  Anthony attached it using a couple of L-brackets and that was that.

All done.  Have a seat and re{freaking}lax.

 dandc 018

 dandc 019

 dandc 028

And my favorite part about the whole shebang:
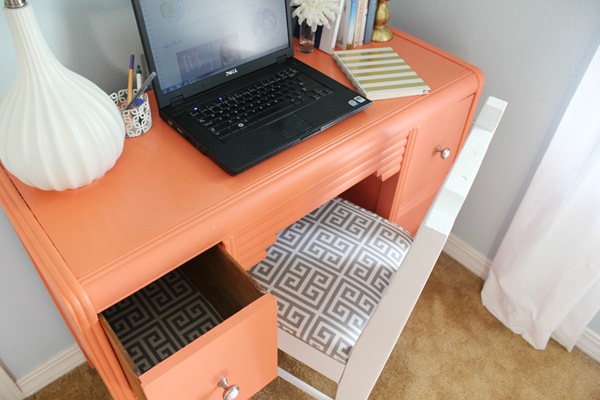
dandc 023 
The matching seat and drawer liners!  So cool, right? 

Now for the saddest part of the entire thing ---> We’re selling this set.  :(  We recently purchased a new desk because of a little scuffle with a Rugs USA groupon and so this one no longer has a place in this casa.  But, on top of that, I’m starting a new little furniture rehab endeavor to add a few drops to the account a la bank and this is the first of hopefully many pieces I’ll be sad to see go. 

But, I’ll get over it…eventually.

.           .           .

Any seat cushion making going on out there?  What about chair painting?  Painting?  Cleaning?…that’s what I should be doing…or stopping S from chewing on the lamp electric plug (unplugged obviously)…priorities…


P.S.  It’s party time and it’s been awhile since I’ve linked up to one so I’m ending the drought and linking up with Not Just A Housewife, Ginger Snap Crafts, and Watch Out, Martha!

Tiny, Tiny Home

Hey friend!  So, uh, yeah.  I know.  I’m supposed to be revealing the kids’ room.  That’s what you should be reading right now.  But you’re not.  I gave a short explanation over on Instagram the other day but if you missed that, basically, I ordered something for their room a month ago, got an email it was shipped from Virginia (or at least that a shipping label had been created) on October 30th, and that still have not yet received it.  I know I could just go ahead and share the final result but that thing is going to be a part of a big piece of design in the room and I just can’t show the room without it.  Sorry!  Hopefully when I get the reveal up and can explain a little further, you’ll understand.  I’ve since ordered from another company (and just got a shipping notification yesterday!) after contacting the first company multiple times without a response.  SO, the silver lining in this little mess is that the new thing will be here by mid-week and a reveal will be up on the blog by week’s end.  Huzzah!  Look for it!

I know I missed the deadline for the big One Room Challenge reveal but I’m not too sad about it.  I wasn’t in it for recognition or blog fame so there’s nothing lost in the delay and only a cute kids room gained in a six-week motivational scoot to a finish line.

Enough about that though, how about this little house?!IMG_7112

I had been very casually hunting for a dollhouse for the girls for the past year or so and, while the four kids and I were traipsing through a local thrift store here at the end of the summer, our eyes beheld this little house and it’s fine $15 price tag.  It was in great condition besides being a little dusty and VERY heavy.  Phew!   

Oh, and a little too frilly.  I realize that someone once painted this sweet little thing for some little person they loved and you can tell that A LOT of love and elbow grease went into it.  But, all of that love came in the form of lots of scrolls and sponge paint and that’s just not my language.  So, I changed things up a little.

Small Cabinet Makeover

Something I've had on my to-do list for a good long while now is to paint a small cabinet that's main function is to hold our Berkey water filter*.  The Berkey is awkwardly large as far as water filters go and if it weren't the best at filtering all the things, we'd probably ditch it for something smaller.  But, here we are with this big, chrome, bullet-looking thing in our kitchen. 


There isn't really a good place for it on our kitchen counter because it's so tall and takes up too much space so we kept hoping to find a small cabinet at just the right height that we could set on this small expanse of wall right beside the kitchen counter and obviously, found one.  


It was for sale on Facebook Marketplace for $10 and not only was it not the prettiest cabinet in the wide world, but the lady who sold it to me used it to store makeup and so it smells...like makeup.  It's a weird smell to have a cabinet giving off.  I knew the smell would eventually go away but that faux wood finish had to be dealt with.  Fast forward months and months when only this #letsroomtogether challenge could provide the motivation I needed to get this thing looking a little more like it fits in with it's surroundings.

About a Door


About a door that only took us a whole entire week to hang.  Lemme explain.

Outside on our back patio we have a small closet of sorts that houses our water heater.  Right?  A closet outside for the water heater?  I thought it was weird too when we saw it but it turns out it's actually pretty common down here in the deep south.  The door on that closet was in major need of repair or replacing though - the bottom part of it was all rotted from the elements and since we moved in, a couple of the slats had fallen out.


Not the prettiest sight.

Not even with our outdoor furniture and a quick power wash helping to disguise its falling-apart state.

It's never been a priority to replace it but when we were painting this part of the exterior trim a couple of weeks ago, we decided to just remove and replace the door with a new one.  Neither of us felt like painting a crumbling old door was a good use of paint.  We had braced ourselves to spend at least $150 on a new door to match the old but then, guess what happened?

Depending on how well you know us, you might have guessed it.

Swing Arm Lamps

Once upon a time we were having dinner with some friends and one of these friends asked me if I had any use for a pair of lamps she didn’t need anymore.  She had seen what I had done with some hand-me-down lamps before and thought maybe I could work wonders on these.  But before I could even get a word in, Anthony piped up with a resounding “NO”. 

So maybe at the time, we had too many lamps.  I was going through this cycle, which really wasn’t a big cycle, of rehabbing a couple of lamps, finding more lamps to rehab, and listing the former ones.  So sometimes we really had a bunch of ununsed lamps sitting in our house because some were awaiting a little love and some were awaiting a new owner.  And I was totally ok with it. 

Anthony though, well, he was not.  Understandable.

Why do you care?  Well because one day during those lamp-hoarding days I was walking through Goodwill with all (three at the time) of the kids and what did I spot?  These:

IMG_8386

They were marked at $8 for the pair.  Argh, I had to have them.  But I resisted the temptation because I love my husband so much.  But then those lamps haunted me and the headboard was a dream waiting to happen and I thought they might look so great with that headboard and so…I went back to Goodwill the next day, bought them, and immediately stuffed them under our bed when Anthony wasn’t looking.

And they stayed there for the next couple of years.

Doh.

Spotted: A Thrift Trip

It's been a good long while since I've been able to take a couple of hours to just roam through a thrift store or two.  But, as last week's errands would have it, there were four of them within the near vicinity of places I had to go and since I had a little extra time on my hands (well, borrowed of course from continuing painting the kitchen), I roamed...and these things are what I spotted...

(Pssst...if you're local to Mobile, I'll put the thrift store under each photo in case you have your heart moved and want to see if any of these are still there!)

This long tray was only a couple of bucks and would be a nice valet tray to set in a bathroom or atop a dresser in the bedroom to hold pretties and things.  In a kitchen it would also make a great place to lay cooking utensils that are in use next to the stove.

Goodwill on Azalea


Are you a plant person?  Pots can get pricey but I've always found thrift stores to have them.  These three were cute.

Living Room Tour

Recently, I’ve been thinking a lot about why I really enjoy decorating our home.  I’ve always found a good bit of fun in decorating – my mom decorated my room when I was younger based off of one of my favorite characters, Minnie Mouse, but I didn’t really play a starring role in the whole process.  She bought everything and was really good at styling and so she did it all and I lived with it for several years.  I tweaked things here and there though, nothing major, but what I really loved is that feeling when it was spotless.  Don’t get me wrong, I was very good at leaving my clothes scattered on the floor for days/weeks and clutter on my dressers and desk but I thoroughly enjoyed decluttering and placing the 3957 pillows I had on my bed perfectly once in that blue moon.

Fast forward to college when I really got to take decorating my own dorm room by the reins and went all out.  I spent $70 of my own, hard-earned money on a comforter I had to have at Linen’s and Things (now defunct) and made sure any other accessories I bought for the room coordinated. 

That passion for decorating still stands but I’m finding that I’m enjoying the process a little less than I did before.  I don’t think it’s that it’s just not as fun anymore though.  I think it’s kids.  Haha!  I decorated my entire dorm room in two whole days, ceiling to floor, and now it takes me weeks to get one room done.  Kids.  The satisfaction of decorating for me is more in the end result than the process anyway so when that end result is akin to the tiniest light in the longest tunnel, it feels overwhelming at times.  BUT, I wouldn’t have it any other way.  I know that’s cliche but it’s truth.  These four chicklets have given me more satisfaction than the final reveal of a million decorated rooms.  :)

On the same note, my reasons for making our spaces pretty have changed a lot.  Whereas before I just wanted a pretty dorm room/first-home-before-kids to come home to, now changing up spaces breaks up the monotony that my life can sometimes be.  I’m a big routine kinda gal.  Growing up I would have said I leaned more towards the unplanned/spontaneous side of life but I think having twins pulled me full circle to the other side.  No routines/structure when you have newborn/toddler twins = lots of stress.  I can’t say that’s a fact but I can tell you that the days where we at least tried (even if we failed a little) to stick to our routine were a heck of a lot easier than days where we completely disregarded it.  And so, structured and rigid I’ve become and that I’m guessing I’ll stay until we’ve got four independent children running around vs. the current dependent ones.  The routine-based life is wonderful and I thrive in it but it can get boring day after day after day after day.  So, adding some new pillow covers here or slapping up a new paint color there, spending naptime making something to hang there or building this to fill this space brings a much-needed surprise visit to that routine and a happier mom makes me.

With all of that, we’re switching gears!  Strap yourselves in for a living room tour! 

I took this before we moved in and started tweaking things:

IMG_6830Covering up the one and only window in the room were some heavy, light-blocking curtains and it looked like there was an eruption of tan everywhere.

I couldn’t get those curtains down fast enough!  Let there be allll the light there can be, I say!  Here’s where painting the walls white and adding in our furniture has us so far:

Where We Eat

Rooms are starting to flow a whole lot better around here and I feel like it’s just added a greater sense of (superficial) peace when we’re constantly moving from room to room…which we do A LOT.  Of course that sounds ridiculous and you can’t really gleen peace from a house, right?  Or maybe you can?  Who knows.  Either way, I might be crazy but here’s the old view into the dining room from the “new” kitchen:

IMG_8943pix

It’s like there was an invisible line at the doorway in which all the fun stopped and all the boring started.

But now, NOW it’s one continuous space where decor harmony flows in, out, and all around:IMG_9161

White walls did the dining room good.  I painted them the same Pure White (Sherwin Williams) as the walls in the kitchen which was key in getting this pretty choppy room layout to feel, well, not quite so choppy.  Maybe cohesive is the word I’m looking for…

Here’s a better view of the whole dining room taken before we moved in:IMG_6821

Old, heavy curtains, tan walls, and all.

And here’s what we’re currently working with:

Spotted: Goodwill

Last weekend I had to make a run to Lowe’s and just down the street from Lowe’s here is a Goodwill.  I left Anthony at home with all the kids and don’t tell him, but I did a quick swing by that thrift store.  ;)

I left without buying anything but I did grab a few pictures of things I liked and so, once again, we have yet another post in the ‘Spotted’ series (you can read more if you click ‘Spotted’ under the drop-down, archive menu in the sidebar).

I don’t know what it was about this picture but I really loved it.  IMG_0593I might nix the existing finish of the frame, painting over it with a creamy white but then again, maybe not.  I think it’d be pretty in a little/preteen/teen girl’s room – I’d pull the bright coral color out for curtains or bedding or maybe both.


On the docket over here is turning two coffee tables into tufted benches (stay tuned!) and so, of course, that’s what popped into my mind when I saw this coffee table.
IMG_0594 I have a thing for bamboo and the bamboo on this thing was in pristine condition.  It was only $4 (!!!!) because the glass was missing.  I’d remove that thick top part and replace it with a piece of plywood.  Stick some foam, some creamy white linen, and some tufting over that and it’d warrant all the heart eyes.

 
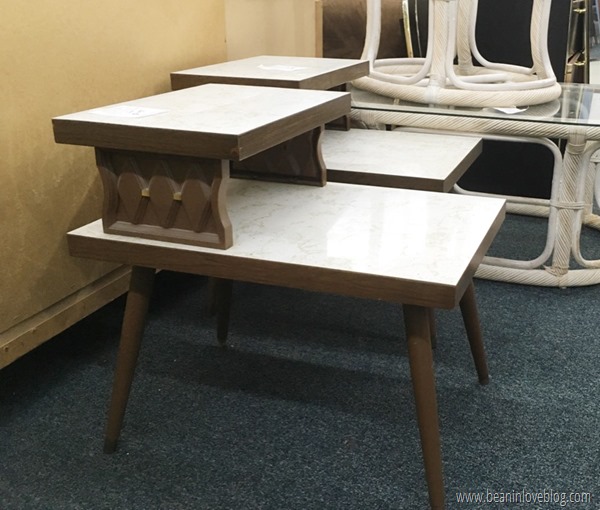
At first glance, these tables weren’t anything special beyond their mid-century modern vibe.  IMG_0595But, had I the time, I’d have swooped them up and dolled them up.  The white tops were a faux marble that I might try to extend or paint down around the sides of the tops to make them look like they were slabs.  Then I’d probably paint those sides with the diamonds and the legs (white?  gold?) only because I’m pretty sure they weren’t wood.  But, I didn’t look close enough to know for sure.  If in fact they were wood, I’d sand them down and stain them a light, ashy brown.


This chair.
IMG_0596Gosh, I wanted it.  But, I’d have an entire houseful of furniture with no room to walk if I grabbed every good piece I saw.  But, it might’ve been perfecto out on the screened-in patio.  Either way, I walked out without it.  It was marked at $34.99 and in great condition.  The cushion was boring so I’d probably make another but the bamboo (how I love it) looked incredible.  And I don’t know if it came off the base or not but how awesome would it be if you took it off the base and hung it?  Swoon…


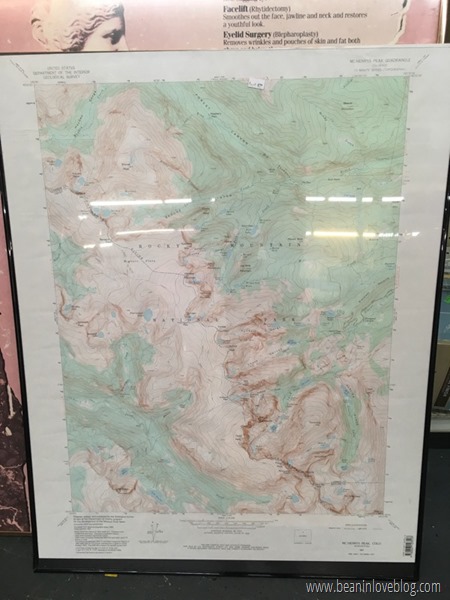
This was a fancy map of the Rocky Mountains:
IMG_0597I loved it because I have all the sentimental feels for the Rockies; lots of great childhood memories.  I also loved the colors in it; the minty green was so pretty.  I’d ditch the frame and find another though and it could be hung anywhere – office, playroom, bedroom, bathroom, etc…


I had a hard time walking away from this little hexagonal dish:
IMG_0598 I couldn’t think of a place to put it off the top of my head and now I’m wishing I’d have just grabbed it.  Our bathroom counter is crying.  My first thought was to stick some succulents in it to add a natural element to a space.


I have absolutely no use for teacups and saucers but these were so pretty.  IMG_0600There were only two anyway and if I were to start a high tea tradition here in this roost, we’d need just a few more.  The teacups might’ve made cute little succulent planters though.


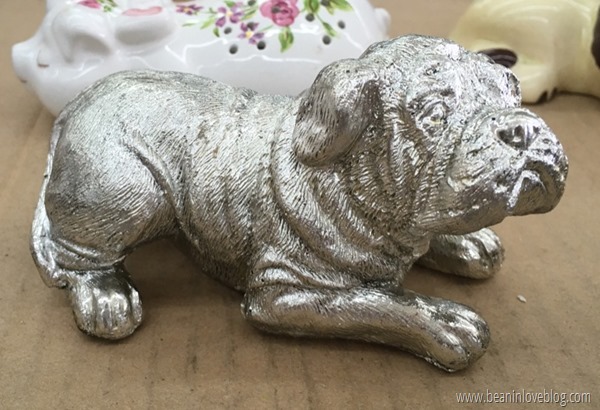
I’m really not much of a dog person (hello allergies) but this little guy was cute.
IMG_0601Sometimes styling shelves can be ruff but the addition of this pup would make any shelf quite fetching, ya know?


And last, I spotted this gem:
IMG_0599’Reconstructive Plastic Surgery’ – this one would be the star in a frame collage.  Hang it somewhere prominent and you’ll forever have the perfect ‘statement piece’.

*wink wink*

House Exterior Update | One Year In

Whew!  March 2020, you are one for the books, right?  April and May etc etc will probably get the same association.  Yipe.  I hope you're tucked away from it all!  We are just trying to lay low and distant but have high hopes that this social distancing will allow us some good family time and maybe let us get a few more things done around here quicker than we expected.  For one, we grabbed exterior paint this morning so we're planning on a few weeks (or more) of sticking close to home and painting.  There's a bright spot in everything, right?  If you haven't never considered yourself a DIYer before, Covid-19 might bring it out of you!  :)  

In other news... 

We closed on our house one year ago!  That's seems wild to me.  Like, really.  And maybe it's because technically, we've only been living here for 10 months so we haven't quite hit the year mark there yet.  If you don't remember, we closed on our house a couple of months before we had to be out of our rental.  That gave us time to scrape all of those popcorn ceilings and paint before we moved in all of our furniture, which would've made scraping ceilings 100 times harder.

I'm going to write up a picture-loaded post of the inside and how it's changed in the past year but first, we're going to start outside.  The backyard hasn't changed much (here's a little update on some landscaping) but the back patio has and all with the addition of furniture and a little feng shui.  ;)

Before:

Currently:

Staples-Be-Gone

No more staples!  I've got nicks and scrapes all over my hands (I got smart and put on my gardening gloves only after I was 75% finished) and my trusty, little flat head screw driver used to pry up those babies up isn't so flat anymore but staple pulling is over!  To give you an idea of how many staples were in this thing, I took a picture of a three-inch section.
Yeah, there were loads.  I'd say somewhere around 500, maybe more.  Some of them came out with the fabric as I ripped it away, but most of them felt the mighty tug and grip of my mini flat head and needle-nose pliers.

So now that that's done, next up is fixing and filling.  While I was pulling staples the other night, Anthony went to work with Liquid Nails, filling in cracks and reinforcing not-so-sturdy dowels (apparently 'unsturdy' isn't a word).  However, now that all of the staples are out of the way, we can go back over and glue anything we missed or couldn't get due to staples being in our way.  Then we'll get to work filling in small cracks and holes with wood filler.  Pictures of the whole gluing and filling process to come later.

We also are going to reinforce the back of the loveseat with burlap straps, just to make sure she's extra sturdy.  I was a little worried about finding burlap straps but as I was traipsing around fabric stores this week on a hunt for it, I found it at JoAnn Fabrics...who knew?  Not me!  I thought it was going to be the kind of thing I wouldn't be able to find anywhere, therefore having to end up buying it from some specialty place online.  
To add to my joy of finding it so easily, I got to JoAnn's cutting station and found out it was only 79 cents a yard...AND I had a 50% off coupon.  So, I walked out of that place with 10 yards for about $4.  I was happy considering my thought had been, "It's a specialty item and it'll probably run me back a good $20".

So anyway, that brings me to the best part of this whole post.  I get to start looking for fabric!  I've had a few ideas swirling around in my head the past few weeks...or since we pulled the loveseat off the curb.  I want something simple; something I can dress up with decor pillows.  Also, since she's going to be in our living room where we've got an aqua-colored sectional, I want something that will complement but not be overpowering.  The sectional is the main piece of furniture.  Plus, my intention is to one day (in a future house) move the loveseat to either a home office or our future little girl's room.  I think it'd be the sweetest sight with some pretty pink pillows and a curly haired little girl perched on it.  :)

But, back to reality, here are some pictures I ransacked the internet for pictures that show what's going on in my head as far as fabric goes:

 This is the color I'm thinking of going for, in a simple upholstery fabric.  It would probably be the cheapest and easiest to find option.


This is just a snazzier version of the same fabric in the color palette I'm looking for.  I'd love a good geometric pattern.


 Speaking of good geometric patterns, this one is my fave.  However, this particular fabric is pricey (ballarddesigns.com) and I don't know if I could find a similar, much less expensive version.


 I couldn't find a good picture of a swatch of thick-striped fabric and the best picture I could find is this one.  So, picture this fabric, only with white and taupe stripes on our loveseat.  Stripes get me every time!


And last but not least:
My ultimate favorite but very possibly hard-to-find-for-cheap fabric!  I love the big medallions and would love to see this fabric on the loveseat and matching pillows on the sectional (and on a future homemade ottoman for the sectional?) just to tie everything together.

So there you have it.  You've been inside my head.  You should also know that we're (I'll paint, Anthony will watch and cheer me on) planning on painting the wood of the loveseat white.  We thought about other colors but decided she'd fit into any room we put her in if we just went with (my favorite color) white.  What do you think?  Which fabric would you choose?  One of the ones I've come up with or a completely different one altogether?  :)
  Assuming I find the perfect fabric that fits the budget ($50), our goal is to have this curb-side "Over-Achiever" sittin' pretty by the first week in September (we have a busy summer otherwise it'd be sooner).  But, we'll get the straps on next week and get her ready to be painted so stay tuned!  Have a great weekend and upcoming week everyone!

.           .           .

P.S.  So I just found out I've been spelling 'loveseat' l-o-v-e-space-s-e-a-t.  The perfectionist in me really, really, really wants to go through every post I've written about this project and change each 'love seat' but I'm not going to because I don't have the time and it'll do me some good to just let it go.  But, I just wanted to get that out in case you think I'm crazy for spelling it two different ways (even though you probably didn't even notice).  There, now I feel better.  :)