Screened-In…or Out

This post was supposed to read…”You guys!  I’ve been keeping a huuuuge secret from you and it’s all done and ready for your viewing eyes!  We had a screened-in porch built onto our back patio and over the past few months I’ve been having so much fun decorating it on a budget.”  But darn it all, instead it’s going to read…

You guys.  We had a screened-in porch built onto our back patio and over the past few months it’s been so bittersweet, emphasis on the bitter.  Really, the idea was and is amazing and we did get to enjoy several hours of enjoyment out there at the end of the fall but then we found out that our chimney, which is on the roof right above the new porch, is actually rotted out and needs to be replaced.  We would never had known if we hadn’t put the porch on though.  We noticed water trickling down the side of the house inside the porch one day during a big rain which was obviously a problem since we had a big ‘ole roof over our heads.  Then we had water issues on the other side of the porch; the side separating the porch from the outside.  Everytime we had a huge rain, water would leak into the porch between the concrete floor and walls.  Not a little bit of water, a lot of water.  The rugs got wet and muddy.  The furniture had to be moved.  It was a mess and such a huge downer.  Not only did we save up over the past two years to get this thing added on, now we had to once again save up to fix problems that came about after while not being able to really use the porch.  I know, first world problems. 

So, instead of an after picture of carefully curated thrift store furniture and a decorated back porch that I was so excited to make look great on a tiny budget, all I have is this for you:
IMG_7633
I love being able to open the french doors in our living room when it’s nice outside without worrying about bugs or mosquitoes coming for me.  I’ll love it even more though when I can just prance out, plop my pregnant self down in the mornings, and drink my coffee aside my loves or walk out to eat lunch al fresco in the summer.

The inside of the porch is currently filled with a bunch of thrifted bamboo furniture waiting for a makeover, a wood-frame couch I made over specifically for the porch (that you can get a glimpse of here), a patio table set, and a couple of rolled up rugs.  The floor is so dirty because we learned, after cleaning all the mud and dirt up after the first rain, that it’s just going to get dirty again with the next big rain so why clean it?  Anthony (and our generous friend Alex!) has been working really hard to put in a french drain right outside the porch to solve the water problem (and it looks like it’s a definite cure so, yay for that!) and he’s trying to carve out some time to fix the chimney himself.  Right now it’s half taken apart and sitting with a huge blue tarp over it to keep the water out…I’m sure our neighbors love it.  Thankfully, you can’t see it from the front.

I’m really so excited to share the finished space with you.  I’m hoping to use only $200 to get it to “oasis” status.  We’ll see how I do.

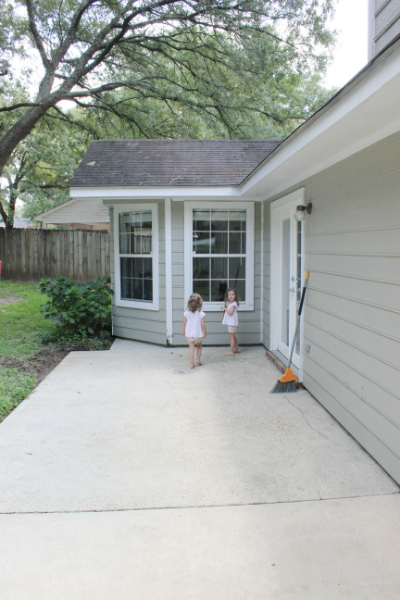
Here’s what our back patio looked like before we had the screened-in porch put on:
IMG_6400
IMG_6402
IMG_6398
It covers the entire concrete area and the extra space is really awesome for the kids…well, it will be once they can actually use it.  I’ve got plans of stenciled floors (still trying to convince Anthony of that one…) under a couple of great rugs, comfy uphostered bamboo furniture, a separate but open living and eating area, and lots more.  Two hundred bucks max…can I do it?

Stay tuned.

So Tuft

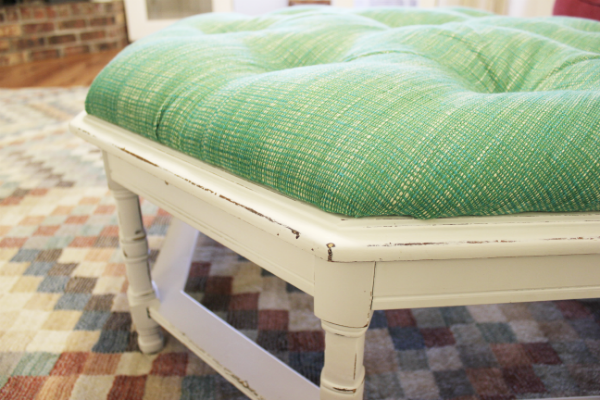
I mentioned in (Ash) Wednesday’s post that we finally rereupholstered the ottoman in the living room (previously a coffee table…read all about that extravagant transformation here).

The fabric on it majorly clashed with the pixelated rug we got two Black Friday’s ago and so I’ve just been living with that awful marriage for the past year.  In that time, I’ve been scheming about what kind/color of fabric we could reupholster it with that would jive with the rug.  My good friend Jesse suggested a cognac leather which sounded and looked amazing in my head but I really was longing for something a little more comfortable; something I could put my footsies on that was soft and not cold to the initial touch.  Velvet.  Yes, it had to be velvet.  Jewel-toned, green velvet.  Yep.  I had my mind made up.  There was this beautiful green lodged in the rug and I’d pull it out in velvet form for the ottoman.  Except any and all searches for that color of velvet on the net gave me nothing and when I did find something that might be what I wanted, I chickened out in ordering because I was scared it wouldn’t be the right color of green.  Computer screens can be such liars and ordering swatch after swatch can get expensive.

Lucky for me, there’s this incredible fabric store about 35 minutes from my house.  I never get there anymore though because driving 35 minutes to unload the kids into aisles of fabric would be like, so dumb.  I’d be trying my best to keep them close to my person and not running down aisles or hiding behind fabric that they unrolled and, oh wait, that they’re now using as a blanket on the floor…oh my gosh, this was monstrous mistake.  I’d leave with nothing more than frazzle.  But, and that’s a big but (I like big…no?  Okay.), also lucky for me is that one of my closest friends just moved two minutes away from that glorious fabric store and so she graciously watched the girls for me for a bit a couple of weeks ago while Sebastian and I went and scouted fabric…and found some!  It wasn’t the velvet and it wasn’t a plain linen I almost bought in the green I wanted.  I went a tad outside my comfort zone and bought a woven green upholstery fabric – woven with strands of cream, bright blue, and bright green that altogether made one nice shade of jewel green.

Anyway, I bought it and I really wasn’t planning on writing a whole ‘nother post on how we reupholstered the ottoman since the first one was detailed enough but then, when the time came to reupholster, I had some frustrating issues with the buttons so I thought I’d make someone’s life a little easier and share my solution.

But let’s backtrack to before I even got my hands on the buttons…

I spent one naptime last week taking the old fabric off the ottoman (which I have along with the buttons if anyone is interested in using it to reupholster and tuft something!) and then took the kids outside to roughen up the base a little with some sandpaper.  Time and kids had already started wearing through my paint job so distressing it seemed a better and easier option than repainting, for now anyway.

After, to show distressing:

IMG_7637(P.S.  I should write up a little post on how I lightly distress but until then, basically all I do is take sandpaper and lightly sand away the paint on the edges of a piece.  I don’t do every part of each edge but skip around so that some edges are painted and some are sanded to the wood below.  It’s so easy and mistakes aren’t really possible.)

Then, while Anthony finished up a little work one night, he and I sat in the living room together and each did our own thing.  I had my lap desk and everything I needed to upholster some buttons with the new fabric and everything was going great…until it wasn’t.  I got as far as cutting out all the circles (per the instructions on the button kit which are awesome) but when I tried to actually put the buttons together, I all of a sudden found myself sweating and with a hearty case of pre-arthritis.  Because the fabric was a heavy, upholstery fabric, it wasn’t fitting very well into the back of the buttons so the backs could be attached and that left me pushing, prodding, poking, and about to break all of my fingers off.  Seriously, I had envisioned this quiet, peaceful night where Anthony and I would each get our work done in 30 minutes and then we could have a little date.  No, no, and no.  I spent the better part of the night with buttons, on the floor.

But, in the end, I won.  So, if any of you ever find yourselves in a fight with thick fabric and upholstery buttons, here’s how to come out on top…

I started just like I did with the old buttons - I wrapped the fabric around the top of the button, stuck it into the button tool that came with the kit (I used this kit* both times), and plopped a tiny dollop of liquid nails into the middle for extra staying power.IMG_2828(P to the S:  You can see the green I was pulling out of the rug in this picture!  It’s so hard to see it when I photograph the rug overall.)

Then I pressed the back on with the little blue cap that also comes with the kit.  Only, when I released, the back didn’t stick and I was all like “what the hay?!”.
IMG_2829
I tried again, and again, and harder, and harder, until I could try no more.  That dang button back just wasn’t going to get in it’s groove because my fabric was so thick.  Grrr…

I didn’t know what to do.  I got out my computer to ask Google for help only all I could find were pleas from people with the same problem or people who apparently didn’t have this problem.  I didn’t really want to buy new buttons since I had already spent moolah on these and loved them last time I used them.

So, I experimented a little.  I only needed nine buttons and there were 10 in the pack so if I ruined one, it wasn’t a big deal.  First I tried using my hammer to hammer the two button tools together instead of pressing them, like you were supposed to do.  The worst I could do was crack the plastic but that didn’t happen.  Nothing happened.  Then I got out my needlenose pliers and set the closed tip in the groove around the outside of the button back and pressed it into the floor as hard as I could.  I did this maybe 10 or so times; all around the back of the button.      IMG_2830
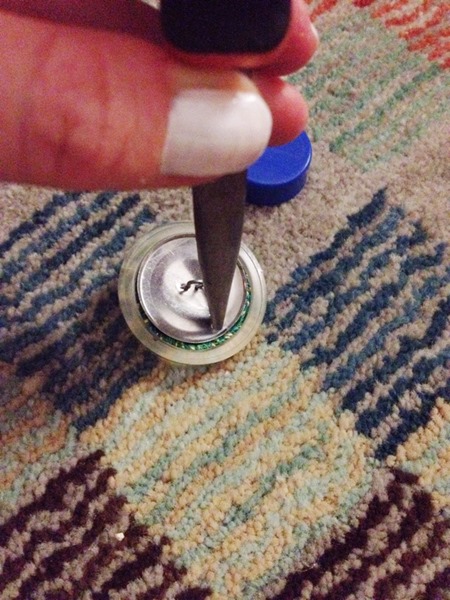
And golly gee, it worked!  The back of my buttons aren’t the prettiest ever but since no one will see them but miniscule dust bunnies, I could care less.IMG_2831

I let the buttons set over night so that the Liquid Nails had plenty of time to dry and the next night, Anthony and I had our date night – tufting and upholstering.
IMG_2679

And it was awesome.  And the ottoman doesn’t clash with the rug anymore and that is awesome.

IMG_7627

IMG_7632

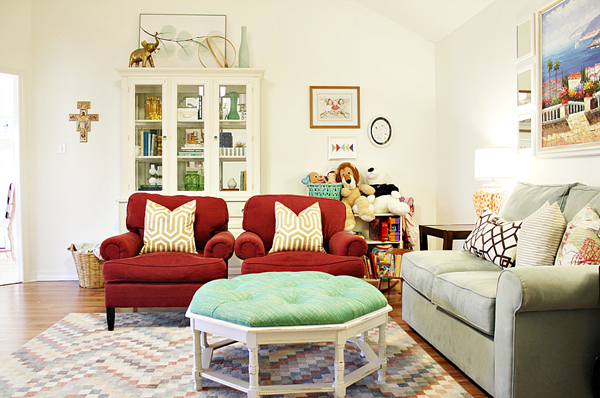
But now we have minty-blue couches, a green ottoman, and cranberry club chairs.  Too many solids and one of them not my favorite on furniture (ahem…cranberry).  So, upholstering I will try.
IMG_7643

I’ve been on the hunt for the perfect fabric and thought I was settled on finding some thin charcoal and white stripes, using these striped beauties as inspiration:

lc861cltx

[image via purehome]

I don’t think I’ll ever get sick of stripes and I need something that will go with any change I decide to throw in the mix down the road.

But then last week I came across this fabric online, ordered a swatch for a buck, and love it.

Large_0408577

Decisions, decisions.  Pray tell my savvy readers, what would you do? 

The only other question is that remains is, will I fight the urge to reupholster and wait until much after baby comes, or will I fall prey to the bug ‘o nesting and do them as soon as possible.  I’m guessing I’ll fall prey to nesting but still have to wait which is a great combo for this semi-perfectionist-need-to-get-everything-done-at-once personality.

I guess we’ll just have to wait and see.  Before chairs on the assembly line is a master bedroom makeover.  I said I’d have an upholstered headboard diy-ed before Sebastian came and that never happened so here I am, saying it again - I’ll have one before this diva gets here.

I will.

There’s no lack of motivation or desire over here so, if you’re needing some, look no further.  Consider it post-marked.

#doallthethings

.           .           .

*affiliate link

upholstering buttons

Mirror, Mirror…

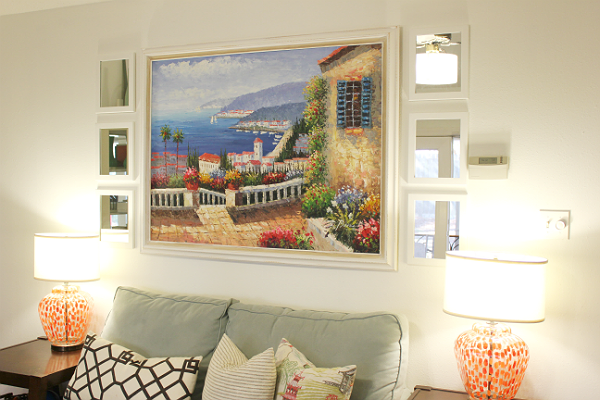
mirror, mirror, mirror, mirrors on the wall.  Ever since we hung our big ‘ole painting of the Grecian (Italian?) shoreline up on the wall, I’ve been dreaming of flanking it with some mirrors.  I mean, we’re talking dreaming for awhile now considering it’s been on that particular wall for several months.  The living room is the darkest room in the house and recently it got a little darker thanks to a big something I’ll disclose a little later (hold your horses!), so we needed some major help in the light reflection area.  Enter these mirrors, perfect for bouncing light off the opposite french doors to lighten up the space:IMG_2628I found them at Dirt Cheap last month for $2.50 each, which I thought was a pretty darn good deal since the cheapest I’ve been able to find in all my searching over the past few months was $3.00 for some square mirrors.  They measure 8” x 10” so I only needed three on each side to line up with the frame and still have a little room for spacing.  As you can see in the picture above, I got them up onto the wall (using my handy-dandy picture hanger) but just so I could get the nails in the wall to make life easier on myself since I was planning on taking them back down to paint before we called anything ‘done’.

And paint them I did:IMG_7640

I also repainted the big painting’s frame too but I’ll get to that in a second.

Before painting and re-hanging though, I needed to remove the kickstands on the back so that they’d sit flush with the wall.  Basically I ripped them off carefully, wiggling them from side to side so that the metal at the top of the kickstand bent and eventually broke.  Then I just popped out the plugs/screws from the other side of the black backing.

IMG_2447

I took each frame off the wall one-by-one to remove the kickstand and paint so I could make sure I marked exactly where it went so I wouldn’t forget.  I just silver-sharpied a little map onto the back of each frame-backing like so:
IMG_2629Make sense?  So this one went in the bottom right corner…

First I primed them with some white Kilz primer I had on hand using a small, flat paintbrush.IMG_2630
I put on two coats because I was going to paint them with leftover wall paint from the living room, and if you remember correctly, the coverage on that was not the best.  So more primer = less bad paint.  The mirror on the left has one coat of primer on it; the mirror on the right has two:
IMG_2631

The primer dried quickly so I was able to paint them during the same nap time and then hang them back up later that night.

I’m not done with them quite yet though.  I was hoping to show you a final, finished picture but last week didn’t give me enough time to hash out a plan and execute.  I’m planning on adding some trellis detail to each one to liven them up a little using this pin and this pin as inspiration.  You know what to do, right?  #staytuned

Now, onto the big frame.  The distressed cream-color looks great with the painting itself (and on red walls), but on white walls, not so much.  It just looked dirty to me against the clean white.  Painting it would help fix that and then allow me to fix one of the corners that wasn’t cut exactly to size.  IMG_2652
All I had to do was fill that little gap in with some spackle, let it dry, wipe it smooth, and I was good to paint right over it.  Gap-no-more.

I ended up slapping more of the white living room paint onto the frame and then taking some sandpaper (plus the palm sander when I got lazy) to it.  I’m not really into distressed stuff that much but sometimes when you paint something with a lot of detailed edges one color, like this frame, it can look fake and plastic real quick like.  Distressing pulled the light wood out from underneath and also helps it stand out a little more against the wall behind it.

Here’s what it looked like post-paint and distress:
IMG_2660

Then, I got a little crazy and a little nervous by trying a little experiment – adding a thin coat of stain to the flat, recessed area on the inner part of the frame.  Anthony was already a little sad I was painting the frame so when I told him about this plan he gave me the whole eyebrow raise and “Oh man, I can’t watch” thing. 

I used a Minwax wood stain in Special Walnut.  I LOVE this color.  It’s not orange at all (I’m not a fan of orange-hued stains) and has a slight gray hue to it.  Perfect.IMG_2661

Using a paintbrush that was just as wide as the recess, I painted one thin coat inside that recess and that was it!  It took a few hours for the stain to fully dry since I didn’t wipe any excess off when I was done and I love the way it turned out…and so does Anthony, ha!  Because I distressed that area too, some of the stain fell onto the wood beneath creating a very imperfect effect.  No plastic or fake frame look here!IMG_2662

I can’t wait to add the trellis detail to the mirrors but so far, I’m loving how much the mirrors and new paint add to this whole space.

IMG_7629

This is what it looked like a few months ago:
IMG_6027

It’s coming along!  Did you notice we recovered the ottoman?  The rug never photographs well but the ottoman and the rug don’t fight so much with this green.  The same green is in the rug and I think once I get the cranberry off those chairs, it’ll meld in even more.

I know the loveseat looks a little awkward without one arm but right now, it’s there because having the sectional there just isn’t very functional as far as the kids easily getting to their little play corner.  So, there it sits for now.  I wish I could crop out those chairs too…the color is killing me.  I think I’ve just scooped up enough ambition I need to reupholster them myself though so, even thought it probably won’t happen until well after this baby girl is born, I can’t wait to slap some patterned fabric on them and even change up the look by adding square arms instead.  I’ll have more details on my thoughts later.

I could go on and on about plans but I’ll leave that to another post.

.           .           .

I hope you all have a wonderful (but not too wonderful) Lent.  It’s such a great season to groom ourselves; to toss out the bad and bring in more good.  This post from Jenny today was just what I needed to start off this time.  I hope it inspires you as much as it did me.  :)

The New Mantel

So how many of you knew by my hint, "boo fantel" last post that we built a new mantel??!! Every single one of you??? I knew it! Smarties, all of ya'll.

When I say "we" built a new mantel, what I really mean is my friend Chelsea and I built a new mantel.

Be. Hold.


This was a project I tacked onto our 2016 To-Do list that I figured we'd maybe get to juuuuust in time to hang stockings on it come next Christmas. But then a few weeks ago Chelsea and I were chatting about projects (psst, she's a DIY blogger too) and I casually mentioned my mantel dreams and then a few days later she emailed me and asked me if she could help me build it for her web show (I was like "WHOA...YES!") and then she said maybe we could do it the next Friday (and I was like "OH MAN! That's really soon and I have no idea what I want quite yet and the kids and no babysitter and and and...but how do I pass that up??!! YES, FRIDAY IS GREAT!!!) So she came, she saw, she conquered...and I followed her every direction because little 'ole me has never even used a circular saw but she told me she'd teach me.  Ha!  Anyway, the best part of all is that you can watch the WHOLE VIDEO of how it was built over on her blog!  I hope it'll inspire you to go out, grab some wood, and build your very own. Let's ditch the curvy/old/not-our-style for the sleek together, shall we?

Speaking of...
I'm so happy to be rid of that thing. The color, the shape; everything about it had me at good-bye.

I'll have more details later on the whole living room because I pretty much spent all of last week tweaking here and there so that our new mantel had a chic-er place to reside but for now, check out the video!

And just to pound in how much better it looks:
I mean really, our first mantel didn't even stand a chance.  Poor thing.

.           .           .

Quick side note:  In case you noticed, we decided to replace the rectangular molding at the top with crown molding post-project.  The previous molding was great and the easiest to build onto the mantel but we wanted to add a little bit of traditional to the modern, clean lines so we just cut some crown molding and put it up right where that other molding was.  :)

Our Paint Chip Family

Ooh, DIY art.  It's my favorite.  And since I'm really, really, really bad/slow at getting real pictures put into real frames, it's really easy too.


So, when I saw the above gallery wall done by Jessica at Pretty Providence, specifically that framed triangle artwork in the upper left, I was inspired.  I got to work one nap time and created my own version of it in the form of a little abstract family portrait, a very abstract family portrait.See?
It's Anthony and I on the left (he's Neutral Gray even though he's anything but neutral and I'm red/orange or "Red Hot" as Behr calls it...ha!), and the kids are two blues and a golden yellow (or boring "Sunwashed Blue", "Honey Beige", and "Harbor").  It's going to have to get tweaked a little bit here in the next few months but since I did this project months ago and am just now getting around to sharing it, we'll stick with five triangles instead of the six we really need now.  The question that now remains is, what color should the new little lady be?  I'm accepting ideas...
The five of us are hanging in the toy corner in the living room; a little area we moved all the toys to last year when we rearranged this room for better functionality.

Want a little triangular fam of your very own?

You know you do!!  Here's how you can birth one...

Grab some paint chips.  I used chips I had on hand from prior projects.  
(Soapbox note:  I don't condone just going into a home improvement store and grabbing paint chips for free for projecting.  I feel like, and maybe this is a little dramatic, but that's almost stealing.  Somebody pays for those and even though they're up for grabs and free for us consumers, I don't think that means going and grabbing a bunch for non-paint related purposes is cool.  However, I do think that going into a home improvement store to buy something and supporting them financially in another way gives you a little more justification to maybe grab a few for a project.  Just my two cents.)

A few of them were squares so I just penciled a line halfway down the middle on the back to create two little triangles.  Then, I used one of those triangles as a template to cut triangles out of the chips that weren't squares.

Then I just cut out the triangles...with my food scissors, yes.  Sometimes they're just the closest and sometimes I'm just lazy.


And then I apparently didn't take or lost any and all pictures of how I got them in a frame but luckily, that's Kindergarten-level stuff.  I just grabbed an old frame I had laying around that I had broken the glass to years ago, stuck a piece of white, matte photo paper inside, and glued my triangles in the order I wanted them to the photo paper.  I used photo paper because it's a little thicker than regular computer paper but really, you can use any kind or color of paper you want.  It's your family.  Make it how you want it.  :) 


Along with our family triangle portrait, I hung this print from Hatch Prints (also used in our recent pregnancy announcement) in a thrifted oval frame that I spray painted white and the mat black (they were a nice shade of gaudy pink), and framed picture of the kids I rehabbed from this thrifted frame:
I bought it for the color of the frame but painted the mat white and then went back in and painted in the gray border for flavor.

This little corner of the living room is set now but we've made some major progress in other corners that I can't wait to share with you.  Stay tuned for one rather large update next week!  I'll give you a hint, it rhymes with boo fantel...