Showing posts with label Fashion DIY. Show all posts

Ripped Off

Hey y’all!  I have been spending all of my allocated blogging time (which translates to post bedtime once in awhile) fixing all of the links on my Projects & Ideas page!  I haven’t changed anything…just fixed the links after a technological error and user agreement change on behalf of Photobucket (don’t ever use them Baring teeth smile), but it has taken me hours and hours here and there to get them all up and running again.  Phew!  I still have a few to fix and they’ll eventually find their conclusion but I wanted to pop in quick with a tiny story and tutorial before I get back at the virtual housekeeping.  :)

I’ve been trying to up my collection of dresses recently, on a budget of course, and so you can imagine my delight when I found this shift at Dirt Cheap for $10:  IMG_6856
It adds a little pizzazz to my winter white skin and ashy knees, doesn’t it?  And the pink elastic around my wrist set for Phia’s noggin’ was the perfect accessory.  Clearly, I was made to be a fashion blogger.  A n y w a y, the dress hails originally from Target (the brand is A New Day) but it doesn’t look like they sell it there anymore.  If you likey too, you can find it here on Blinq (for $10!…though I’ve never shopped there before) and I found some ‘used’ on Poshmark but they’re almost retail price.  #dumb

Well, all was great until I slipped mine on for church one morning and noticed a big rip…right in front. 

DIY Fur Infinty Scarf

I have to give myself a reality climate check every fall down here in the South.  It’s something like - H E Y, I know everyone and their cousin is posting pixels filled with spiced lattes and covered toes but you live down where it’s still, not technically, but actually summer.  The humidity is still here to slap you in the face upon the exit of any a/c-filled abode and building and, your deoderant, yeah, it’s still working overtime.  You’d think I’d be used to it by now but no, no, no.  I actually grew up in the midwest where fall really feels like fall and summer stays back in summer.  But, I’m not complaining.  Sure, I miss the snow but I don’t miss the months on top of months of it and it’s great to not have to dress the kids up with 75 layers and then their Halloween costumes every year…you know, so they can actually go out as a little butterfly without looking like a stuffed butterfly. 

Anyway, the past couple of weeks have seen a little bit of chilly weather (chilly as in under 70) and so I jumped at the chance to finish a little project had started last fall…and by started I mean, I pulled out the fabric one day, threw up an Instastory about it and then never got around to moving it to my sewing machine.  But, with Gianna and Sebastian doing their synchronized napping thing, I was able to whip this up in a half hour and get the regularly scheduled homeschooling in with the twins one day last week.  #werkit 

Without further chatter, let me introduce my new, faux fur, infinity scarf:

IMG_6217jacket:  hand-me-down, altered // similar
button-down:  Target via Dirt Cheap // similar
jeans:  Old Navy (I heard great things about the Rockstar Built-In Sculpt jeans from ON last year and was so excited to try a pair but when I did, I was sadly disappointed.  I felt like they smashed my rear end down and were really uncomfortable.  Darn.  When I returned them, I tried their Rockstar Super Skinnies instead and LOVE them!)
wedge booties:  eBay // Amazon (I bought mine new off eBay three years ago and they are still going strong.  They’re really comfortable too!)
 

Want to make a fur scarf of your very own?  You know you do!  And guess what?  You could hand sew one in under an hour, maybe even in under a half hour.

Bow Whoa Whoa

Once upon Sunday, minutes before church, we were rushing to get out the door and I had the girls dressed in the cutest of outfits that would be best topped off with a pretty little bow on their pretty little heads.  The problem?  We had no bows.  I don’t know about you but you might know this about me…I work pretty well under pressure.  Actually, that’s when a lot of my out-of-the-box ideas come loose.  So, with seconds to spare, I remembered I had some scraps of felt laying on my desk.  With a little snip here, a little snip there, a twist here, and a tuck there, we had bows. 

Lemme explain in pictures…

You’ve got a little piece of felt:
IMG_4196

Painted Sneaks

Whew!  What a week, huh guys?  I’ve been staying away from social media and focusing all my nervous energy on doing things like swapping out our kitchen cabinet pulls with knobs, a very spontaneous decision, and letting the girls paint their new kicks. 

IMG_8333
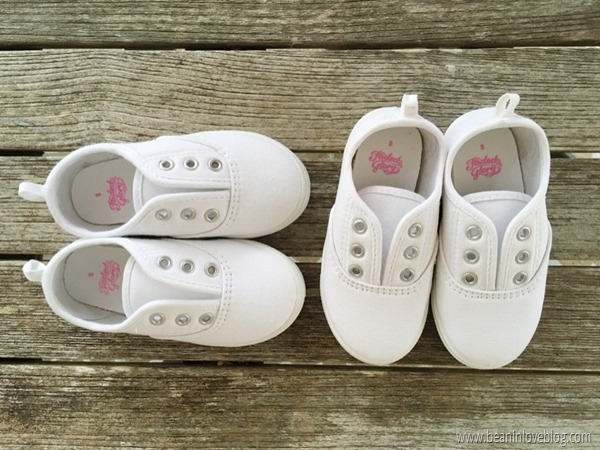
They both started complaining last week, while wearing their old sneakers, that their feet hurt.  Maybe it was because, when I checked out the situation, their toes were stuffed into their now-too-small sneaks and needed a tad more space.  (Seriously?  Didn’t I just buy those yesterday?!)  So, to Walmart we went where we grabbed the same sneakers as the ones they had that had lasted us several months.  You can’t beat the price at $5.67 each and really, they hold up so well!  I really loved these tennies too but they didn’t have them in the girls size at the store and I didn’t feel like waiting for them to be shipped so we went another route – plain white with a project in mind.

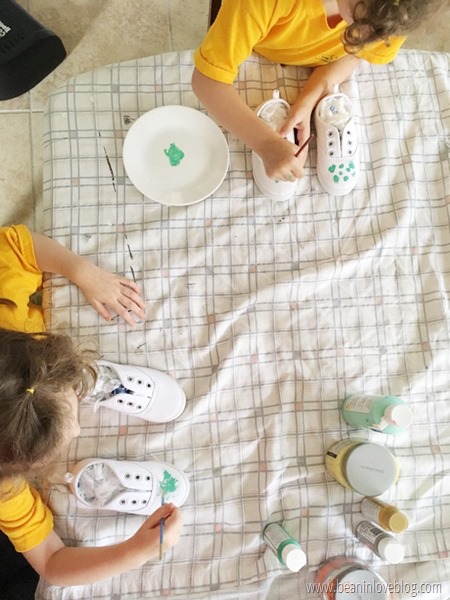
I had to push my fear of messes aside to set out all of my (very permanent) paints so that the girls could get their customization on.

First, I removed all of the shoelaces.
IMG_1710(And speaking of the shoelaces, the girls don’t know how to tie their laces yet so I’m thinking about grabbing some of these laces!  They look so cool and would make getting out the door without having to bend over (twice) so much easier!)

Then I stuffed the insides of the shoes with plastic bags so that paint didn’t get inside and also because they kept the sides from collapsing in while the girls painted.
IMG_1711
I wrote in this instagram that I let the girls “go to town” on their new shoes and maybe that was a little misleading because I didn’t just hand over the paint and walk away.  I did a little bit of what’s called micro-managing.  :)  Gianna and Sebastian were both sawing logs so I had two free hands to help, clean-up, whatever.  Part of that micro-mamaging was only letting them do one color at a time.  They wanted “rainbow” shoes and we’re still working on the concept of color-combining.  They have a hard time understanding how you get brown when you mix ALL the colors instead of rainbow… 

IMG_1712
I asked them to try not to get paint on the rubber soles.  I knew that the paint would end up peeling off of the rubber and so I just figured we could skip that part.  They did pretty good staying off the rubber and the little bits that they did paint, I could scratch right off.

I also told them that they could paint them however they wanted – stripes, polka dots, zebra, whatever.  And I told them that they could paint them differently than their sister was.  Haha!  They tend to start coloring differently and then, once they see how their sister is handling the crayon, they do the same.  I wanted their shoes to be totally different 1) because I was interested to see what each’s idea of painted shoes looked like and 2) so I could tell whose was whose without asking (even though I did mark their initials on the bottom soles just to be safe…not that they can’t share shoes but more so they won’t forget which they painted and fight over them Surprised smile).

IMG_1713

I thought about grabbing some NeverWet to spray them with so they’d stay cleaner longer but I haven’t had a chance to grab some.  By the time I do, their little feet will probably be begging for the next size up and since this paint-fest went so well, we might have to repeat it later.

IMG_8334

Next time, maybe I’ll grab a pair of my own and join in!  Anybody else?  :)

.           .           .

*affiliate links included in post*

painted toddler sneakers

Cuffergirls

It’s rare that I can begin a project and see it through to the end in one day but this past Tuesday, I did just that.  I’ve had some thigh-high womens’ socks in my “to sew” pile for a year now and finally got around to refashioning them into…IMG_8244…boot cuffs for the littlebig girls.
(PS, grandma got the girls these boots I was all heart-eyed over and they are just as cute and deserving of that emoji in person.  So, in case you’re in the market for some toddler booties, I highly recommend these!  They’re linked towards the end of the post!)

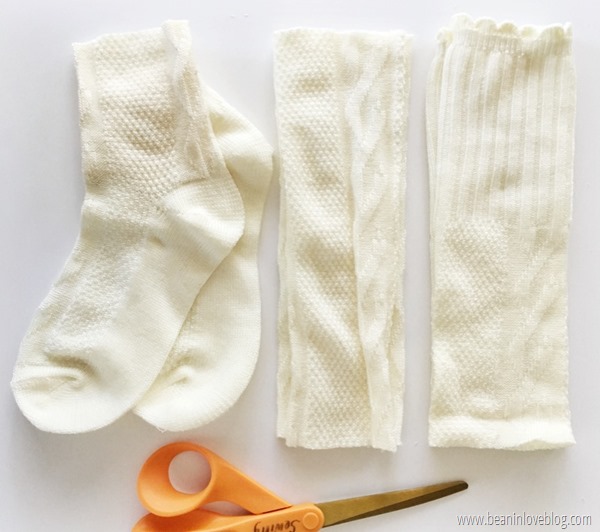
It took me about ten minutes total to grab the socks,
IMG_1276
cut each shaft into two equal lengths (which, by the way, leaves mama with a pair of crew cuts),
IMG_1277
and serge the unfinished ends.
IMG_1280Don’t have a serger?  Just sew a zig-zag stitch around the ends.  No sewing machine?  Grab some matching thread and sew a quick whip stitch around the top edge.  Don’t worry about perfection.  Worn, they’re scrunched up anyway so no one will be able to critique your whipping.

When the air down here eventually dips below sweltering during the day (November, here’s looking at you), the girls will actually don them outside for longer than a two-minute photo sesh. 
IMG_8241jeans:  Carter’s clearance last year // similar
sweatshirt tunics:  Carter’s clearance last year // similar or this one would be so cute too
scarves: 
diy // similar
boots:  Carter’s or Kohl’s
hats:  one gifted and one a hand-me-down // similar and similar
tire swing (in case you need a swing option that can hold two tots – we paid $30 for it so watch that price):  Amazon
slightly blurry pic:  juggling the camera with a baby on the hip
*some of the links above are affiliate links
 
Someone was not about to be left out of picture-taking…
IMG_8246…and one eager mama was not about to decline because, just look at that face.

Eat him up.

.           .           .

diy toddler boot cuffs

Maternity Pants Refashion - Khaki-Style

That’s what Jake, from State Farm, is wearing and that’s what I’m here today with.

Although, I can pretty much guarantee you his look way better than mine:
IMG_3314
Or at least way better than mine looked.  Mine might have a fighting chance in the fit arena now.
IMG_7788
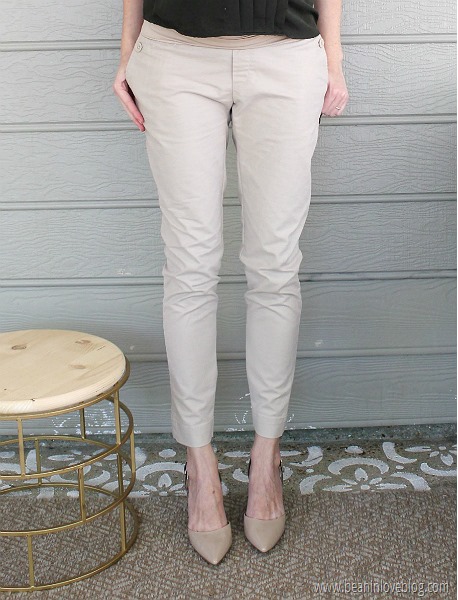
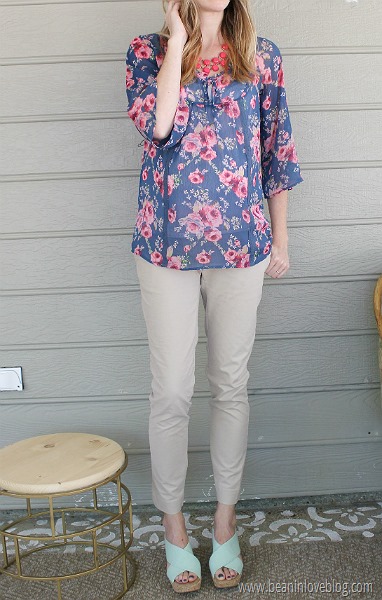
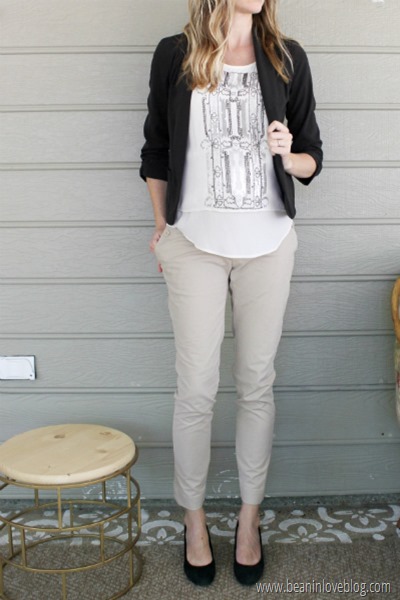
I snagged these Gap maternity khakis from Goodwill ($4) when I was pregnant with Sebastian and never got around to fixing them to fit me…until yesterday.  I was motivated to pull them out and take them to my sewing machine asap after last weekend, when I really had the worst time finding something that fit to wear to church.  It was partly because my brain wasn’t quite awake when I was scouring my maternity wardrobe, partly because all of my other church-appropriate maternity pants were in the dirty laundry and partly because, hello, this might be my last pregnancy so, better get on that stat.

I didn’t take pictures during the process because I used the same process I’ve used to slim down every other pair of pants I own that needed it (see here and here) but I did play dress-up so that in the coming days, I’d have some idea about what to pair with these “new” pants during those moments when “I have nothing to wear with themmmm!”

Just humor me.

And then, answer me this…are pregnant women even allowed to wear belts?…because the idea looked great in my head not to mention, I love belts so I’ve been going through a little bit of a withdrawl.  I tried it way back when and I liked it but this time it kinda looks like I’m wearing a woven support belt.  Maybe it’s because my jean vest might be a little too short to pair with a belly therefore exposing the entire belt when just the front would suffice?  Either way, here we have something I can sport on the daily:
IMG_7760

This one’s my fave and it would’ve been perfect to prance around in on an Easter egg hunt with the tots:
IMG_7763
For all my grocery store/Target runs:
IMG_7780
And I don’t even know what the scene would be for this but this beaded top is one of my favorite (non-maternity) tops and I’m millimeters away from not being able to wear it anymore so I might have to indulge before that happens.  Plus, a blazer sounded fun.
IMG_7790
And this is when a humongous, monster bug went flying by and for a split (terrifying) second, I thought it was inside the screened-in patio with me.  Self-timer didn’t miss my reaction and I’d be remiss to not include a blooper so…
IMG_7781
May all the bugs always, always stay on the other side of that screen and may the rest of your day be glorious.

Amen.

.           .           .

khaki trouser refashion

Bean Refashioning: Military Jacket

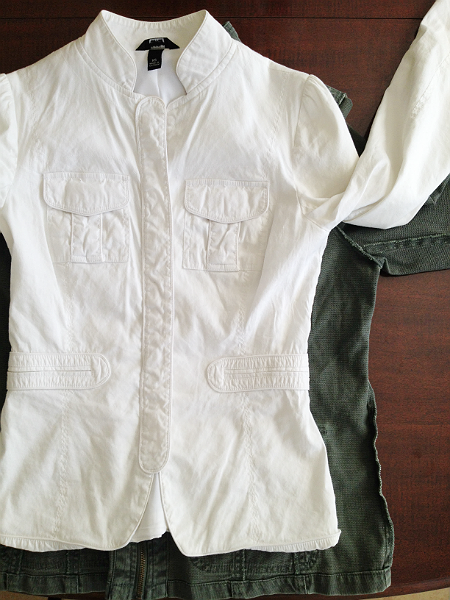
Hand-me-downs.  Love them.  Half of my closet was my mom’s and sisters’…and then there’s one piece from my Grandma.  Yep, you read that right.  This jacket…
IMG_7653…was my Grandma’s.  She asked if anyone wanted it over Christmas and it took me a minute, but I knew it had potential, so I grabbed it. 

But, obviously, something had to give if I was ever going to wear it in public.  First, I took out the sleeves to make them a tad longer.  I took out this seam…
IMG_2651…and that’s it because there was another seam underneath that kept everything nice and finished.
 
I’ve never taken in a jacket before so I was a little intimidated by this refashion, I’ll be honest.  But, since it was free, I didn’t have much to lose if I messed up.  A bunch of seam ripping and another try was Plan B and donating it was the worst case scenario.

First, I zipped it up and turned it inside-out.  Then I laid it out so that the side seams were right at the sides and the jacket was flat along the edges.
IMG_2880There was a litte more fabric in the front of the jacket than the back so that’s why the above picture shows a little buckling on top.  It was more important for the sides seams to line up since that’s where I’d be sewing than for the jacket to be laying perfectly flat…if that makes any sense.

For sizing, normally I might just try it on and figure it out from there but with a belly and no waist, there’s no figuring out anything that way.  So, I grabbed my favorite white blazer that I know has a great fit and used it for sizing.

First I marked out how much I wanted to take the sleeves in.
IMG_2881I lined the two sleeves up along the top and used a white sewing pencil (technical term?) to draw a line onto the military jacket that followed the bottom of the white blazer’s sleeve.

Then I lined the armpits up, starting at the point where my line for thinning out the sleeve ended at the armpit seam, and used the same pencil to draw a line down the military jacket that went right along the edge of my white blazer.
IMG_2883
I made sure to press down the white blazer with my hand along the place I was penciling so that it was totally flat while I traced its edges.
IMG_2884
Next, I pinned everything into place, making sure my edges and armpit seams were lined up, and sewed a straight stitch right along my white line.
IMG_2893
A repeat on the other side of the jacket, a pinking shears to cut off the excess fabric (eventually I’ll serge the edges), and that was that.

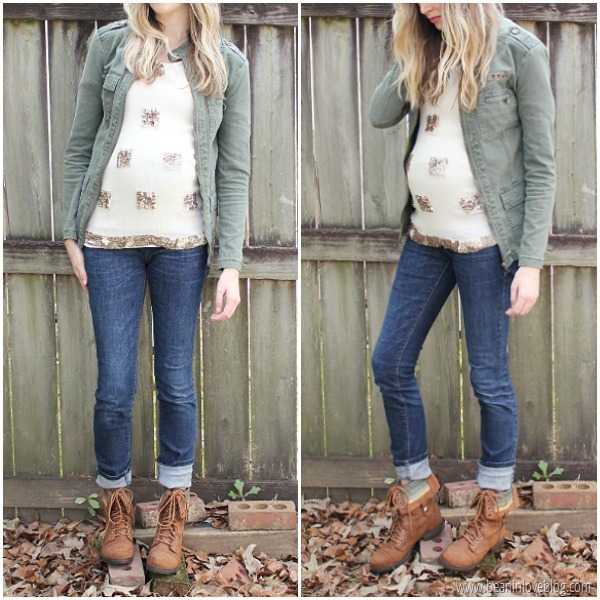
mil jacket2military jacket:  hand-me-down – $0
sequin-embellished top:  hand-me-down (mom’s) – $0
maternity jeans:  hand-me-down (friend – thanks Grace!) – Old Navy
boots:  Target (purchased on sale 2-3 years ago but here’s a similar pair* on clearance!) – $22
grand total:  $22


I can’t exactly zip it up at the moment but that’s totally fine by me – spring and summer don’t necessite zippers unless it’s the fly really, so looks like this chick is in the clear. 

I’ve had a military jacket on my wish list for awhile now so I’m happy I came across one for free, even if it did cost me a little bit of time.  :)

Thanks again Grandma B!

.           .           .


mil jacket

*affiliate link similar to combat boots I purchased from Target

Fur Real

I feel like a new woman!  My head is slowly coming out of the fog that has been the last five days.  A couple of hours after this recent ‘gram, things around here went south…or should I say north.  Sebastian ejected the entire contents of his day out of his mouth on our way home from the playground (oh yes, think carseat…everywhere) and it didn’t stop there.  Oh no.  The next day and a half after that hold the record for the most vomit I’ve ever seen come out of any of my kids mouths…the record because, until now, we have somehow escaped it.  We’d never had to deal with a stomach bug plus a heaping side of vomit before the last few days.  It’s awful to see your kids suffer and not be able to take it all away.  After the vomit came the flood out the other end for all kids and I’ll just stop there because I’m experiencing some feelings of PTSD arise and I’m sure you want to know allll the details.  Right. 

Anyway, I’m just so happy to be here today and I’m overjoyed our kiddos are smiling again.  I wish the screen could exude my excitement a little more.  We had a normal night last night and a normal morning this morning so I’m calling all systems go.  I might even get dressed today knowing that the chances of my clothes wearing bodily fluid are super low.  It’s great and I’m just happy to be alive with all kids in tow!

I even got the kids dressed.

See?

IMG_6686 
But let’s zoom in on the fur, shall we?  That’s why I’m really here today anyway.
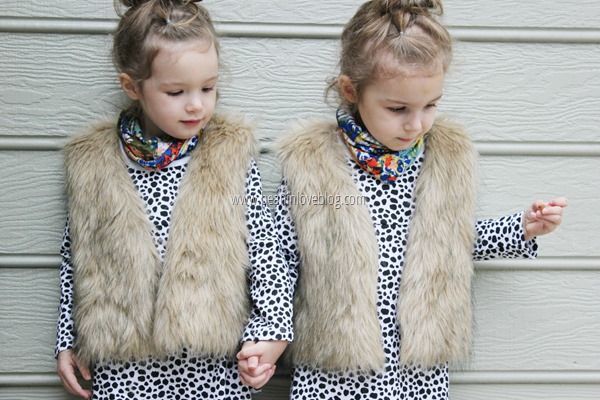
IMG_6682
Those vests were my miniscule link to reality the past several days.  I made them in two fifteen minute breaks while all sick kids were sleeping (two breaks because poor cries cut me short during the one shot I had to get them all done).  They only cost me about $3 each too!  So, like I do, I’m going to tell you all about how I made them and how you can make them too!

Oh, and did I mention that you can make them without sewing a single stitch?  You can!

The supplies:
-vest pattern (link to free download below)
-a piece of faux fur – I bought mine from Hancock Fabrics and it’s awesome (couldn’t find it on their website for ya – boo!).  Plush and soft and the color is just perfecto.  To make two size 2T-4T vests, I only needed a little over a half yard and since I bought the fur on sale, that meant only $6.  (I actually bought a yard though because, at the time, I wasn’t sure how much I needed but I’m glad I did because with the remainder of the fur I have, I can get at least one fur scarf for mwah and maybe two tiny ones for them!)
-scissors
-staples and a staple gun for the no-sew route (I know it’s weird but read on…)
-hot glue and hot glue gun

I know I said you can make these without sewing; that’s where the staples come in.  But if you know how to sew a simple straight stitch or you’re a beginner hand-sewer, you can use a machine or needle and thread instead of the staples.  Since I know how to sew, I used my machine.

First, you’ll want to grab this free toddler vest pattern from Once Upon a Sewing Machine.  You’ll only need the front and back pages, not the hood.

Print it out and cut it out along the given lines.

On the pattern it says to add 6.5 inches to the bottom of each piece but I only added three because the vests would’ve been way too long with 6.5 more inches on my girls.  To add those inches, I just taped a piece of paper onto the bottom of each piece and cut it so that the sides lined up all the way down and so that it extended that three inches from the bottom of the pattern.IMG_2046 I also cut off the small part on the front pattern piece placed there for buttons (that middle strip that’s cut off in the picture above).  I wasn’t going to have any buttons so I didn’t need the extra fabric there.
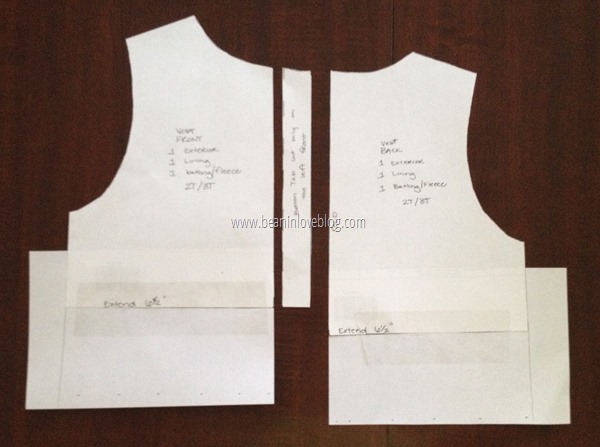
The next thing I did was make the arm holes a little smaller.  To do this, I pulled out one of the girls jean vests and moved it so that it was laying on top of the pattern armhole with the top of the shoulder and sides of the vest lined up with the top and sides of the pattern.  Then I just traced it onto a sheet of paper I had taped under the pattern armhole and cut it out.
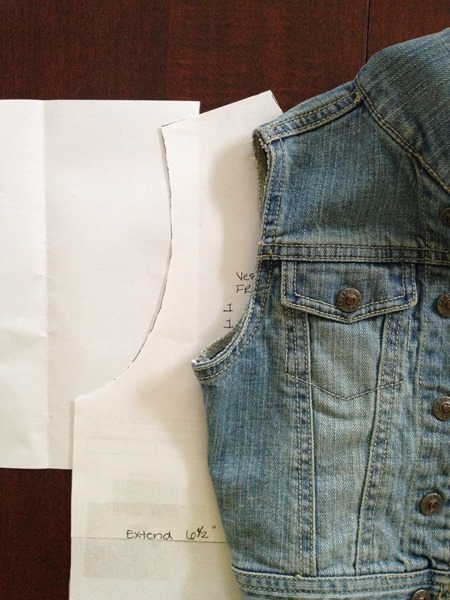
IMG_2047This is before I positioned the jean vest where it needed to be lined up to trace it, but you can see how much smaller the actual vest armhole was.  It’s worth noting though that my girls are fitting comfortably in 2T tops right now so if you’re making this for a child closer to 4T, you might be able to keep the armholes the size they are.  It’d be worth comparing it to a sleeveless shirt or vest you already have to make sure though.

Here’s what the pattern looked like when I was done lengthening and minimizing the armholes:IMG_2048
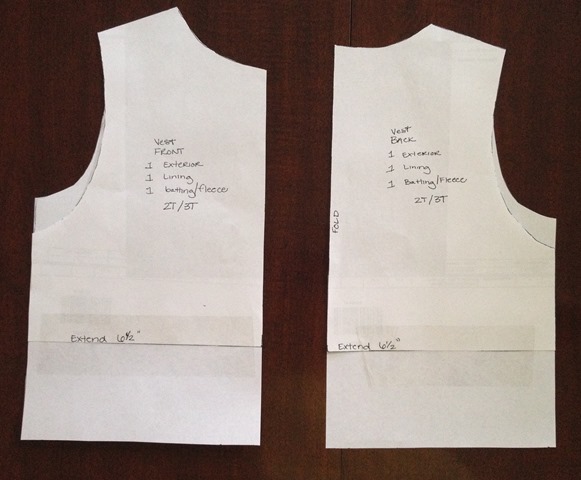
At this point I thought I was ready to take the fabric to the fur but when I placed the front and back pieces together (they meet at the armhole side), one was longer than the other.  I wish I could’ve said it was my measuring error but as it turns out, the front of the pattern is actually a smidge longer than the back.
IMG_2049It was an easy fix though; I just sliced that extra length off the bottom and to the fur I went.

So, you’ve got your fur.  Lay it fur-side down on a table but make sure that you lay it so that the fur is pointing in a downward direction – the nap of the fur goes down towards the bottom of what will be your vest.  Does that make sense?
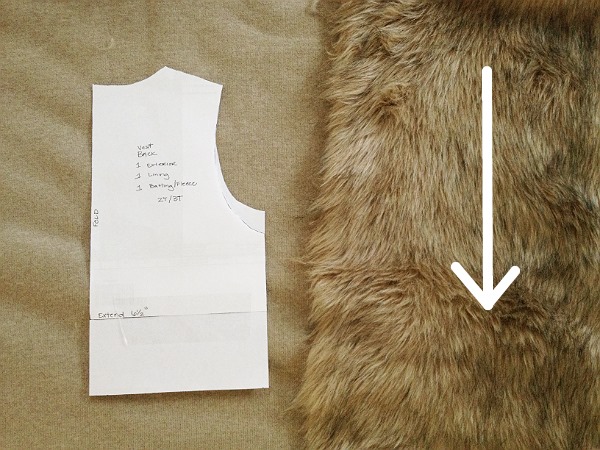
IMG_2050I folded the end of the fabric over in the picture above so you could see how my fur was laying.
 
Next, grab both pieces of your pattern and tape them together at the armholes.  Then, along each side except for the far left side, trace around the pattern but trace a half inch out.  (Note:  I used a sharpie because a pencil didn’t show up that well but if you have a washable marker, that would be even better.)
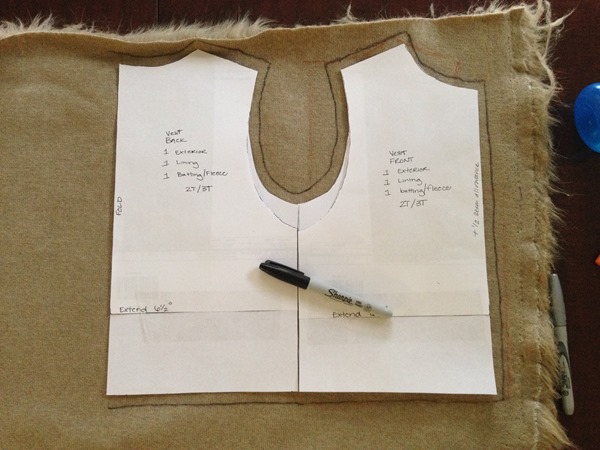
IMG_2051No need for perfection!  Fur hides that really, really well!  :)

Along the left side of the pattern, trace right along the edge of the paper.  This line will just be a guiding line to show you where to line up the pattern for the next side.  (Note:  this line will be the only one that shows on the inside of the finished vest.  I wasn’t too worried since when it’s worn, it’s not seen at all but if you want it eliminated, make sure you do use a washable marker and it’ll come out in the wash.)

Next, flip your pattern over and line it up along that middle line you drew.
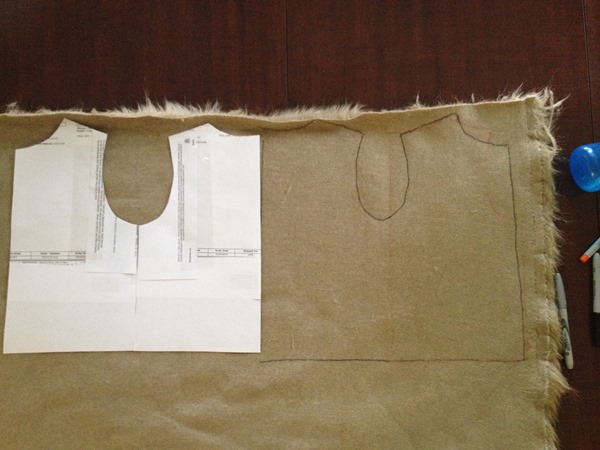
IMG_2052Make sure you literally flip the pattern over!  Don’t just slide it over!

Trace a half-inch out again along all sides.  You won’t need to trace along the now-right side again. 

This is what the back of the fur will look like when you’re done.
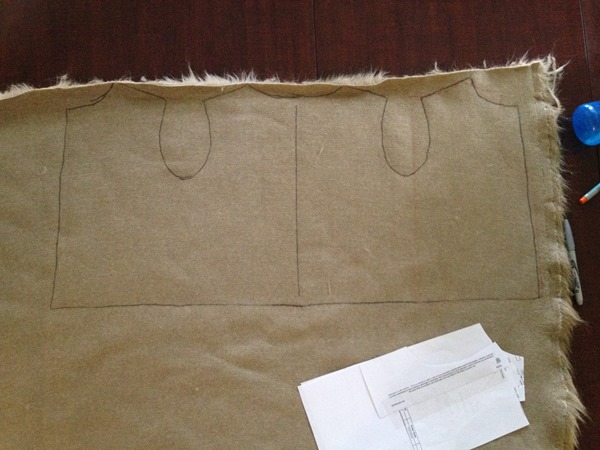
IMG_2053

Now it’s time to cut along every line but that middle line.

Cutting fur is a little tricky.  If you can, use a small, pointed scissors and snip away in small increments from the back of the fur.  If you don’t have a smaller scissors, a regular-sized pair will work too but just remember those small increment cuts.  They’re crucial in not cutting off the fur so it looks like it got chopped at the $5 hair salon.

IMG_2104In cutting in small increments, you’re not really cutting fur as much as you’re just cutting the backing.

Once you have your vest cut out, it’ll be time to attach the shoulders.

I sewed them together but you can staple them if you don’t know how to sew!  I promise it’ll hold up and no one will know but you!  First though, we need to trim away some fur so that the seam isn’t so thick – it wouldn’t fit under my machine foot the way it was.

To do that, just trim off the fur along the top half-inch or so.
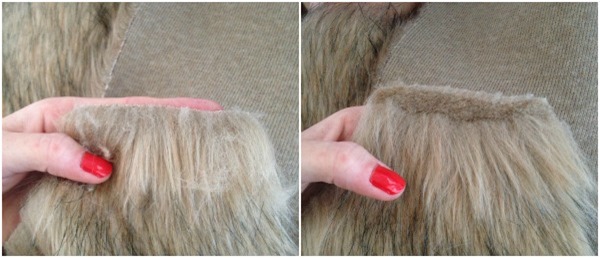
fur 
Then, fold the sides of your vest in, fur-side in, so that the front and back shoulders line up.  If you’re sewing, sew a straight stitch like this but stop a half-inch from each edge.  You’ll glue those unfinished ends down in a minute.
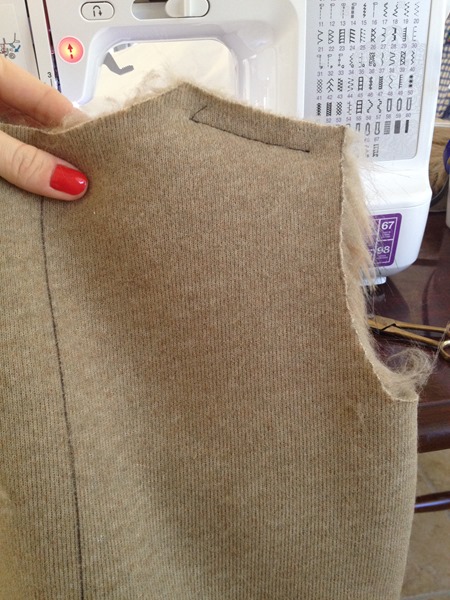
IMG_2110If you’re stapling instead of sewing, just placed a line of three or four staples horizontally along the line I sewed.  Or if you know how to hand sew, you can sew a quick line too!

Once you’re done attaching the shoulders, you can move on to the hot gluing or you can quickly cut a v-neck in the front of the vest like I did.  Starting at the top inside shoulder, I just drew a straight line a little more than half way down the front inside hem.  Then I used the same small-increment snipping to cut that little triangle off each side. IMG_2128
Last step!  Hot glue!  This part was hard to document because hot glue dries so quickly but basically I went around each edge of the vest minus the very bottom hem and glued a half-inch hem.  I worked in three or four-inch sections so that the glue wouldn’t dry faster than I could get it on.  I didn’t do the bottom hem because the fur hangs down far enough to cover the backing completely.

You can see in the picture below that the bottom part of this side is glued.  The white line shows where I placed the glue.  Once the glue was there I just folded the edge of the fur over onto itself, pressed it and held it until the glue was dry, and wala!  An easy hem!
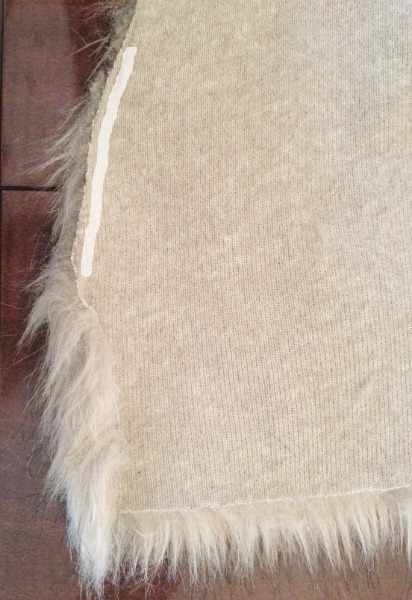
IMG_2143 I even folded the arm holes in a half inch and did those.  I feel like hemming all the edges makes everything look a little cleaner because you can’t see any backing peeking out from anywhere.

This is what the vest looks like from the inside, all finished:
Image-1 

All that in about a half hour…and that was making two vests.  Uninterrupted, this is an easy breezy project that’ll have your little fashionista right in line with the runway these days.  ;)
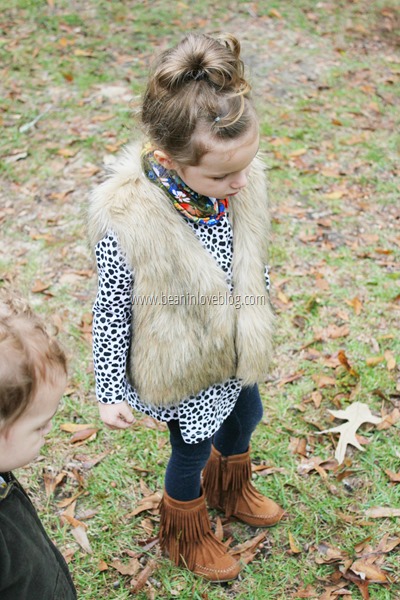
IMG_6683 
Taking the after pictures was actually the hardest part for me.  So many acorns.  So little time.
IMG_6688 
IMG_6690 
Here’s the funny thing about this project - I bought this fur last fall thinking I’d make the vests back then and they just got shoved to the end of the project line and now, here they are.  Haha!  But, as it turns out, they would’ve look huge on the girls last year.  The timing will now allow them to be worn this year, next year, and maybe even the next year after that.  Unintentional providence that is also known as procrastination ftw.

Adios.  I have lots more procrastinating to attend to…the dishes for example.  The couch is calling my name.

.           .           .
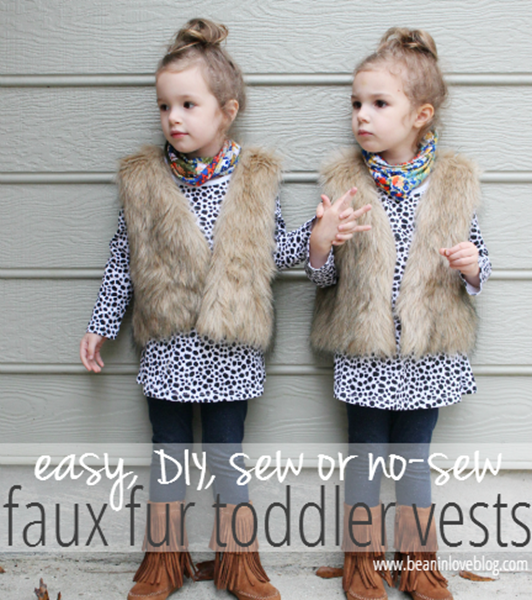
diy faux fur toddler vests