Lights & Registers
Removing Popcorn Ceilings - How We Did It
It only took us three weeks of plugging away but our new house has 2300 square feet of smooth ceilings to add to it’s resume. I’m going to tell you all about how we went from popcorn to smooth but first, let’s do a quick Popcorn Ceilings 101.
What are popcorn ceilings?
A travesty, that’s what. Hehe…kidding. They’re not really that bad and some people probably like them way more than we do and that’s a-ok. To each his own, right? Right. Popcorn ceiling refers to the popcorn-like/cottage cheese texture that some ceilings are covered with, especially in houses built in the 70’s, 80’s, beyond. Really, they just look like someone sprayed a mixture of teeny-tiny pieces of popcorn stirred up into thick chalk paint up onto the ceiling.
Apparently they have functional value in that they up the acoustics of a room – they make sound stop in it’s tracks and not bounce all over the place (though I can’t say that smooth ceilings really make sound in a room louder). They are also somewhat of a short cut on the building-of-the-house side in that ceilings don’t have to be “finished” quite as much as walls if they’re just going to get sprayed with popcorn texture. It covers a multitude of drywall imperfections and we. would. know. We recently finished (well, almost) making amends with those imperfections and THAT will be a whole ‘nother post.
Why get rid of them?
Well, there’s nothing super bad about them. Aesthetically, they’re just not the most pleasing. The texture creates lots of shadows on the ceiling which in turn makes a room darker. Light just kind of hits them and stops instead of bouncing off them to what’s below, like it does on smooth ceilings. They’re also great at holding onto dust and cob webs AND they can harbor allegens. Oh, and cigarette smoke (lots of fingers pointing to our ceilings). Let’s not forget about that. Awesome, right? But, here’s the thing, they’re almost impossible to clean. Any amount of light scrubbing or on-contact vacuuming will most likely ruin them/create a ruined spot. You can attempt to fix spots but getting them to match the original is no easy task. The main reason that we are getting rid of ours (followed by aesthetics in a v v v close second) is because the previous owner of our home smoked inside and they were stained and held in that ashtray smell. Case in point, our master bedroom:
How do you get rid of them?
First of all and VERY importantly, if your home was built prior to 1980, your popcorn ceilings might be made with asbestos. Make sure you check first (you can buy test kits like this one* that note a lab fee) because if they are made with asbestos, you’ll have to leave the removal to a pro or learn to live with them.
You can have them professionally scraped and removed…but it’ll cost ya. We looked into this in our old house because the popcorn ceiling in our kitchen was discolored and we wanted to remedy that before we put it on the market. It was sort of a fiasco but in a nutshell, we tried to paint the popcorn, it started falling off with every roll of the paint, and in a panic, I called a local drywall specialist to see how much it would cost to have them removed. He quoted me $3/square foot so almost $600 for just our kitchen and dining nook. Ouch. We ended up scraping what we could and then spraying a knock-down texture instead so we solved our dilemma but, just so you have an idea of pricing, our house is around 2400 square feet so we’d pay $7200 to have our popcorn ceilings removed down to those smooth beauties. Not a handful of change by any means and in our case, not worth the cash when we knew we could try it ourselves…with success, I might add. ;) Cha-ching…in our pockets.
Which leads me to option numero dos – scraping them off yourselves. I’ll be honest, it’s not nearly as bad as I thought. I’ll get more into that later.
You can also just cover them up. Cindy did that with hers and the planks add a lot of character to her space. (Spoiler alert, we have some covering up plans for the bathroom that had painted popcorn. I’m dreaming of geometric tiles.)
Another option is to spray or have a professional spray them to create a knock-down texture look. My sister and her hubby had this done to their entire home and it cost them a small fraction of the cost it would have been to get them scraped.
Let’s get to the fun part though, shall we? DIYing those ceilings off. :D
Tiny, Tiny Home
Hey friend! So, uh, yeah. I know. I’m supposed to be revealing the kids’ room. That’s what you should be reading right now. But you’re not. I gave a short explanation over on Instagram the other day but if you missed that, basically, I ordered something for their room a month ago, got an email it was shipped from Virginia (or at least that a shipping label had been created) on October 30th, and that still have not yet received it. I know I could just go ahead and share the final result but that thing is going to be a part of a big piece of design in the room and I just can’t show the room without it. Sorry! Hopefully when I get the reveal up and can explain a little further, you’ll understand. I’ve since ordered from another company (and just got a shipping notification yesterday!) after contacting the first company multiple times without a response. SO, the silver lining in this little mess is that the new thing will be here by mid-week and a reveal will be up on the blog by week’s end. Huzzah! Look for it!
I know I missed the deadline for the big One Room Challenge reveal but I’m not too sad about it. I wasn’t in it for recognition or blog fame so there’s nothing lost in the delay and only a cute kids room gained in a six-week motivational scoot to a finish line.
Enough about that though, how about this little house?!
I had been very casually hunting for a dollhouse for the girls for the past year or so and, while the four kids and I were traipsing through a local thrift store here at the end of the summer, our eyes beheld this little house and it’s fine $15 price tag. It was in great condition besides being a little dusty and VERY heavy. Phew!
Oh, and a little too frilly. I realize that someone once painted this sweet little thing for some little person they loved and you can tell that A LOT of love and elbow grease went into it. But, all of that love came in the form of lots of scrolls and sponge paint and that’s just not my language. So, I changed things up a little.
Step-In Closet
“I’m late, I’m late, I’m late!!!”…said the white rabbit…and says me. I didn’t make the link-up deadline for the One Room Challenge this past week because I was teaching a two-year old how to use the bathroom properly BUT never fear, I’m still in it and I intend to finish the kids room before the big reveal day – November 8th! I started painting their rug a couple of days ago and I’ve got one other little thing to iron down (literally) and then it’s finito!
Week four saw me in their closet. I put up a whole Instagram story about their closet situation and a couple of things I did to make it better a few weeks ago (and didn’t save it because I just am not that on top of things) but then didn’t go in again. Great except when I left off, there were a couple of big bins and bags full of clothes right when you walk in that needed to go. Let me explain from the top though, in case you missed the story.
This house has decent-sized closets – they’re pretty long inside but they have regular, doorway-sized entries so almost all of the usuable rod space is behind a wall. It’s not ideal when you have four kids in a room and need access to all of their clothes regularly.
Here’s what their closet looked like shortly after we moved in:
There was a hanging rod in there but we took it out and hung it in my closet as a second rod so I could get more organization. Then, we set up that closet organizer (it’s this one that I found at Dirt Cheap…here’s a similar one*) and it seemed like a great idea at first because it’s got double rods on one side and shelves on the other; perfect to hold all of the kids stuff and keep it organized. But then we realized that half of it would be behind the wall and, while still accessible, a big pain.
Then, one day not too long ago, I stumbled upon this closet makeover Amy cranked out. And you know what it is? Genius. That’s what. Her hubby’s closet has a wider doorway than that of our kids’ but it’s the idea that counts. I couldn’t copy it fast enough.
Kids/Guest Bathroom Reveal
So, I did a thing. I know I casually mentioned I was doing it a few weeks or so ago but…
I brought this horribly lit, outdated bathroom…
into 2018 with a little bit of paint and some better lightbulbs.
The Multi-Purpose Room Reveal
It’s always awkward for me to take something from my heart, write it down, and hit publish…and then go on to post about something in a whole ‘nother arena, say superficial decorating, next time. I feel like there needs to be a better transition but I don’t know how swing that so in we jump from heart to home again. :)
I’ve actually spent almost every moment of free-time the last two days concocting a whole entire post on the multi-purpose room but last night, when I had reached 3000 words detailing only one half of the room, I made the intelligent decision to close my laptop and start anew this morning. I’d lost myself just reading through what I’d written and I have no doubt I’d have lost you too in the absurd amount of details in that novel. Sometimes I get carried away. So, I’ll keep this short and come back later with more.
“Wait, back up.”
“What the heck is a multi-purpose room?” Good question. Did I make that kind of a room up? Maybe. I haven’t googled it to see if it’s a real thing yet. I’ve talked about this before but this little house has two living rooms. One, I suppose is more of a formal living room and one is more of a den. Well, we don’t need two living rooms – we only have one television and one couch and they both fit great in one room. But, we do need an office space, a sewing space, and a homeschool/kids’ coloring space. So, we’ve spun the formal living room on it’s side to create, you’ve got it, a multi-purpose room. ¯\_(ツ)_/¯
Here’s what that space looked like before we moved in:
From 1:00 pm on it’s the brightest room in the house and, therefore, had lots of potential to be something fun and happy. Since we spend a good amount of time in this room on the daily, that fun and happy status was really important.
Body Spray to Floating Vase
Within in the past several years, our family has become an avid recycling family. Reading statistics relating to plastic waste plus facts on rates of decomposition plus knowing our kids will inherit our waste as a nation and world have made moved us to try our best to not contribute to the throw-away society we’ve created. We recycle every single piece of plastic (paper and everything else…) we possibly can after we use them and, when I remember, I try to use reusable shopping bags. Every little bit helps, right? :)
So, when I came up with a solution to fill that little piece of empty wall space above our security system keypad and next to the new, framed picture of Christ that involved recycling something used and that was FREE (in that I didn’t have to go out and buy anything), I counted myself in.
Over the years, I’ve accumulated quite a few bottles of body spray from here and there.
After I emptied one recently, I realized it had a ton of decor potential…more than it had just sitting in our recycling bin.
Drumroll please…
Happy Corner
Let me introduce you to my new favorite corner of this little house.
It doesn’t really look like much but it’s my favorite because it’s chock full of fun diy’s I’ve been knocking out over the past couple of weeks. Still on the list is a hook system (just like this one) that I want to get up on that empty wall to the right of the door. Hopefully that will happen before school rolls in this fall so we have a place to park backpacks. :)
To jog your memory, here’s what that corner looked like just after we moved in:
We desperately needed a place to store shoes since this is the door we use most often and so we bought Ikea’s Mackapar, hacked it, and still love it. I finally got around to painting the living room last month too. Goodbye tan! With all of the orangey-wood trim and lack of light during the majority of the day, white was the clear winner. We went with Pure White by Sherwin-Williams. The door was in a sad state; dinged and stained. It was begging for a new coat of paint.
One Room Challenge–Week 3
Hey hey! It’s week T H R E E of the
and over here, things are looking UP!! No really, they are. I got all of the upper cabinets painted this week and, oh my, it is CRAZY how much more light bounces through what I already thought was a fairly bright kitchen!
And then take a look at the same area pre-move:
The Almighty said it best with “Let there be light!” Have you ever gone white in the kitchen (or any room really) and experienced the added light? It’s great, right?
I’ve written a few posts on how I paint cabinets in the past and time around the paint can wasn’t much different in the way of technique but I did use a new-to-us paint than I have in the past and got a little smarter as far as set-up goes.
Ikea Mackapar Hack
I’m baaaaack!! But still not unpacked. Ack. It’s ok though because we’ve done a hack and hung a rack. So hopefully you’ll give me a little slack.
Ok, ok, I’ll stop before you feel like you wanna whack me. ;) The girls and I have been doing rhyming in homeschool…
Ahem…
We have a situation. Our back door is our most used door and therefore, where we keep all of our most-used shoes…haphazardly (usually) set on this little shelf (previously a bookshelf in Sebastian’s old room).
It looked a mess because it was kind of a mess. Our closets are small and lack space for lots of shoes plus I like the idea of shoes being near a door for easy access so this was our situation. I feel like entry ways should always be clean and uncluttered since they’re the first things you walk into when you come home. They could make or break a mood, ya know? When ours is cluttered and messy, it really makes me happy to be home. So inviting. Like, welcome home to your peaceful abode…ooh! Watch out for that little shoe! *trip and an ankle twist* Ok, so maybe I’m being a little too dramatic but really, first impressions do count, right? That can somehow apply here.
Anyway, the wall next to the door was begging to be a functional one so we had to come up with something.
Marble Tray ~ DIY
It’s going to get real original over here today yo. I’m not the first and I definitely won’t be the last to type about marble contact paper. There are a myriad of pinned projects using just the stuff and mine will be just another to add to the collection. There are a huge basketful of bloggers and DIYers who have written/talked about using the stuff and so I’ll just add my voice to the queue. BUT, I betcha that of all the marbled contact paper projects you find out there, mine will roll in as the cheapest. Not bragging…that’s just the fact. You know how I do. ;)
Internet, meet marble contact paper project…again.
West Elm Knock-Off Rug
I was set on a black & white rug to set down in the kids’ bathroom. Black & white screams “gender neutral” to me and since I needed all of that I could get in this little bathroom for two girls and a boy, that’s the direction I was headed.
Enter this little thing:Not black and white (even though it could argue the gender neutral case pretty well) but a great path to getting there since the other side was a blank slate. You probably read the post about this rug and how I sewed, cut, and frayed the edges to get fringe.
Now enter the Torres Kilim from West Elm…aka, my inspiration.I saw it first on an episode of Fixer Upper and knew it would be super easy to imitate since the lines are perfectly imperfect. Rug. Kids’ bathroom. Now.
Kids’ Bathe-room
B-A-T-H-E room because of T-H-E hooks…you might remember. You might not and maybe you’ll need to read this post first. Either way, we are 90% done (until the winds of change blow usually) with the kids’ bathroom and man, for a room that’s had an upgrade coming for years now, it feels real good. Here’s what this bathroom looked like before we moved in and were just crushing on the house, thinking about putting in an offer:
Quick Hair, Don’t Care
Over the past several years that I’ve been blogging, I’ve had several requests for a hair tutorial and I’ve always had intentions of obliging but whoa, let me tell you, it is hard to film anything with kids running around. After a few more requests flowed in last week though, I just threw caution and perfectionism to the wind and set up my phone while I was doing my hair one morning. My thought was that I’d throw up a quick video tutorial, nothing too eloquent, that showed the basics until I could invest more time in a better video. The filming went great despite two interuptions by kids asking questions but when I went to upload, that’s when everything got a little wrangled. I couldn’t figure out how to add text, how to compress the size, how to blah, blah, blah. Suffice it to say, I spent wayyyyy more time than I had intended on this video and it still is pretty awful. Haha! But hopefully you get the gist.
The original video was eight minutes long but the file was too big to do anything with or store in any of my available storage places so I ended up chopping it into pieces that come in at just under a minute. To make up for the cuts, I figured (and hoped) some written details would suffice.
So, here goes.
If the video isn’t working here, hop, skip, or jump over to YouTube to watch it.
Just some notes:
First and foremost, it is painfully evident that I have no talent in video editing. Ahem…
From start to finish, it takes me about seven minutes to get my hair curled. It’s never perfect and because it’s curly to begin with, it hides that imperfection pretty well…and some people would dub the look “beachy” so I’ll just lean on that justification. If I’m going somewhere special, I spend a little more time on it so we’ll just say 15 minutes max.
After I wash my hair, I put a little bit of Garnier Fructis mousse in the bottom half and I blow dry my hair upside down, focusing on the roots, for about two minutes. I can’t stand wet hair on my neck and back so this gets me to dry at the top, damp at the bottom status. I usually wash it at night so by the time I’m ready to curl, it’s 100% dry. Also, about the mousse, I’m kind of a mousse snob. I don’t like mousse that leaves your hair super stiff and this stuff is the best at not stiffening for the price. I do think blow-drying after applying helps keep things soft too.
My hair isn’t thin but it’s definitely not thick. At the thickness it is, I divide it into two layers for curling. If your hair is thicker, you might want three layers. Also, my hair is cut with several layers. The way your hair is cut detemines how it will look curled…that’s probably obvious but I thought I’d mention it anyway. :)
When curling, it’s key not to adjust your grip at the base of the section you’re holding. Grab the hair and wrap. The section of hair will twist as it’s being wrapped and you want that to happen!
The iron I’m using in the video is this Hot Shot/Helen of Troy curling iron. It is amazing and I’ve had it since college (10+ years). I have it in the 1” size and a 2”. I’m using the 1” in the video. The link will take you to it at Sally Beauty Supply, where I bought mine. If you become an email subscriber with them, you’ll probably be able to nab a coupon that would make it even more affordable than it already is!
This is my hair after three days: In the summer with all the humidity down here, it usually looks a little crazier after three days but the hairs are faring pretty well in this gorgeous fall weather.
I only brush my hair after showering and that’s it. And actually, this past summer I tried something new where I brush my hair with a wide-tooth comb while I’m washing conditioner out and that’s it. When I’m done and while it’s still pretty soaking wet, I apply mousse and then I blow dry, upside-down, for the usual two minutes. My curls stick together more and humidity doesn’t hamper them as much as it usually does. You curly-haired girls should try it. :) Sometimes it looks great as-is and sometimes just adding a few wrapped-curls here and there adds a little more form.
I didn’t have time to tack this on at the end of the video (another reason why I need to make a better one) but I usually tease my hair at the roots when I’m done to add a little extra va-voom. On normal days, I just grab a fine-tooth comb or a pick and go at it a little bit but if I’m going to a wedding or some other special occasion, I sprinkle in some Powder Play and then tease it. My sister introduced me to this stuff a few years ago and it is A+. It holds and a little goes a really long way so it lasts forever.
I’ve never went Live with Facebook but I was thinking maybe it’d be fun to run through the whole process on there one day? Maybe? Maybe not? We’ll see how much courage I can gather and how much awkwardness I can ignore to try that…
Anyway, I know I’m no hair pro but I’ve gotten pretty good at making my hair look fairly decent in the very, very little amount of time that I have to do it. If anything, I hope I prove that it’s possible to lose the bed head with very little time and effort. ;)
Questions? Leave them in the combox or email me!
Adios! ![]()
. . .
*affiliate links included in post*
Trophy (Painting) Wife
Last week, I finally got around to throwing up a collage wall and making a lamp out of string lights in Sebastian’s room. If you missed that post, go check it out.
A few of the things up on that wall are some trophies from Anthony’s years past – Little League baseball years past. I asked him a few years ago if he’d allow me to spray paint them and I got a shocked face and a stern, are-you-crazy, “no”. Then I tried again last week and, maybe since all these guys have been doing is chilling in Sebastian’s closet, I got a “sure”. So, I took that affirmative and ran with it…straight outside…with a few cans of spray paint.
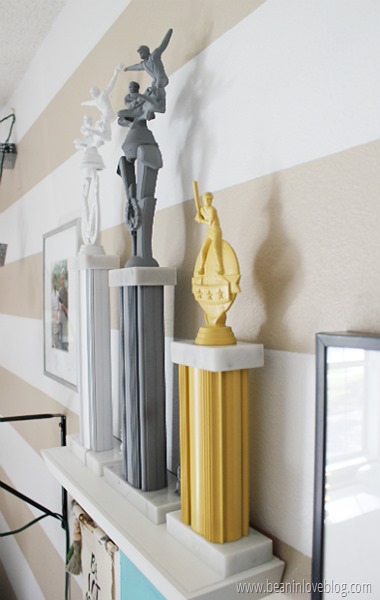
Have you a few old trophies laying around? Maybe you’ve passed some by at your local thrift store? Well, if so, here’s how to make them as exciting today as they once were.
Trophies are put together really simply.
Basically, they’re a bunch of pieces and parts stacked on top of eachother with a long, threaded rod down the middle and that rod is secured at the bottom with a nut.
Unscrew that nut and everything will just slide right off.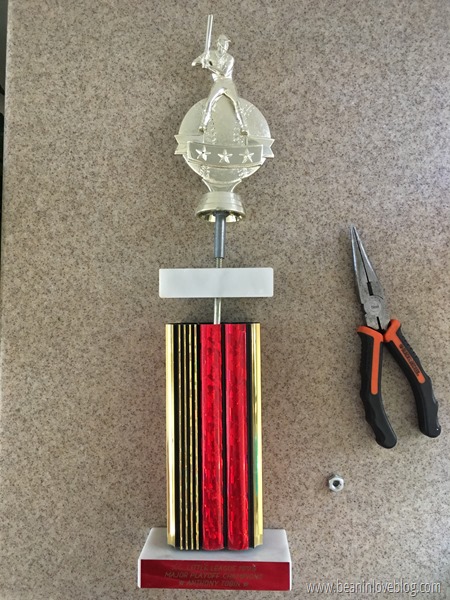
The super cool thing about Anthony’s trophies is that each base is marble, carrerra marble to be exact. I know so because a tiny sticker on the back of each told me so. So fancy, right? Well, there’s no way I’m going to paint something that isn’t ugly in the first place. So, I grabbed all the plastic to be painted and left the marble as-is.
I gave all of the pieces a good washing with some dish soap and a toothbrush before I painted them. They were a tad dusty from being stored so long. After they were dry, I took them outside and laid them all out on a big piece of posterboard that was headed for the trash.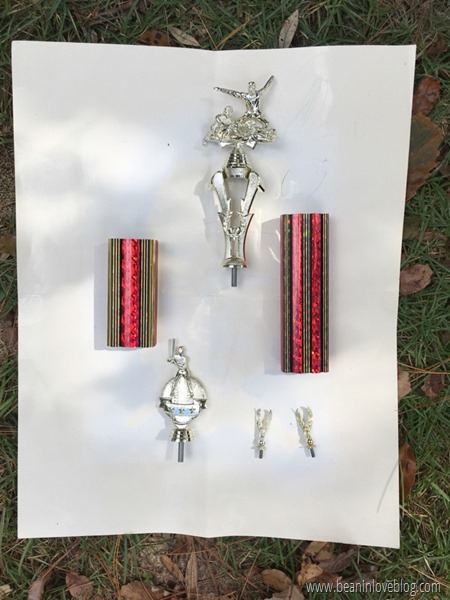
Then I gave each piece a coat of spray primer. Plastic tends to be pretty finicky when it comes to holding paint (ahem), so priming it first ups the chances of it really sticking.
I painted one side of each piece, let that side dry, and then turned everything over to paint the other side.
Two of the trophies I left just primed – the gray and white. I wasn’t sure what color I wanted to go and the only actual color I have in my spray paint stash right now is yellow.
Once everything was nice and dry, I put the trophies back together the same way I took them apart – by stacking them in order over the rod and securing it all by putting that nut back on at the base. Except, in putting them back together, I turned the marble bases around backwards so that the metal plate parts with all of the writing were facing the back and the fronts were just plain marble. See?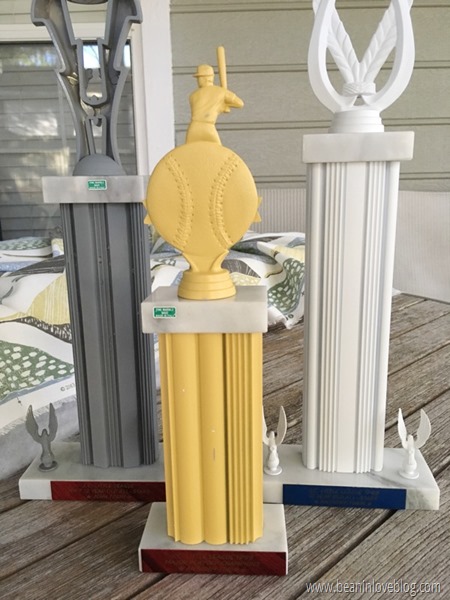
(So I was thinking while I was putting these things back together, about how awesome it would be to grab a few marble-laden trophies from a thrift store, take them apart to remove the marble, and stack the marble pieces all together to make a lamp base. You could put all the big pieces at the bottom and small at the top or you could stagger them so they’re all different. Either way, it be a really cool and cheap way to get a marble lamp! :D )
Had I a longer shelf, I probably would’ve painted more trophies and maybe that’ll eventually happen anyway. Until then though, I really love how these turned out. It’s fun when you can redo and repurpose something but even more fun and special when it’s something of sentimental value that probably wouldn’t have been used much less displayed anyway. :)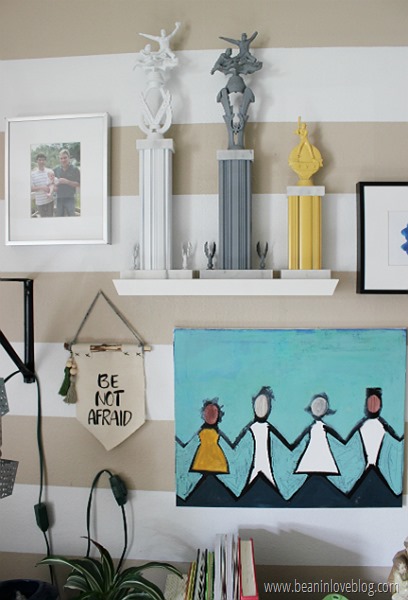
All thanks and gratitude to my trophy husband for being so good at baseball as a wee lad, for without his mad skills (and eventual reluctance to my painting idea), this post would probably never have been written. :)
Acting on a Hutch
This post will show the snail’s pace at which we project these days…in case you’ve ever wondered how we get it all done with four kids in tow. Answer: WE DON’T! Haha…oh *sigh*.
The hutch I’m about to unveil has been around and waiting to be finished for a few months now. Actually, it was part of the yard sale fundraiser that this table was also a part of. One of the teens going on the mission trip painted it and it was up to me to do some slight distressing and stenciling of the back. I didn’t get a before shot but I did find this one Googling, and it’s kind of similar to what ours (ours as in the donated-to-the-fundraising-effort) looked like: 
It was brown all around with that dated gold pattern on the glass doors but thankfully, in really good shape. Perfect for a few coats of paint and a trip to 2016.
We put the teens to work on giving it a light sanding, giving it a coat of white primer, and then going over that with a couple of coats of a creamy white latex. We removed the backing behind the top part of the hutch (it was just held on by several small nails) and, on it and on the back on the inside of the doors, the teens painted on a coat of the leftover chalk paint we used on the table mentioned earlier.
And then that backing sat,
and sat,
and sat,
and sat at our house, waiting for me to stencil it.
And finally, I got around to it one night last week. I used the Beads Allover Stencil from Cutting Edge Stencils (the same stencil I used on an accent wall in the twins’ room last year) and some of that creamy white latex paint to add a unique touch to the hutch.
It’s currently sitting in the youth center waiting for a buyer and for sale pictures, I ran around Anthony’s office, trying to find what I could stage her shelves with. I didn’t have many options, as you can tell but either way, it was a fun challenge.
The stencil goes horizontally but actually I meant to paint it on vertically. We sort of guessed on which way the backing went on while it was sitting at our house, miles from its counterpart hutch and our guess was wrong. But it’s okay because we were both pleasantly surprised at how good it looked going the “wrong” way. But really, with a stencil this pretty, there’s probably no wrong way anyway. :)
The mission trip is done and over this year so the proceeds from this hutch will go towards the trip next summer. One of the coffee tables I’m working on turning into a tufted bench is also a part of the fundraiser so you’ll see that finished on the blog in approx. three months. Ha! Slow and steady does not win the race folks but as long as what you’ve got looks better than what you had, hopefully no one will notice. ![]()
Headboard Retrofit
Annnnnd we’re back with the last step in the making of our new, luxe headboard. Get all the details on the tufting here and see how we made the arms here. Pretend that it hasn’t taken me weeks to pound all these out for you and we’ll be well on our way to a harmonious and constructive blogger/reader relationship based on mutual trust and understanding. ;)
Right after we got hitched, we made our way down the road from our new house to our favorite thrift store in Steubenville, Ohio where we found and purchased a new-to-us bedroom set. We paid $100 for the solid wood four-post bed, long dresser, and tall dresser. It wasn’t exactly the style I would’ve picked up new at the store but we needed something and our teeny, newlywed budget loved this set.
I know it’s hard to see the entire thing with all those pillows in the way but here’s what the bed used to look like and what it looks like now after we retrofit the new headboard right over the old:
“How?”, you might ask. Well, let me tell you. Quick though because all the kids are apt to wake up in the next half hour.
The posts on the bed simply screw on and off so, off they came. 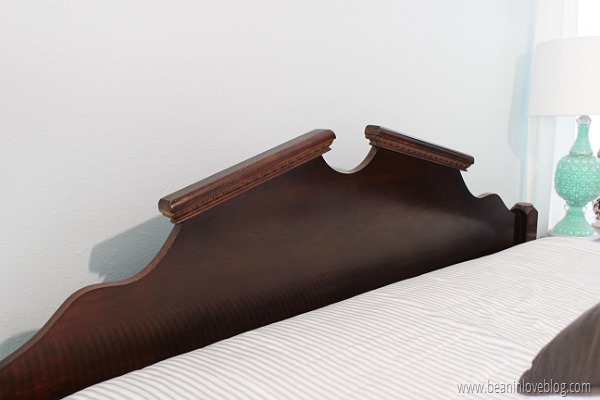
Next we had to remove those two pieces of trim at the top of the headboard. If they hadn’t been as bulky and thick as they were, we probably could’ve left them there but, alas, they had to go or the new headboard wouldn’t have fit in between the mattress and old headboard. I thought it’d be as easy as removing the three screws holding them in…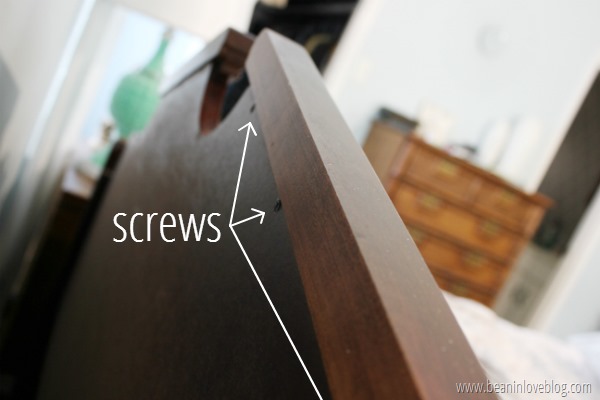
…but once the screws were out, I still couldn’t get them off because they were also glued on. In came Anthony and his hammer to the rescue with a few solid taps and that brought us to the new blank slate.
Pan to the new headboard…
Before attaching it to the old headboard, we attached the arms. Along the back of the plywood we used to make the headboard, we had to place a few boards – two 1 x 4s on the top 1/3 of each side, a 1 x 4 close to the bottom, and a 1 x 4 plus a 2 x 4 along the entire top.
Those boards needed to be there, not only for extra support for the plywood but also so that the screws that would attach the arms had a place to sink into. The top of the headboard had to be extra thick so that it sat flush at the back with the arms, which were extra deep in order to completely cover the existing bed posts.
In order to attach the new we had to construct it so that it, in a sense, slid right over the old headboard. Screws would be placed through the arms into the side posts of the old headboard and from the back of the old headboard into the 1 x 4 along the back of the new. 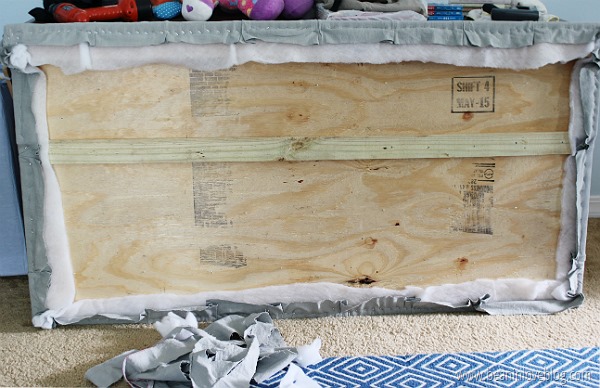
And then we realized shortly before we went to install it that we (ok, I) mismeasured and that the 1 x 4 across the middle-back needed to be moved down so that it was between the old and new headboards. My. Bad. #pregnancybrain
Then it was up and at ‘em as Anthony and a friend slipped the new over the old. It sounds super easy but really, we didn’t realize how heavy the entire headboard was being that it was solid wood and so when I write they “slipped” the headboard on, what I really mean it that they heaved it on. They pulled the entire bed out from the wall and one held the tufted back while the other attached the arms.
Here it is on but unsecured; just standing on it’s own between the mattress and old headboard:
To give you an idea of how it slipped over the old headboard, here’s the old just prior…
…and here’s a mock-up of how the new fits on: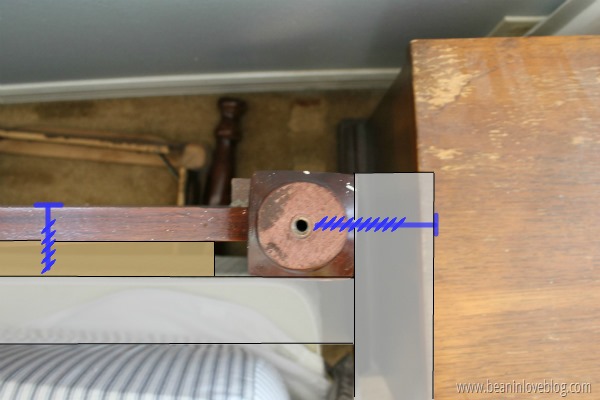
Three screws were placed into the back of the old headboard straight into that 1 x 4 spanning the lower back of the new headboard and then Anthony put a couple of screws through the side of the legs into the posts of the old bed frame.
Here is the view from the back:

See how the arms extend back past the plywood in order to cover the posts? That might help explain why we needed to add the 2 x 4 along the top of the new headboard – so that the back of the arms would be flush with the top back of the headboard.
I think McGyver would be proud, don’t you?
The entire headboard cost us around $100 to make from start to finish. That’s not including the tools we used (drill, a friend’s jigsaw to make the curves at the top of the arms, and a measuring tape) nor does it include the foam since that was given to us. I could be a tad biased but the quality of this headboard would probably make it over $1000 retail so I’m throwing confetti over what we did (and didn’t) spend. Oh what a little vision and elbow grease can achieve, no?
 (Sources: the sheets and duvet are both originally from Target but found at Dirt Cheap ($28 altogether), the lamps are updated thrift store finds, the euro pillows are down-filled, West Elm scores from a local resale group ($12 for both) and their covers I recently made along with the matching shades, the square decorative pillows actually belong in the living room, the small lumbar pillow was a thrift store find but originally from Target, and the faux bamboo mirror was a resale group find.)
I’ve conked out at the nursing wheel a bajillion times during these midnight feedings and I blame it all on the softness of what’s behind my head these days in our new headboard. Also, it’s funny how much a luxe headboard will do to a room – it makes even the messiest moments look incredible. Our bed is the home of the contents of the laundry basket waiting to be folded and with the headboard in the background, the piles of clothes look just fab.
Anyway, this is the last you’ll hear of the headboard but probably not the last you’ll see of it. I still love it so much I take trips to our bedroom door just so I can peek in on it. I can’t wait to gussy up those nightstands and figure out some wall decor to compliment it but something tells me I’ll have to wait until we’re well out of the newborn stage.
So, retrofitting. It’s an awesome way to take what you already have and turn it into something else. What have you retrofit? I know there are some of you who have genius ideas that need to be unleashed! Go ahead! The comment section is open! :)
. . .
We are skimming right past summer and into fall and, for us, that means back into a routine of sorts and hopefully more consistent blogging. This summer was crazy busy with Anthony being gone a lot for youth group trips and then a week-long family vacation with my extended family and, oh yeah, we added another human to the fam bam. So I guess I should rephrase and say it’s been busy with a capital B. But, that’s how I like it. It’s better than boredom. Am I right? ;)


